February arrives and with it comes a special day to show and express LOVE. Why not show it and express it every day!
There is an easel with a blackboard, that I recently restyled from a plain wood finish with a crackle finish. It is located near the front door in the entryway of the house. It is the perfect addition to make a statement to anyone entering.
Recently I created a banner made from materials of the Fabric Elements™ line by Rebekah Meier and wanted to share it with everyone.
To make the hearts, I die-cut a base from white poster board. After surface painting a white-on-white fabric and the waffle muslin fabric from the collection, they were also die-cut in the same size. Two pieces of iron-on, fusible interfacing were cut to match and used to apply the fabrics to both sides of the poster board base. (The decorative fabric on the front, waffle fabric on the back.)
The next layer was a smaller heart cut from batting and then trimmed with pinking shears around the edges.
The top layer is made using painted lutradur and finishing with stamped letters from Ann Butler's collection of stamps. This heart shape is cut one size smaller than the batting layer. This layer is sewn with a zig-zag stitch to the batting layer before being glued onto the larger hearts.
Decorative trim is glued to around each of the hearts. Punch holes on the sides of each heart to add strips of fabric for tying them together and for end ties.
Showing posts with label Designer Craft Connection. Show all posts
Monday, February 1, 2016
Thursday, June 25, 2015
Fairfield Pillow Challenge - Designer Craft Connection
What better way to brighten up a summer setting is there! Combine an outdoor pillow with some colorful fabrics and embellishments and the results can be amazing.
I requested Weather Soft™ Pillow Inserts for this project. They are a water resistant pillow shape made specifically for outdoor use. They have a laminated shell that protects the fiberfill from moisture. They are durable and add comfort to your patio and deck furnishings.
Measure a piece of the Oly-Fun™ Sky Blue fabric an inch larger than the size of the pillow form. The fabric will be sewn by machine to form a pillow covering that may be removed to be changed for the seasons. Overlap the fabric approximately 3" to 4" on the back part of the pillow covering. NOTE: Hem the edges by folding over the edges 1/4" to 1/2" before sewing around the four sides of the pillow covering. Before turning to the right side, trim the four sides with pinking shears and trim the points.
Die-cut circles from the Hot Fudge Oly-Fun™for each flower. Die-cut leaves from the Pine Oly-Fun™. Using the Eileen Hull Leaves Sizzix die, cut 12 of each size leaf for each flower. NOTE: The stems on the leaves can be trimmed away. Beginning with the largest leaf shape, glue them around the brown center, spacing as evenly as possible. Continue to glue the next size leaf around the center placing them in between the leaves of the first band. Finish with the smallest leaf, placing them between the leaves of the prior row. Find the placement of the flowers and leaves that is desired and then glue them into place.
Place the finished pillow where ever you would some brightness!!!
Materials
Fairfield Weather Soft™ 18" x 18" Pillow Insert (#A-WP18)
Fairfield Oly-Fun™ Craft Pack Pine
Fairfield Oly-Fun™ Craft Pack Sky Blue
Fairfield Oly-Fun™ Craft Pack Hot Fudge
Yellow Felt
Sizzix Big Shot
SIzzix Dies: Eileen Hull Leaves, Original Leaf, Maple
Beacon Adhesives FabriTac™
Sewing Machine
NOTE: Fairfield Oly-Fun™ Lemon Drop could be used in place of the yellow felt.
Visit the Fairfield World website to see the complete line of products.
I requested Weather Soft™ Pillow Inserts for this project. They are a water resistant pillow shape made specifically for outdoor use. They have a laminated shell that protects the fiberfill from moisture. They are durable and add comfort to your patio and deck furnishings.
Measure a piece of the Oly-Fun™ Sky Blue fabric an inch larger than the size of the pillow form. The fabric will be sewn by machine to form a pillow covering that may be removed to be changed for the seasons. Overlap the fabric approximately 3" to 4" on the back part of the pillow covering. NOTE: Hem the edges by folding over the edges 1/4" to 1/2" before sewing around the four sides of the pillow covering. Before turning to the right side, trim the four sides with pinking shears and trim the points.
Die-cut circles from the Hot Fudge Oly-Fun™for each flower. Die-cut leaves from the Pine Oly-Fun™. Using the Eileen Hull Leaves Sizzix die, cut 12 of each size leaf for each flower. NOTE: The stems on the leaves can be trimmed away. Beginning with the largest leaf shape, glue them around the brown center, spacing as evenly as possible. Continue to glue the next size leaf around the center placing them in between the leaves of the first band. Finish with the smallest leaf, placing them between the leaves of the prior row. Find the placement of the flowers and leaves that is desired and then glue them into place.
Place the finished pillow where ever you would some brightness!!!
Materials
Fairfield Weather Soft™ 18" x 18" Pillow Insert (#A-WP18)
Fairfield Oly-Fun™ Craft Pack Pine
Fairfield Oly-Fun™ Craft Pack Sky Blue
Fairfield Oly-Fun™ Craft Pack Hot Fudge
Yellow Felt
Sizzix Big Shot
SIzzix Dies: Eileen Hull Leaves, Original Leaf, Maple
Beacon Adhesives FabriTac™
Sewing Machine
NOTE: Fairfield Oly-Fun™ Lemon Drop could be used in place of the yellow felt.
Visit the Fairfield World website to see the complete line of products.
Monday, June 1, 2015
Designer Craft Connection - Let's Party!
Summer is here and it brings along with it - PARTY TIME! Of course, parties are great no matter the reason or the time.
Every party calls for beverages and why not make serving them fun. There are several containers on the market that can make beverages at parties special.
Using a Mason jar, a drinking mug and replicas of milk bottles, then adding some extras to embellish, the end product are unique additions for your party table.
Create a fabric lid for the containers from fabrics to suit a theme. Make a pattern by drawing a circle. Use a 6 1/2" circle for the larger vessels and a 4 3/4" circle for the bottles. In the center of each pattern, trace the diameter of the corresponding jar/mug and bottles. Trace the circles onto the fabrics of choice, then cut out using pinking shears. Make another set of circle patterns the same size as the diameter of the container opening. NOTE: The measurements are approximately 2 3/4" for the jar/mug and 1 3/4" for the bottles. Trace these circle patterns onto vinyl iron-on material, two per cover; cut out. NOTE: Cut these circles slightly smaller than the tracing line. Place and press these vinyl circles onto the fabric circles, centering them. Follow the manufacturer instructions to apply these to the fabric. Applying them to both sides will make these reusable and keep them from absorbing any liquid.
Fold each circle to find the center and carefully cut and X in the center. For the jar or mug, place the fabric onto the top and center the vinyl circle then screw a jar lid ring on. Add some ribbon or other trim for decoration if desired onto the edge of the lids. For the bottles, place the fabric circles onto the tops and hold in place with clear rubber bands. Add ribbon or trim for decoration if desired.
Die-cut corresponding tags in shapes to match the theme from chalkboard material. Punch a small hole into the shapes and attach a thin cord for tying. Use chalkboard markers to add names to the tags.
Every party calls for beverages and why not make serving them fun. There are several containers on the market that can make beverages at parties special.
Using a Mason jar, a drinking mug and replicas of milk bottles, then adding some extras to embellish, the end product are unique additions for your party table.
Create a fabric lid for the containers from fabrics to suit a theme. Make a pattern by drawing a circle. Use a 6 1/2" circle for the larger vessels and a 4 3/4" circle for the bottles. In the center of each pattern, trace the diameter of the corresponding jar/mug and bottles. Trace the circles onto the fabrics of choice, then cut out using pinking shears. Make another set of circle patterns the same size as the diameter of the container opening. NOTE: The measurements are approximately 2 3/4" for the jar/mug and 1 3/4" for the bottles. Trace these circle patterns onto vinyl iron-on material, two per cover; cut out. NOTE: Cut these circles slightly smaller than the tracing line. Place and press these vinyl circles onto the fabric circles, centering them. Follow the manufacturer instructions to apply these to the fabric. Applying them to both sides will make these reusable and keep them from absorbing any liquid.
Fold each circle to find the center and carefully cut and X in the center. For the jar or mug, place the fabric onto the top and center the vinyl circle then screw a jar lid ring on. Add some ribbon or other trim for decoration if desired onto the edge of the lids. For the bottles, place the fabric circles onto the tops and hold in place with clear rubber bands. Add ribbon or trim for decoration if desired.
Die-cut corresponding tags in shapes to match the theme from chalkboard material. Punch a small hole into the shapes and attach a thin cord for tying. Use chalkboard markers to add names to the tags.
Thursday, May 21, 2015
JOY®-ful Letters
First comes this little white linen bag that I created for a previous manufacturer challenge for Decorative Trimmings. Someone happened to give me a suggestion (thanks Julie), about using these wonderful letters for this challenge. Personalizing items for any occasion can be fun, why not something for a brides special day. Take this idea beyond the bride and add the names of your bridal party to a special item for this special day.
Why not add a monogram to all your traveling paraphernalia. Here I added my own initials to a fabric travel pouch that I made for myself. I definitely like the look of these on the pouch and think it would be a great idea to add them to all my other travel bags.
Totally love the look of these large letters when I first saw them. My original plan was to make something for my two youngest granddaughters that they could use for taking on a trip or a sleepover. Unfortunately I made a big mistake when choosing the letters and could only make one.
Using a purchased plastic tote from Michael's, it was perfect for the base of a cute carry-all. These great letters were glued on and stand out on this tote, add some die-cut duck tape flowers and iridescent gems and that's all that is needed for sweet carrier for any little girl - what JOY!
Use this link to check out and read the Creating with Joy blog: Link
Thursday, April 23, 2015
Decorative Trimmings Ideas With Designers Craft Connection
Another fun design challenge this time using trims from Decorative Trimmings. This particular project was made using just one of the requested trims for this months challenge. I am excited about the others I requested and received and will be using them in upcoming projects.
The theme given to follow was "Weddings". Here I created two items for a bride on her special day. Two white linen bags, one to hold make-up and a small tote to hold anything a bride had to have on hand for the day. This same combination of bags could also be made for the bridal party in a color to match their attire. This would make a lovely bridesmaid gift from the DIY bride-to-be.
Materials
White Star 1" Guimp Trim #02550-001
White Linen Fabric
White Lining Fabric
Iron On Low Loft Fleece Interfacing
White Thread
White 8" Zipper (or slightly longer)
Sewing Machine
For Bag
Cut 2 - 10 1/2" x 11 1/2" pieces of white linen
Cut 2 - 10 1/2" x 11 1/2" pieces of white lining fabric
Cut 2 - 10 1/2" x 11 1/2" pieces of fusible fleece interfacing
Cut 2 - 2 1/2" x 23" pieces of white linen (Handles)
Cut 2 - 11" lengths of White Star trim for bag
Cut 2 - 23" lengths of White Star trim for handles
For Cosmetic Bag
Cut 2 - 7" x 8 1/2" pieces of white linen
Cut 2 - 7" x 8 1/2" pieces of white lining fabric
Cut 2 - 8" lengths of White Star trim for cosmetic bag
Cut 1 - 6" length of white ribbon for zipper tab
Sewing
Iron fusible interfacing onto the wrong side of lining piece of fabric according ot manufacturer directions. Place right sides of fabrics together for the front and back of bag. Sew along the top (10 1/2") edge, using a 1/2" seam. Turn and press along the top edge. Place a cut length of the decorative trim onto the right sides of bag pieces, placing both in the same spot. Stitch down center of trim using a slightly longer stitch. Place the front and back pieces together, with right sides facing and matching the trim on both pieces, sew around the bag. Trim seams if necessary, cut with pinking shears, then use a zigpzag stitch to finish the seams. To form the bottom of bag - Form a corner at the seam line, measure about 2" up from the to point, draw a line about 4" across; the stitch on the line across, backtacking at both ends. Repeat for other corner. This will make the bottom of the bag flat. NOTE: Either trim the points for leave and use some Fabri Tac™ glue to hold them down.
Iron the two handle pieces in half; iron the raw edges to the inside fold; press strips well. Place the longer length of decorative trim onto the handle strips and stitch down the center. NOTE: Make the trim piece slightly longer so about an inch of the trim can go around the ends of the handle pieces; pin to hold in place, then sew. Hand stitch the handles onto the bag.
For cosmetic bag, sew front fabrics and linings together along 7" edge for the two sides. Turn and press the edge well. NOTE: Use a 8" or longer zipper so it can be trimmed. Place the metal "stop" and pull at least 1/2" from outer edge of fabric pieces. Sew one of the pressed edge pieces to the zipper, using a zipper foot and topstitching about 1/8' along edge. Repeat with other side piece, making sure side edges of both pieces are even. Continue the sewing using a regular sewing foot. Place and sew a length of decorative trim to the bag panels, as done for the larger bag.
Open zipper to about the middle of the bag. Place the two sides together, rights side facing each other: pin to hold. Start sewing at the top of one side, sew around the three sides of the bag. NOTE: Use a 1/2" seam. Sew carefully through the zipper at both ends. Backtack both spots. Trim the excess zipper away.
Like the larger bag, measure 1" from each of the corners at the bottom of the bag, draw a line about 2" long. Sew across the line, backtack to hold ends. Trim the corners neatly. Turn bag right side out; push out corners. Tie a length of ribbon through the zipper pull; trim.
The theme given to follow was "Weddings". Here I created two items for a bride on her special day. Two white linen bags, one to hold make-up and a small tote to hold anything a bride had to have on hand for the day. This same combination of bags could also be made for the bridal party in a color to match their attire. This would make a lovely bridesmaid gift from the DIY bride-to-be.
![]() |
| Close-up of 1" White Star Guimp Trim |
Materials
White Star 1" Guimp Trim #02550-001
White Linen Fabric
White Lining Fabric
Iron On Low Loft Fleece Interfacing
White Thread
White 8" Zipper (or slightly longer)
Sewing Machine
For Bag
Cut 2 - 10 1/2" x 11 1/2" pieces of white linen
Cut 2 - 10 1/2" x 11 1/2" pieces of white lining fabric
Cut 2 - 10 1/2" x 11 1/2" pieces of fusible fleece interfacing
Cut 2 - 2 1/2" x 23" pieces of white linen (Handles)
Cut 2 - 11" lengths of White Star trim for bag
Cut 2 - 23" lengths of White Star trim for handles
For Cosmetic Bag
Cut 2 - 7" x 8 1/2" pieces of white linen
Cut 2 - 7" x 8 1/2" pieces of white lining fabric
Cut 2 - 8" lengths of White Star trim for cosmetic bag
Cut 1 - 6" length of white ribbon for zipper tab
Sewing
Iron fusible interfacing onto the wrong side of lining piece of fabric according ot manufacturer directions. Place right sides of fabrics together for the front and back of bag. Sew along the top (10 1/2") edge, using a 1/2" seam. Turn and press along the top edge. Place a cut length of the decorative trim onto the right sides of bag pieces, placing both in the same spot. Stitch down center of trim using a slightly longer stitch. Place the front and back pieces together, with right sides facing and matching the trim on both pieces, sew around the bag. Trim seams if necessary, cut with pinking shears, then use a zigpzag stitch to finish the seams. To form the bottom of bag - Form a corner at the seam line, measure about 2" up from the to point, draw a line about 4" across; the stitch on the line across, backtacking at both ends. Repeat for other corner. This will make the bottom of the bag flat. NOTE: Either trim the points for leave and use some Fabri Tac™ glue to hold them down.
Iron the two handle pieces in half; iron the raw edges to the inside fold; press strips well. Place the longer length of decorative trim onto the handle strips and stitch down the center. NOTE: Make the trim piece slightly longer so about an inch of the trim can go around the ends of the handle pieces; pin to hold in place, then sew. Hand stitch the handles onto the bag.
For cosmetic bag, sew front fabrics and linings together along 7" edge for the two sides. Turn and press the edge well. NOTE: Use a 8" or longer zipper so it can be trimmed. Place the metal "stop" and pull at least 1/2" from outer edge of fabric pieces. Sew one of the pressed edge pieces to the zipper, using a zipper foot and topstitching about 1/8' along edge. Repeat with other side piece, making sure side edges of both pieces are even. Continue the sewing using a regular sewing foot. Place and sew a length of decorative trim to the bag panels, as done for the larger bag.
Open zipper to about the middle of the bag. Place the two sides together, rights side facing each other: pin to hold. Start sewing at the top of one side, sew around the three sides of the bag. NOTE: Use a 1/2" seam. Sew carefully through the zipper at both ends. Backtack both spots. Trim the excess zipper away.
Like the larger bag, measure 1" from each of the corners at the bottom of the bag, draw a line about 2" long. Sew across the line, backtack to hold ends. Trim the corners neatly. Turn bag right side out; push out corners. Tie a length of ribbon through the zipper pull; trim.

Wednesday, March 18, 2015
Designer Craft Connection Manufacturer Challenge - Connie Crystal
Just a little bit of sparkle can dress up anything. Thanks to Connie Crystal for the opportunity to work with some of the products. Find some sparkling ideas on the Sparkle blog.
There are a number of other designers who are also participating in this manufacturer challenge using products from Connie Crystal. This product is new to me and I can see many uses for the crystal sheets to add some extraodinaire glitz to a wide variety of projects.
To show off the sparkle of the crystal sheets that I received, I first created a black felt handbag as a surface. To give the bag a special finish I attached the crystal pendant that I also received onto the handbag's flap.
I cut two single strips of the crystals from the sheet. The strips were handsewn along the edge of the handbag flap, front and back. The extra was trimmed away.
From the remaining crystal sheet, I cut away a 4-square count of the crystals to create a simple pattern in the mesh. I attached it in a few places with Fabri Tac glue and then stitched around it with handsewing to hold it into place. Attach a piece of Velcro onto the flap and handbag front to help keep the bag closed.
Any plain purse or handbag can take on a whole new look with some Connie Crystal sheets.
Check out this link to see the other blog posts: DCC Pagehttp://designercraftsconnection.blogspot.com
Materials used for the project:
Kunen Glitterfelt™- Black - 4 sheets
Sewing Machine
Black Thread
Lining Fabric
Beacon Fabri Tac Glue
Connie Crystal crystal sheet - black
Tiny Scissors
Handsewing Needle
There are a number of other designers who are also participating in this manufacturer challenge using products from Connie Crystal. This product is new to me and I can see many uses for the crystal sheets to add some extraodinaire glitz to a wide variety of projects.
To show off the sparkle of the crystal sheets that I received, I first created a black felt handbag as a surface. To give the bag a special finish I attached the crystal pendant that I also received onto the handbag's flap.
I cut two single strips of the crystals from the sheet. The strips were handsewn along the edge of the handbag flap, front and back. The extra was trimmed away.
From the remaining crystal sheet, I cut away a 4-square count of the crystals to create a simple pattern in the mesh. I attached it in a few places with Fabri Tac glue and then stitched around it with handsewing to hold it into place. Attach a piece of Velcro onto the flap and handbag front to help keep the bag closed.
Any plain purse or handbag can take on a whole new look with some Connie Crystal sheets.
Check out this link to see the other blog posts: DCC Pagehttp://designercraftsconnection.blogspot.com
Materials used for the project:
Kunen Glitterfelt™- Black - 4 sheets
Sewing Machine
Black Thread
Lining Fabric
Beacon Fabri Tac Glue
Connie Crystal crystal sheet - black
Tiny Scissors
Handsewing Needle
Monday, March 2, 2015
Designer Craft Connection - Crafting for National Craft Month
March marks National Craft Month!!! This month we will be sharing ideas, tips and recreating projects that we have seen somewhere and always wanted to try.
I have many, many "saved" ideas in my files with hopes of someday getting time to try them. With the creation of Pinterest, another way was presented, to find and save so many wonderful ideas. One of the pinboards that I created is "Projects to Try"and there is where my ideas came from.
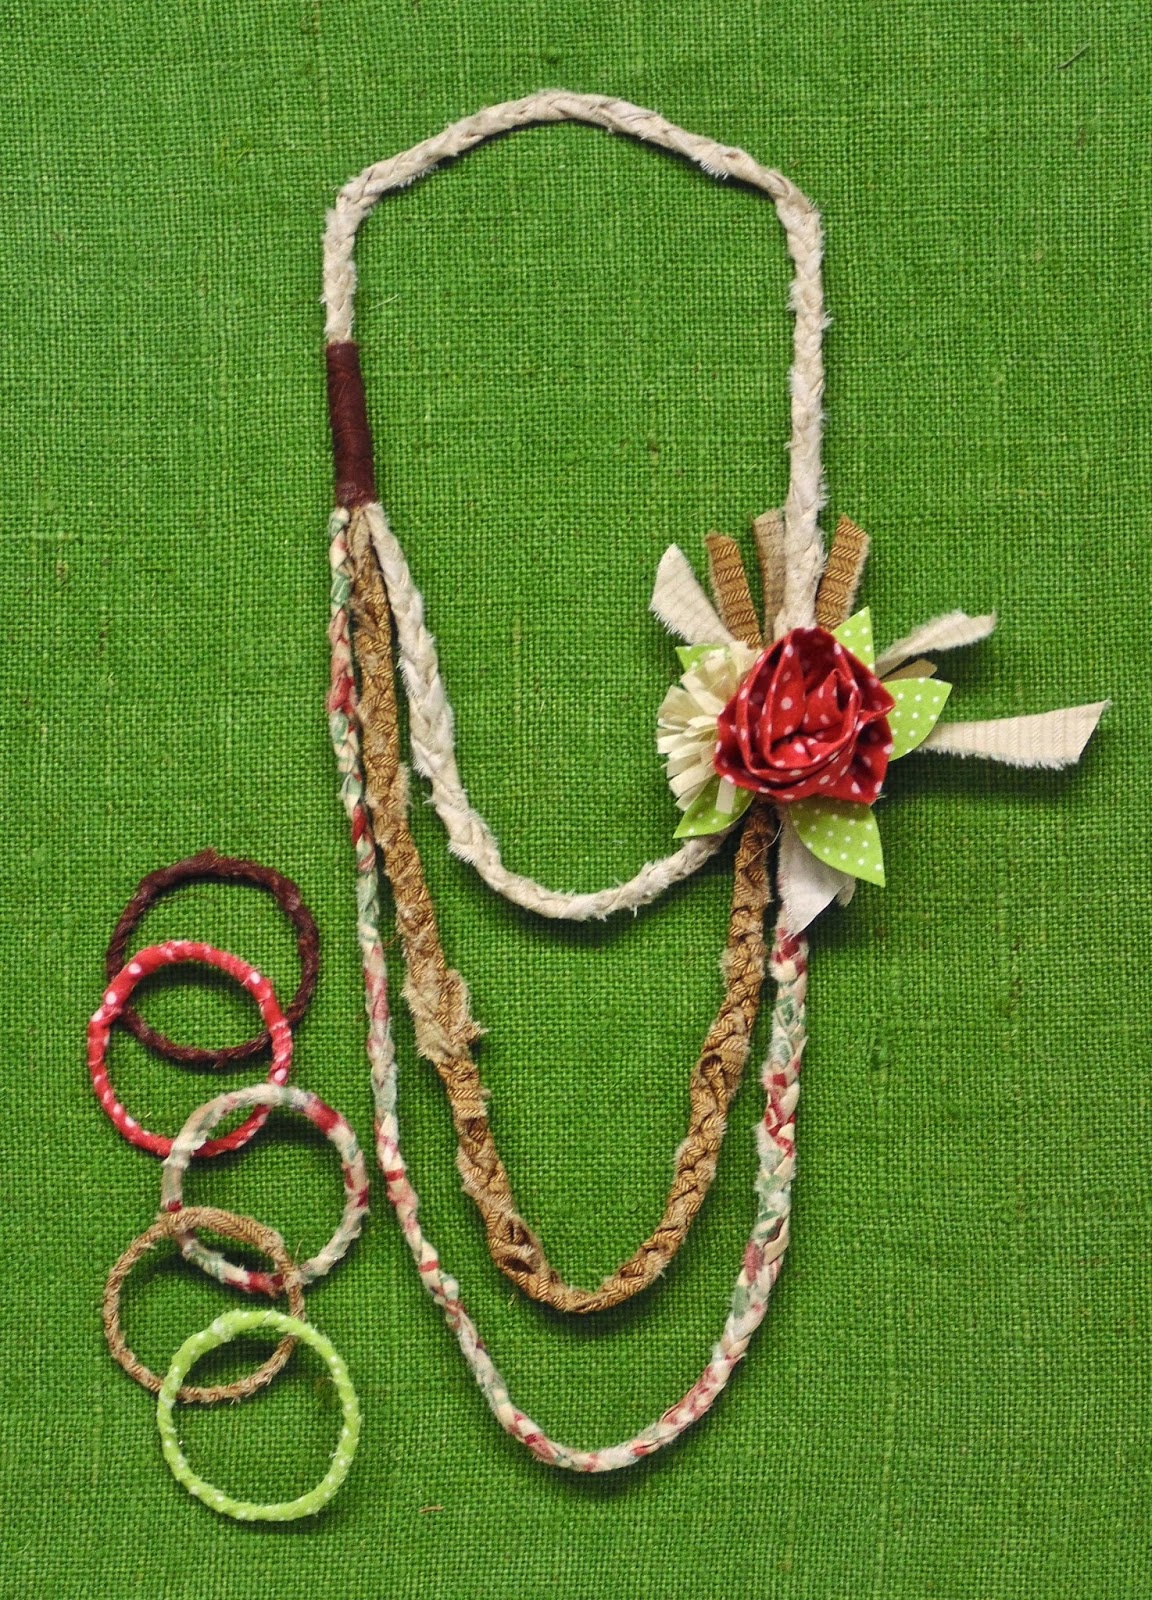
These projects use one of my favorites - fabric! The links for the "pins" for both the braided necklace and the wire wrapped bangles are found here:
Fabric Scrap Necklace
Fabric Wrapped Bracelets
Each of these links give some instructions and visuals to follow also. I took liberties with the instructions to make the necklace and bangle bracelets suit my taste.
This simple, light jewelry can be made from scraps of fabrics in any color combinations you would like. Colorful combinations would be fun for summertime accessories on solid colored tops or dresses.
I chose left over fabric scraps from a recent quilting project. To make the braids for the necklace, tear the fabric into 1" strips. If the pieces need to be longer, knot two strips together before braiding. NOTE: The knots become part of the braid. Use safety pins to hold the three strips together to help make the braiding easier. Three various lengths of braids create the necklace.
To cover the area where the layers of braids are sewn together on one side, use a small piece of contrasting fabric and sew to cover. On the opposite side, create an embellishment of your choice to cover this spot. Two fabric flowers and leaves are made to be attached to this area.
After completing the necklace it only made sense to continue by making some easy bangle bracelets. Heavy gauge wire, fabric strips and a little glue are all that's needed. Tear the fabrics into 1" strips. Start wrapping the fabric around the wire bangle. NOTE: Glue the end of the strip to the wire, overlapping the fabric to itself at the end. Continue to wrap around the wire bangle till the end of the strip. Glue the end onto the wrapped fabric to hold. NOTE: Use inexpensive metal or plastic bangles if available.
While trying to decide just what I would be sharing in this post, and the going over some of my Pinterest pin boards for ideas, I have become inspired to try several more ideas and what better time then now - National Craft Month!
Now take some time to check out the other designers post, just use the Designer Craft Connection button located in the right sidebar to see other ideas, tips and a giveaway.
This "crafty" month will bring another manufacturer challenge from Connie Crystal so check back!
I have many, many "saved" ideas in my files with hopes of someday getting time to try them. With the creation of Pinterest, another way was presented, to find and save so many wonderful ideas. One of the pinboards that I created is "Projects to Try"and there is where my ideas came from.
These projects use one of my favorites - fabric! The links for the "pins" for both the braided necklace and the wire wrapped bangles are found here:
Fabric Scrap Necklace
Fabric Wrapped Bracelets
Each of these links give some instructions and visuals to follow also. I took liberties with the instructions to make the necklace and bangle bracelets suit my taste.
This simple, light jewelry can be made from scraps of fabrics in any color combinations you would like. Colorful combinations would be fun for summertime accessories on solid colored tops or dresses.
I chose left over fabric scraps from a recent quilting project. To make the braids for the necklace, tear the fabric into 1" strips. If the pieces need to be longer, knot two strips together before braiding. NOTE: The knots become part of the braid. Use safety pins to hold the three strips together to help make the braiding easier. Three various lengths of braids create the necklace.
To cover the area where the layers of braids are sewn together on one side, use a small piece of contrasting fabric and sew to cover. On the opposite side, create an embellishment of your choice to cover this spot. Two fabric flowers and leaves are made to be attached to this area.
After completing the necklace it only made sense to continue by making some easy bangle bracelets. Heavy gauge wire, fabric strips and a little glue are all that's needed. Tear the fabrics into 1" strips. Start wrapping the fabric around the wire bangle. NOTE: Glue the end of the strip to the wire, overlapping the fabric to itself at the end. Continue to wrap around the wire bangle till the end of the strip. Glue the end onto the wrapped fabric to hold. NOTE: Use inexpensive metal or plastic bangles if available.
While trying to decide just what I would be sharing in this post, and the going over some of my Pinterest pin boards for ideas, I have become inspired to try several more ideas and what better time then now - National Craft Month!
Now take some time to check out the other designers post, just use the Designer Craft Connection button located in the right sidebar to see other ideas, tips and a giveaway.
This "crafty" month will bring another manufacturer challenge from Connie Crystal so check back!
Friday, February 6, 2015
Designer Craft Connection Manufacturer Challenge - Offray Ribbon
Participating in manufacturer challenges are always fun and surprising. This challenge, using a variety of Offray® ribbons was not any different.
Of the five different ribbon bolts that I was sent, the wired, printed bolt was where I felt I should draw my inspiration. The color combination that I received made me think of the beach and outside entertaining.
Picture this tablesetting on a porch or patio or even a beach blanket. The placemat was woven using the 1 1/2" wide wire edged printed ribbon, along with both the natural and white 3/8" grograin ribbons.
The ribbons along the four sides are held in place with Beacon® Fabri Tac™ glue, then machine sewn around the edge. Trim neatly and the ends folded to the back and glued with Fabri Tac™.
A simple and no-sew napking ring was formed from a piece of thick white canvas, cut 1 1/2" wide and 7" long. A piece of the same ribbon is glued to one side of the canvas. Form the ribbon covered strip into a circle and glue to ends to together, overlapping about 1/2". Embellish the napkin ring with a starfish.
To add to the tablescape I repurposed an empty candle jar into a vase. Lengths of the natural 3/8" grograin ribbon was cut into strips long enough to fit on the candle jar from the top, down around the bottom, and up to the top of the jar (plus adding an additional 2"). Use Beacon® 3-in-1 glue to add the ribbon strips to the outside of the candle jar. Cut two circles from felt for the bottom of the jar. Cut a small circle from the center of each. Glue the two layers to the bottom. Trim the ribbons at the top evenly and then glue to the inside edge. To finish the vase, glue a length of the same ribbon near the top and a starfish for embellishment.
Each of these projects could be made with other colors and widths of other Offray™ ribbons for any desired theme or look. There was one more project that is not quite completed, using the other ribbons that I received. Once finished I will add it to this post. NOTE: This will be a longer table runner, made with the two grograin ribbons and the 1 1/2" white and natural organza ribbons that I received. It will be woven like the placemat and finished in the same way. Once completed, I may sew the printed ribbon as a binding around the edges. A table runner made using sheer ribbons, mixed with a sturdier grosgrain, would add to any tablescape. White for weddings, colors to suit any holiday.
Photos of woven runner before and after binding of the wired and printed ribbon was added:
Ribbon is for much more than bows - the manufacturer challenge should prove that point. Enjoy the many ideas and designs you fill find in the participating blogs. Thank you OFFRAY™ for this opportunity!
Of the five different ribbon bolts that I was sent, the wired, printed bolt was where I felt I should draw my inspiration. The color combination that I received made me think of the beach and outside entertaining.
Picture this tablesetting on a porch or patio or even a beach blanket. The placemat was woven using the 1 1/2" wide wire edged printed ribbon, along with both the natural and white 3/8" grograin ribbons.
The ribbons along the four sides are held in place with Beacon® Fabri Tac™ glue, then machine sewn around the edge. Trim neatly and the ends folded to the back and glued with Fabri Tac™.
A simple and no-sew napking ring was formed from a piece of thick white canvas, cut 1 1/2" wide and 7" long. A piece of the same ribbon is glued to one side of the canvas. Form the ribbon covered strip into a circle and glue to ends to together, overlapping about 1/2". Embellish the napkin ring with a starfish.
To add to the tablescape I repurposed an empty candle jar into a vase. Lengths of the natural 3/8" grograin ribbon was cut into strips long enough to fit on the candle jar from the top, down around the bottom, and up to the top of the jar (plus adding an additional 2"). Use Beacon® 3-in-1 glue to add the ribbon strips to the outside of the candle jar. Cut two circles from felt for the bottom of the jar. Cut a small circle from the center of each. Glue the two layers to the bottom. Trim the ribbons at the top evenly and then glue to the inside edge. To finish the vase, glue a length of the same ribbon near the top and a starfish for embellishment.
Each of these projects could be made with other colors and widths of other Offray™ ribbons for any desired theme or look. There was one more project that is not quite completed, using the other ribbons that I received. Once finished I will add it to this post. NOTE: This will be a longer table runner, made with the two grograin ribbons and the 1 1/2" white and natural organza ribbons that I received. It will be woven like the placemat and finished in the same way. Once completed, I may sew the printed ribbon as a binding around the edges. A table runner made using sheer ribbons, mixed with a sturdier grosgrain, would add to any tablescape. White for weddings, colors to suit any holiday.
| Uncomplete, woven table runner using sheers and grosgrain ribbons. |
Ribbon is for much more than bows - the manufacturer challenge should prove that point. Enjoy the many ideas and designs you fill find in the participating blogs. Thank you OFFRAY™ for this opportunity!

Monday, February 2, 2015
Designer Craft Connection - I LOVE This Tool!
February's blog theme was to choose a technique or tool that I LOVE. For me that's a tough choice!
If I am not making a quilt or clothing, I can honestly say that my "go to" tool seems to always be my Sizzix Big Shot™ and dies. Whether designing a project for a gift, shared ideas or myself, I normally find some way to include the use of these items. No matter what type of materials I could be working with, it's still the most used tool in my workroom. Cutting fabric, felt, metal, thin plastics and wood, cork, chalkboard and magnetic sheets, I LOVE this little machine.
Make simple decorations or more intricate ones with the wide variety of shapes available from Sizzix.
I made this simple "String of Hearts" in a couple hours yesterday with scraps of red papers and a set of Sizzix Heart Thinlits™ nesting dies and the Big Shot™.
Simply cut four hearts from different papers for each various sized hearts. Fold each of the heart shapes in half. Glue the hearts together. Before gluing the last fold of the fourth heart, insert bakers twine along the middle fold of the hearts. Space each different sized heart on the twine, spacing evenly. Form a loop at the top of the string for hanging. (NOTE: I began the heart placements at the bottom of the twine by placing two small jeweled red hearts at the very end of the twine, followed by two larger jeweled hearts. Then continue with the sets of paper hearts - smallest to largest - up the twine to the hanging loop.)
I just made the one string, but I could see making a few more to hang along the arched area above the fireplace for decoration. These hearts could be made from white papers and used for a wedding theme decoration, or switch out the shapes and use snowflakes, holly leaves, fall leaves, egg shapes, just to name a few, for other holiday decorations. These were made from paper scraps, but consider using fused fabric, felt or fun-foam for a start.
If I am not making a quilt or clothing, I can honestly say that my "go to" tool seems to always be my Sizzix Big Shot™ and dies. Whether designing a project for a gift, shared ideas or myself, I normally find some way to include the use of these items. No matter what type of materials I could be working with, it's still the most used tool in my workroom. Cutting fabric, felt, metal, thin plastics and wood, cork, chalkboard and magnetic sheets, I LOVE this little machine.
Make simple decorations or more intricate ones with the wide variety of shapes available from Sizzix.
| Use nested heart thinlit dies (6) and two sizes of red jeweled hearts at bottom of string |
Simply cut four hearts from different papers for each various sized hearts. Fold each of the heart shapes in half. Glue the hearts together. Before gluing the last fold of the fourth heart, insert bakers twine along the middle fold of the hearts. Space each different sized heart on the twine, spacing evenly. Form a loop at the top of the string for hanging. (NOTE: I began the heart placements at the bottom of the twine by placing two small jeweled red hearts at the very end of the twine, followed by two larger jeweled hearts. Then continue with the sets of paper hearts - smallest to largest - up the twine to the hanging loop.)
I just made the one string, but I could see making a few more to hang along the arched area above the fireplace for decoration. These hearts could be made from white papers and used for a wedding theme decoration, or switch out the shapes and use snowflakes, holly leaves, fall leaves, egg shapes, just to name a few, for other holiday decorations. These were made from paper scraps, but consider using fused fabric, felt or fun-foam for a start.
Friday, December 5, 2014
Designer Craft Connection - Easy Holiday Decoration with "Foamology™" by Fairfield
Another opportunity to work with something new that I had never seen or used before, presented itself with this designer challenge. I was totally unaware of this line of products called Foamology™by Fairfield. I requested the 24" x 24" Rigid Tiles to work with. Here is my creation using just one of the tiles, Faux Wooden "BELIEVE" Plank...
This will be a welcome addition to the country holiday vignette near the front entrance. The idea was inspired by a similar one my daughter had made out of old recycled wood.
The 24" x 24" rigid tile was cut using a serated knife into two pieces measuring 12" x 24". The two panels were taped together using wide strapping tape to hold them together. The long panel was then covered with a natural cotton batting. NOTE: Add the batting to the panels as shown in the video files for working with these products: http://foamology101.com/videos/.
I cut a piece of brown felt to cover the back of the plank. NOTE: Fabric or paper could be used also.
Using the back side of a butter knife, I ran it down the length of the plank about 3" from both sides to make an impression. Using thinned paint, I brushed it into the groove made by the knife. This gave the panel some depth and the look of a wooden plank.
Letters that spell out BELIEVE, were cut from heavy, decorative cardstock using a Silhouette and a decorative font. Spray adhesive was used to adhere the letters to the plank. A little bit of gold spary glitter was applied before spray the entire surface with a clear acrylic spray finish. A little strip of "bark-like" ribbon was glued on and a small evergreen spray added to finish the look.
Enter the contest to win a prize here:
Rafflecopter/Giveaway - Enter Here
This will be a welcome addition to the country holiday vignette near the front entrance. The idea was inspired by a similar one my daughter had made out of old recycled wood.
The 24" x 24" rigid tile was cut using a serated knife into two pieces measuring 12" x 24". The two panels were taped together using wide strapping tape to hold them together. The long panel was then covered with a natural cotton batting. NOTE: Add the batting to the panels as shown in the video files for working with these products: http://foamology101.com/videos/.
I cut a piece of brown felt to cover the back of the plank. NOTE: Fabric or paper could be used also.
Using the back side of a butter knife, I ran it down the length of the plank about 3" from both sides to make an impression. Using thinned paint, I brushed it into the groove made by the knife. This gave the panel some depth and the look of a wooden plank.
Letters that spell out BELIEVE, were cut from heavy, decorative cardstock using a Silhouette and a decorative font. Spray adhesive was used to adhere the letters to the plank. A little bit of gold spary glitter was applied before spray the entire surface with a clear acrylic spray finish. A little strip of "bark-like" ribbon was glued on and a small evergreen spray added to finish the look.
Enter the contest to win a prize here:
Rafflecopter/Giveaway - Enter Here
Friday, November 7, 2014
Designer Craft Connection Challenge - Handmade Holiday with Fairfield
Holiday season is definitely upon us! There have been several holiday related projects sitting on my dwing table for some time. This challenge for Fairfield, thankfully, gave me the opportunity to finish these holiday projects so I could used them at home or for gift giving.
My choice of product to use was Fairfield Poly-Fil Low-Loft® batting. I have worked with various battings for my quilts. I found this batting to be perfect for these sewing/craft projects. For all the following projects, the batting gave each just enough body, yet they remained soft and easy to sew and cut.
Last year I purchased a printed fabric panel from an area quilt shop but never found the time to use it. The "flag" banner will be a nice addition to display this winter season. The contempory colors and design will make this a perfect gift for my youngest sons home.
The panel also had a printed square to use as a pillow cover. I chose to make a table square from it. The batting ws perfect for this project and just thick enought to add some "free form" quilting over the branches and pinecone images on the fabric. This will most likely become a gift for my very "modern" daughters home. Four printed fabric tags were part of the panel. They are finished off with off-white jute cording and will be given along with the table square, to be used as coasters. These could even be used as a place card for a dinner with friends.
Here is an idea to reuse a candle holder:
Cut a piece of batting, slightly longer and wider then needed. Press the batting with a iron set on a setting for polyester. NOTE: Use a piece of parchement paper or a release sheet from "iron on" fusible. The pressing will compact the batting slightly. Make a cylinder from the batting to fit around the candle jar. Sew a very narrow seam to hold the batting together. Tirm if necessary to the hieght needed to cover the jar. Slip it over the container an fold over the top slightly to form a cuff. Add some die-cut snowflakes if desired with a bit of fabric glue. NOTE: The snowflakes could be glitered before applying. It can give any container a frosted affect.
I love banners and I use them in many places around the house. The mantle in the family room is always adorned with one throughout the year. The latest is made from red burlap, muslin and Fairfield's Low-Loft® batting. I included a simple snowflake stitch at the top of each after sewing around the edge with a straight stitch and wihite thread. Once the mittens were layered and sewn, the edges were pinked with scissors. White letters were cut, fused and stitched on each mitten. Use a white iridescent fabric paint to add some dimension around each letter. Embellish with two green holly leaves and red berries in felt. Hang them from ribbon with small wooden clip clothespins.
There are a number of other DCC designers who are participating in this blog hop. Please follow the button on the right side to hop through the other blogs or the linkz below for creative handmade holiday ideas using a variety of products from Fairfield World.
Add your name to win a gift here:
a Rafflecopter giveaway
My choice of product to use was Fairfield Poly-Fil Low-Loft® batting. I have worked with various battings for my quilts. I found this batting to be perfect for these sewing/craft projects. For all the following projects, the batting gave each just enough body, yet they remained soft and easy to sew and cut.
Last year I purchased a printed fabric panel from an area quilt shop but never found the time to use it. The "flag" banner will be a nice addition to display this winter season. The contempory colors and design will make this a perfect gift for my youngest sons home.
The panel also had a printed square to use as a pillow cover. I chose to make a table square from it. The batting ws perfect for this project and just thick enought to add some "free form" quilting over the branches and pinecone images on the fabric. This will most likely become a gift for my very "modern" daughters home. Four printed fabric tags were part of the panel. They are finished off with off-white jute cording and will be given along with the table square, to be used as coasters. These could even be used as a place card for a dinner with friends.
Cut a piece of batting, slightly longer and wider then needed. Press the batting with a iron set on a setting for polyester. NOTE: Use a piece of parchement paper or a release sheet from "iron on" fusible. The pressing will compact the batting slightly. Make a cylinder from the batting to fit around the candle jar. Sew a very narrow seam to hold the batting together. Tirm if necessary to the hieght needed to cover the jar. Slip it over the container an fold over the top slightly to form a cuff. Add some die-cut snowflakes if desired with a bit of fabric glue. NOTE: The snowflakes could be glitered before applying. It can give any container a frosted affect.
I love banners and I use them in many places around the house. The mantle in the family room is always adorned with one throughout the year. The latest is made from red burlap, muslin and Fairfield's Low-Loft® batting. I included a simple snowflake stitch at the top of each after sewing around the edge with a straight stitch and wihite thread. Once the mittens were layered and sewn, the edges were pinked with scissors. White letters were cut, fused and stitched on each mitten. Use a white iridescent fabric paint to add some dimension around each letter. Embellish with two green holly leaves and red berries in felt. Hang them from ribbon with small wooden clip clothespins.
There are a number of other DCC designers who are participating in this blog hop. Please follow the button on the right side to hop through the other blogs or the linkz below for creative handmade holiday ideas using a variety of products from Fairfield World.
Add your name to win a gift here:
a Rafflecopter giveaway
Monday, November 3, 2014
Designer Craft Connection - Fun Ways to Say Thanks
Little things can say so much. How do you say "thanks"? Send or give a card, a personal call or and handwritten note? A little something can say so much!
After finding some small jars in the dollar bin at a area store, I knew they would be a great container to make a handmade gift for giving away. Fill with something good or something special. This jar was filled with a yummy snack mix that is a little sweet and a bit spicy. Purchase or make your own mix.
Cut a circle from fabric and place over the jar cover. Use a small invisible rubber band to hold it in place. Add a coordinating ribbon around the cap and tie a bow. Hand print a message on an oval cut-out and glue to top.
Use a gift idea like this on a table setting a a small holiday dinner for each guest. Change the jar covering to fit an occasion or season, add a message accordingly. A simple way to say "thanks"!
After finding some small jars in the dollar bin at a area store, I knew they would be a great container to make a handmade gift for giving away. Fill with something good or something special. This jar was filled with a yummy snack mix that is a little sweet and a bit spicy. Purchase or make your own mix.
Cut a circle from fabric and place over the jar cover. Use a small invisible rubber band to hold it in place. Add a coordinating ribbon around the cap and tie a bow. Hand print a message on an oval cut-out and glue to top.
Use a gift idea like this on a table setting a a small holiday dinner for each guest. Change the jar covering to fit an occasion or season, add a message accordingly. A simple way to say "thanks"!
Friday, October 17, 2014
Designer Craft Connection - Sullivan's Hebe Cord Blog Hop
Using the two colors I received from Sullivans USA, I created a knitted necklace embellished with crochet flowers.
Use a French Knitter/SpoolKnitter and make a knitted tube approximately 24" long. Leave several inches of cord at the beginning end and also at the finished end. On one end, make 9 to 10 chain stitches with a crochet hook. Attach this chain to the end by inserting the crochet hook into the end and pull through to knot. Feed part of the leftover cord through the knitted tube to hide. Thread the other end cord through a large eyed needle and thread through a bead (this will be the closure) and then through the end of the tube and knot. Feed leftover cord through the tube as above to hide.
To make the flowers: Chain 5, join with a slip stitch. Make 5 single crochets in the ring, join with a slip stitch. Chain four, two treble crochet in one single crochet stitch, chain four (this creates one flour petal) into the same SC. Make four more petals in the same fashion, end with a slip stitch in the bottom of the first flower petal. Leave a length of cord for adding a bead for the flower center and to attach to the knitted tube. Make two more flowers.
Pull the end of the cord to the front center of the flowers, thread the cord through a decorative bead. Feed the cord to the back with a crochet hook or needle and tie the bead in place. Feed the ends of the cords from the back of the flowers through the knitted tube and knot in place. Feed the ends of the cords up through the tube to hide and cut. To finish the flowers, cut three leaves from felt, for each flower, and glue to the backs.
Now take some time to hop through the other blogs for creative ideas made with Sullivans USA HEBE Cords.
Tuesday, October 7, 2014
Designer Craft Connection - Witchy Halloween
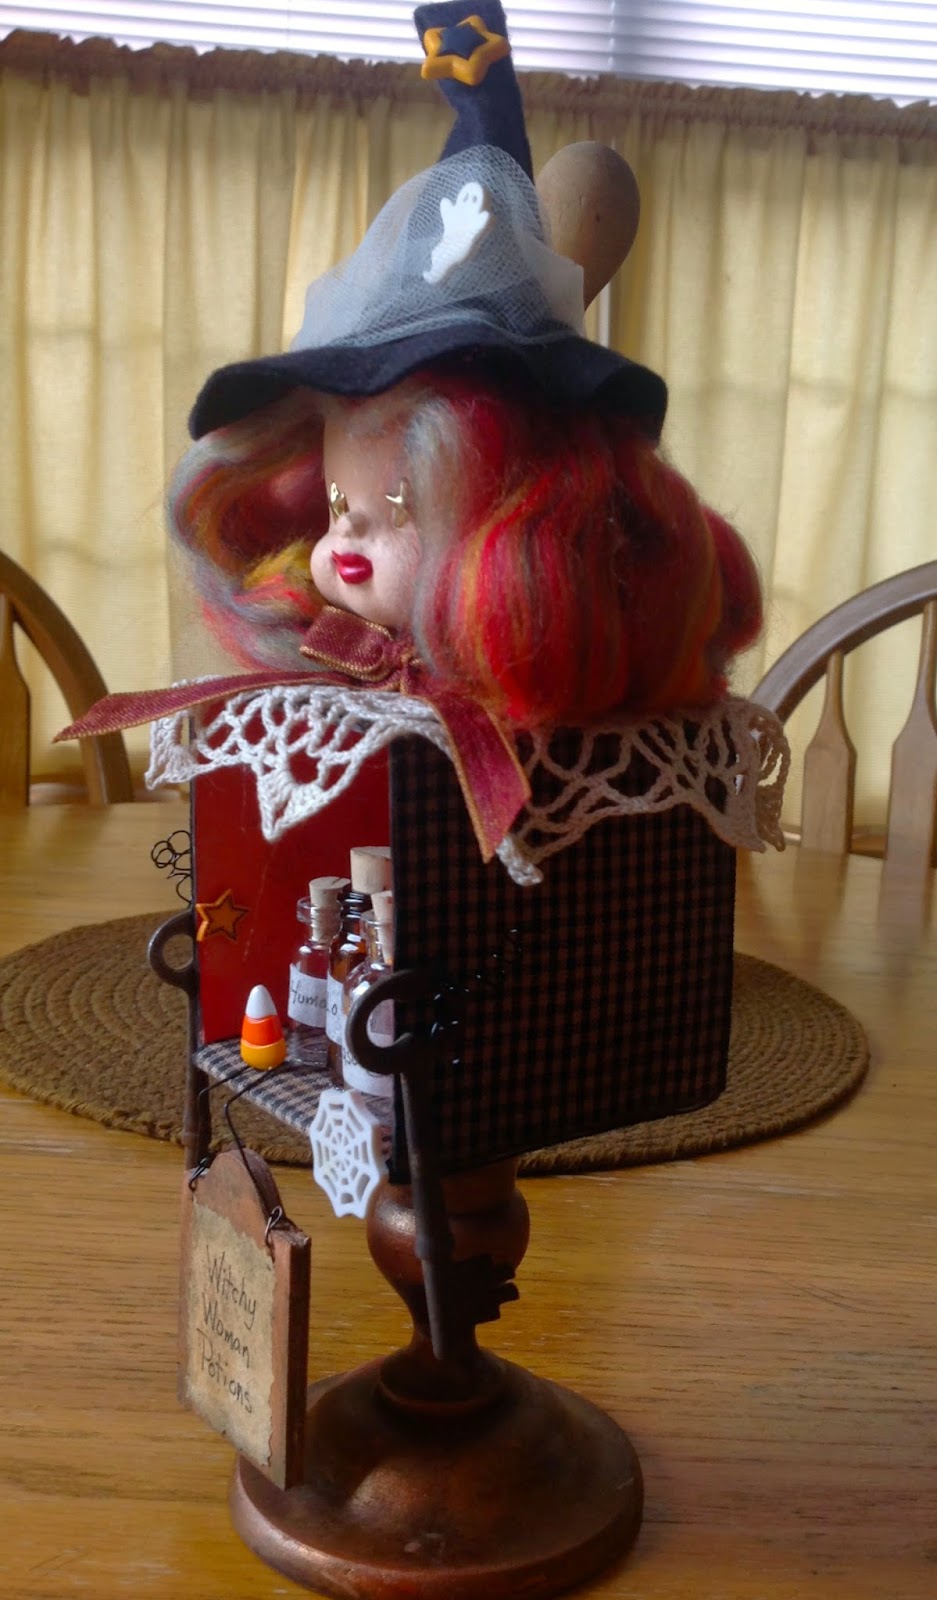
Work some crafty magic by combining interesting elements to create a "bewitching Halloween decoration.
Begin by painting a Smoothfoam baby head with white gesso, then give the head two coats of a flesh colored acrylic paint. Gold star brads are used for the eyes. Paint red lips on the face. Strips of of thick variegated yarn is glued to the head for hair.
Cut a round piece from black felt for the brim of hat. Form a cone shape from another piece of black felt for the top part of the hat. Cut slits around the lower edge and glue this part to the brim. Add any decorative additions to the witch's hat as desired.
Using Eileen Hull's box die, cut the shape from mat board. Paint the inside with acrylic paint of choice. Cover the outside of the two pieces with fabric, using heat n' bond iron on fusible. Form the box by glue it together. NOTE: cut one flap away and push the side into the inside of the box to have one side of the box open.
Old keys are wired to the sides of the box for arms. A small, old doily is places on the top of the box. Place several interesting items into the open area of the box.
Attach the box to some type of base. In this case an old wooden candle holder was used as a base using a strong glue. Glue the head to the box using a strong glue.
Other views of my "Witchy Woman":
Begin by painting a Smoothfoam baby head with white gesso, then give the head two coats of a flesh colored acrylic paint. Gold star brads are used for the eyes. Paint red lips on the face. Strips of of thick variegated yarn is glued to the head for hair.
Cut a round piece from black felt for the brim of hat. Form a cone shape from another piece of black felt for the top part of the hat. Cut slits around the lower edge and glue this part to the brim. Add any decorative additions to the witch's hat as desired.
Using Eileen Hull's box die, cut the shape from mat board. Paint the inside with acrylic paint of choice. Cover the outside of the two pieces with fabric, using heat n' bond iron on fusible. Form the box by glue it together. NOTE: cut one flap away and push the side into the inside of the box to have one side of the box open.
Old keys are wired to the sides of the box for arms. A small, old doily is places on the top of the box. Place several interesting items into the open area of the box.
Attach the box to some type of base. In this case an old wooden candle holder was used as a base using a strong glue. Glue the head to the box using a strong glue.
Other views of my "Witchy Woman":
Sunday, September 7, 2014
Kunin Felt/Beacon Adhesives/Buttons Galore & More Manufacturer Challenge
Another challenge presented itself this month. When the package arrives it's always a surprise to see what is sent and then to come up with a finished design with the materials provided. I'm anxious to see all the ideas from the participating designers and thrilled to be sharing mine with everyone!
Three manufacturers were gracious enough to provide materials to work with. Here is a list of the three with links you can go to for information and ideas.
Kunin Felt
Beacon Adhesives
Buttons Galore & More
Products used here are:
Printzfelt™Blooming Floral
Rainbow Classicfelt™ Bright Lilac, Yellow, Fuchsia
Beacon Adhesive Felt Glue
Beacon Adhesive Fabri Tac
Buttons Galore & More assorted coordinated buttons
Now to share three home decor ideas with the materials I received. Each of these can take on a completely different look by using any of the felt designs.
A simple, no-sew table runner was made from a length of burlap fabric as a base. The Blooming Floral Printzfelt and yellow Classicfelt was die-cut for the scallop design and rick-rack design on the two ends. Three other dies were used to cut the larger flower and leaves for the ends and the layered small flowers. Either of the glues listed can be used for this project. Both will work extremely well to adhering the felt pieces to the burlap. NOTE: A tip when gluing, place a piece of waxed paper underneath the burlap for protection of residual glue. Once felt flowers are in place, glue a button into the center of the two large flowers on the ends. Use a glitter glue to add a dot to the centers of the smaller layered flowers for a touch of sparkle.
Recently I have seen several ideas for "candle mats", "candle rugs" and "candle wraps". I made a no-sew version of my own to share. For the mat or rug, cut a square piece of felt. For the border pieces I cut small squares and cut each in half on the diagonal. Fold and glue the two corner points to the top point on each of the triangles. NOTE: I used Fabri Tac for this step. If needed weight or clip with something to hold them in place till dry and ready for next step. Glue the folded triangle pieces onto the cut square, placing them even around the edges. Two are placed side-by-side on the corners of the square. Finish decorating with die-cut leaves and flowers. Glue a button onto the center of each flower. NOTE: Beacon Felt Glue can be used for these steps.
For the candle wrap, cut a rectangle from a piece of felt, approximately 3 1/2" x 12". The length of the piece should fit around the circumference of a pillar candle or large jar candle, with about a 1/2" gap for tying it closed. Cut two strips of felt about 1/2" wide x 3 1/2". Glue the strips to the end edges of the rectangle. If desired, cut along the length of the piece with scallop scissors. Fold the felt piece in half, matching the ends and punch two sets of holes for threading ribbon through. Die-cut
3-D flowers from felt. Roll and form the flowers and glue together using Fabri Tac. Hand or die-cut leaves. Arrange leaves and flowers as desired and glue them into place.
List of other materials used:
Sizzix Big Shot
Sizzix Dies - Eileen Hull Leaves, Eileen Hull # 657721 Borders & Hydrangeas, Flowers-3-D, Flower Layers w/ Leaf, Flower-Build a Lilac
Ranger Ice Stickles-Silver Ice
There are 14 different designers taking part in this challenge, please go to each of their blogs or websites and find more fantastic ideas! Use the Designer Craft Connection button to the right of this post to allow you to hop through to each of them.
Please enter to win a prize package valued for over $100.00 using this link:
Entries for prize drawing will be accepted through September 14th.
Three manufacturers were gracious enough to provide materials to work with. Here is a list of the three with links you can go to for information and ideas.
Kunin Felt
Printzfelt™Blooming Floral
Rainbow Classicfelt™ Bright Lilac, Yellow, Fuchsia
Beacon Adhesive Felt Glue
Beacon Adhesive Fabri Tac
Buttons Galore & More assorted coordinated buttons
Now to share three home decor ideas with the materials I received. Each of these can take on a completely different look by using any of the felt designs.
A simple, no-sew table runner was made from a length of burlap fabric as a base. The Blooming Floral Printzfelt and yellow Classicfelt was die-cut for the scallop design and rick-rack design on the two ends. Three other dies were used to cut the larger flower and leaves for the ends and the layered small flowers. Either of the glues listed can be used for this project. Both will work extremely well to adhering the felt pieces to the burlap. NOTE: A tip when gluing, place a piece of waxed paper underneath the burlap for protection of residual glue. Once felt flowers are in place, glue a button into the center of the two large flowers on the ends. Use a glitter glue to add a dot to the centers of the smaller layered flowers for a touch of sparkle.
Recently I have seen several ideas for "candle mats", "candle rugs" and "candle wraps". I made a no-sew version of my own to share. For the mat or rug, cut a square piece of felt. For the border pieces I cut small squares and cut each in half on the diagonal. Fold and glue the two corner points to the top point on each of the triangles. NOTE: I used Fabri Tac for this step. If needed weight or clip with something to hold them in place till dry and ready for next step. Glue the folded triangle pieces onto the cut square, placing them even around the edges. Two are placed side-by-side on the corners of the square. Finish decorating with die-cut leaves and flowers. Glue a button onto the center of each flower. NOTE: Beacon Felt Glue can be used for these steps.
For the candle wrap, cut a rectangle from a piece of felt, approximately 3 1/2" x 12". The length of the piece should fit around the circumference of a pillar candle or large jar candle, with about a 1/2" gap for tying it closed. Cut two strips of felt about 1/2" wide x 3 1/2". Glue the strips to the end edges of the rectangle. If desired, cut along the length of the piece with scallop scissors. Fold the felt piece in half, matching the ends and punch two sets of holes for threading ribbon through. Die-cut
3-D flowers from felt. Roll and form the flowers and glue together using Fabri Tac. Hand or die-cut leaves. Arrange leaves and flowers as desired and glue them into place.
List of other materials used:
Sizzix Big Shot
Sizzix Dies - Eileen Hull Leaves, Eileen Hull # 657721 Borders & Hydrangeas, Flowers-3-D, Flower Layers w/ Leaf, Flower-Build a Lilac
Ranger Ice Stickles-Silver Ice
There are 14 different designers taking part in this challenge, please go to each of their blogs or websites and find more fantastic ideas! Use the Designer Craft Connection button to the right of this post to allow you to hop through to each of them.
Please enter to win a prize package valued for over $100.00 using this link:
Entries for prize drawing will be accepted through September 14th.
Subscribe to:
Posts (Atom)


_250x250.jpg)