Wednesday, May 31, 2017

The Journal Journey Continues

Journal making has slowed down a little because "life" seems to get in the way of the process!  Today I finally found time to sit down and share the next one on the list.


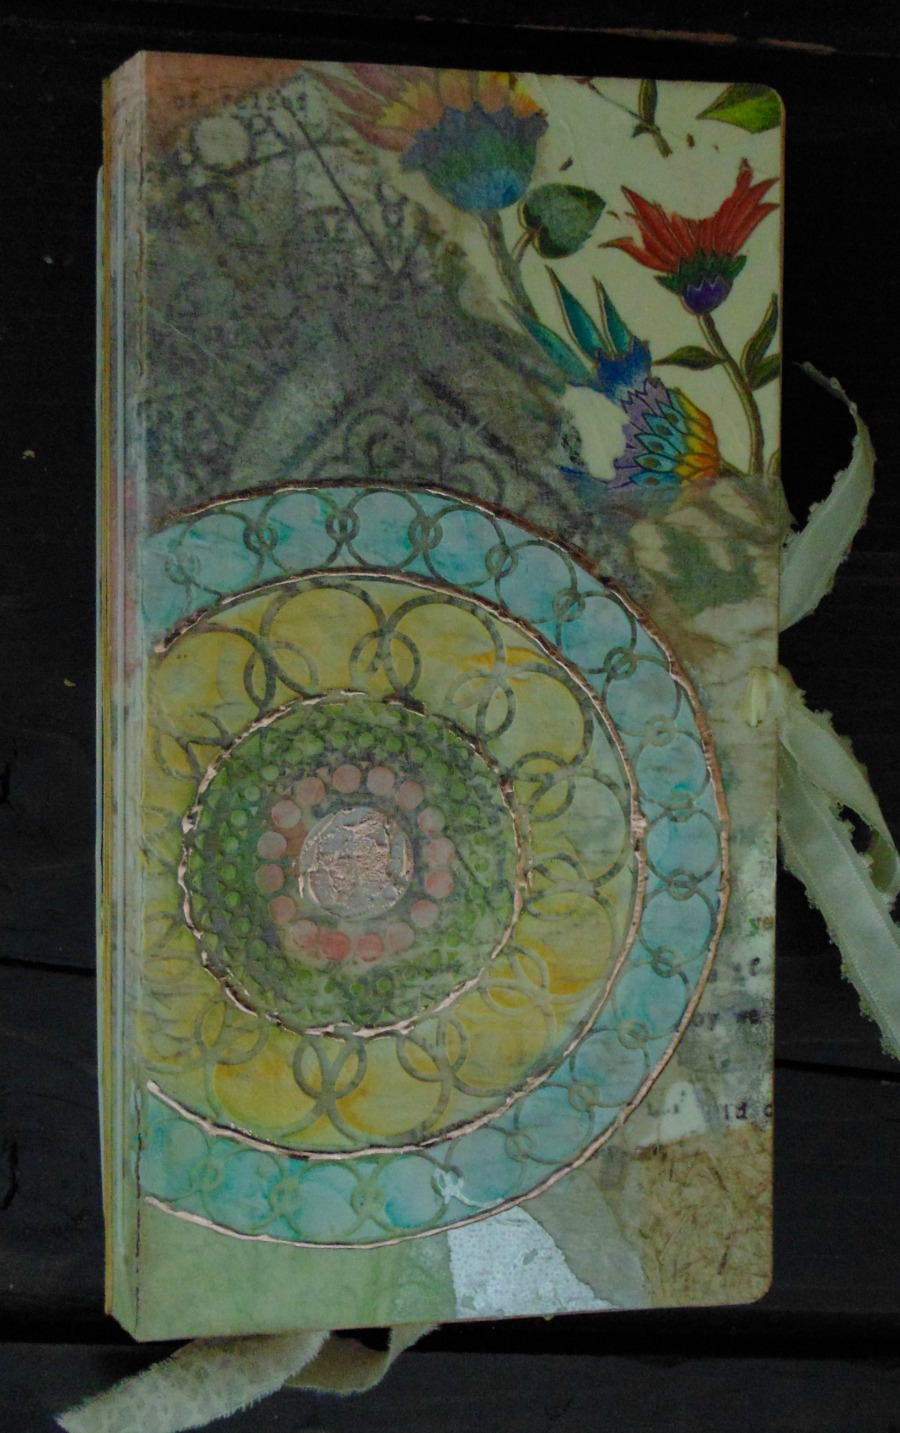
After a tiny "sneak peek" last week with an "instagram" post here is a the final journal.

It was decided to keep the embellishments on the outside of this one to zero so the technique for the covers standout and it can easily be carried in my purse without damage to those very decorations.

So now to take you through the steps of this journal making process.

Once again it begins with cutting the covers from matboard.  This time I used some scraps from a leftover colored matboard, though it didn't really matter with the additional covering of these two pieces.  NOTE: The spine of the journal was not covered leaving the colored matboard showing.


The inside of the covers were done by layering torn pieces of pages from an old dictionary onto Mixed Media Adhesive Sheets by Rebekah Meier for Thermoweb.  Once the layering is complete, coat the surfaces with Mixed Media Medium or any gel medium.  Die-cut this piece for placement onto the inside of the journal covers.


To make the front cover panels, I started by making a collage of decorative tissue papers on a square of muslin fabric that measures approximately 10 1/2" x 10 1/2".    Layer the tissue on with a gel medium.  When that is dry add color with the medium of your choice. Once the the colored layer is dry, add more design with stencils and/or stamps.  Coat the entire piece with gel medium.


To coat the collage square with resin, this is the process I used:

NOTE: I used EnviroTex Lite resinEnviroTex Jewelry Resin could also be used for a small project like this.  Follow manufacturer instructions. 
Place the square onto a piece of disposable plastic bag or a surface like a non-stick craft mat.  Mix only small amounts of resin for covering the piece.  I made a small amount to coat the backside first.  I poured it onto the fabric square and brushed it out with a small disposable brush.  Turn the square over to have the right side up.  Mix more resin and pour onto the piece.  Brush out the resin to the edges.  Allow the fabric square to now sit till the resin hardens completely.  When the resin sets well the piece can be lifted off the plastic.  Die-cut two cover panels from the resin covered fabric.  NOTE: To eliminate bulk, I only cut the cover part, not the spine area.


The front, outside covers and inside cover pieces can be placed onto the matboard die-cuts.  The resin covers are put into place using 1/2" Super Tape around the four edges of the front covers and glue added to the center. NOTE: More tape can be added to the center of the covers also for better contact if desired in place of glue. Then assemble the journal as given in the directions.

The elastic is covered with a decorative trim
I used clear jewelry elastic to hold the signatures.  Punch two holes on the edge of both covers.  Add a decorative button to the front for a closure; thread a length of flat trim or ribbon to the back for the tie.

NOTE: In making the outer and inner linings for the journal covers, they can be completed seperately, then die-cut individually before being adhered to the matboard covers OR layered onto the matboard pieces first before cutting the covers.  *Both ways will work, but aligning the edges can be tricky! I did the former with good results!

The journal hold three signatures. The signature covers where made from co-ordinated decorative cardstock papers and manila folders.  To make this a writing journal, the inserts are made using the lined paper from a "dollar store" notebook.  Two sections of pages are sewn together on a sewing machine with a zig-zag stitch sewn down the center.  Score the center using a ruler and bone folder.   Fold along the scored fold line; trim the inserts to fit into the signature covers.


For more information see:
Eileen Hull Designs
Rebekah Meier Designs
ThermoWeb
EnviroTex

HAPPY JOURNAL MAKING TO ALL! 

Wednesday, May 17, 2017

Journal Journey - Part #4

Continuing the adventure of creating journals with the fabulous JOURNAL die by Eileen Hull for Sizzix.  The latest edition again uses the die as the starting point.  For decorating the covers and inserts I used the wonderful mixed media materials by Rebekah Meier Designs for Thermoweb.  I have only "scratched the surface" of the ways to use these but will be happy to share how they were incorporated into the journal making.


Just to familarize you with the product line here are some images and discriptions.


 Mixed Media Art Paper and Tape take paint, ink and other art mediums very well.  Tears and cuts easily and use with die cutting systems.  Stamp, stencil and emboss. Wonderful surface to be used in many ways.

Mixed Media Adhesive Sheets are doubled-sided making them very versatile.  Can be used to layer paper, fabrics and foils.

Mixed Media Foam Sheets are double-sided also.  Can be used to add dimension to collage projects of all types.  Can be painted, inked, cut, textured.

NOTE: The three variety of sheets all measure 9" x 12".

Mixed Media Medium is a multi-purpose adhesive that will work in a variety of ways.

Mixed Media Transfer Foils come in five new colors and can add that special touch to all your creative crafting.  The names alone make you want to use them! (Antique Pearl, Old Gold, Vintage Tin, New Penny, Patina)

Experimenting has only just begun!

Now let me begin to walk you through the steps I took -


NOTE: In making the outer and inner linings for the journal covers, they can be completed seperately, then die-cut individually before being adhered to the matboard covers OR layered onto the matboard pieces first before cutting the covers.  *Both ways will work, but aligning the edges can be tricky! I did the former with good results!


For the front cover: Using a adhesive sheet, I randomly layered a variety of torn bits to one side of the sheet.  Brush on a thin coat of the Mixed Media Medium to adhere any loose edges of papers.  Next, using a sheet of the art paper, I colored it with Colorbox® Blends Sunshine.  The process I used was to blend the ink onto the sheet, working in small sections at a time; spritzing each section with water and blending the ink into the sheet with my finger.  In areas I went and added more color using the same technique.  NOTE: The water does not hurt the adhesive on the sheet, but I did not over saturate the sheet with water.  If that happens, blot with a paper towel to help remove the excess. ***SIDE NOTE: These blotting sheets might make interesting elements for collage.  Set the sheet aside to dry before cutting.


Make the front and back covers for the journal.  (Refer the NOTE above.)  After cutting the covers, blend the edges with Nutmeg Colorbox® Blends.

Before putting the journal together I stenciled a design onto the front and back covers, using a stencil paste and some of my favorite stencils.  NOTE: Stencils are designs by Rebekah Meier for TCW


Once the stencil paste dryed I went back and added touches of color by painting on the ink from the Colorbox® Blends with a wet brush.  Some bits of foiling were added.  Apply the iCraft® deco foil™ liquid adhesive to areas of the stenciled design.  Allow to dry following manufacturers instruction before adding the transfer foil.  

Assemble the journal following the directions.  For the closure on this journal I added a decorative button and ribbon.

To finish the front cover, die-cut the label from the Journal die.  Stamp and emboss a title.  The edges of the label were wiped with clear embossing ink and dipped in clear embossing powder then heated for a slight textured effect.  Flowers and leaves are die-cut using an Eileen Hull die.  To make them, adhere small bits of fabrics (flowers) and tissue paper (leaves) to some of the Mixed Media Foam Sheets.  Die-cut the shapes and add extra color with inks.  The centers of the flowers have a bit of foil added for some metallic sparkle.


Inside the journal I added three signatures.  The first signature cover is made from a sheet of the art paper that was printed by Rebekah Meier on a gel plate and given to me as a sample.  I added some other stenciling and coloring to it; placed a piece of decorative paper onto the adhesive side before forming it into the cover with a small pocket.


The second signature was made from an old manila folder.  It has leftover art paper pieces added to the front (yellow torn stripe) and inside (pink print). I like the transparency of the  sheet with a stamped design over part of it.


The third signature cover is made by placing a piece of tea dyed fabric onto a adhesive sheet then onto a piece of manila folder.  Cut the signature cover and round the edges. Stencil a design and add shading onto fabric if desired.  A strip of colored art tape is added and stamped on.


Combining all these really wonderful elements from this product line,  I only see possibilities to be creative with!  Get your hands on some and HAVE FUN!

Thanks Eileen and Rebekah for endless possibilites!

Thursday, May 11, 2017

Journal Making Adventure Continues - Part Three

Coming to you with the third edition of journal making!  Here's the latest version using Eileen Hull's "Journal" from her latest collection - HeartFelt by Eileen Hull Designs for Sizzix.


For this journal I decided to make one themed for quilting.   Since sewing has been a large part of my life, it was natural that quilting would probably become a part of my activities.  Years earlier I made a few quilts on my own with the "teach yourself"method!  It was about 10 years ago that I become involved with a small group of women in the neighborhood, and we formed a "quilting group".  We still meet monthly, except summer.  We share ideas, tips, tricks, projects and help when necessary.  From time to time we make treks around the area to shops that share our sewing and quilting desires, hence the inspiration for this journal.


Now let me walk you through the steps and materials used to create this.

It all begins with the base pieces of the journal.  I decided on one of many of my favorite quilt blocks to place at the center of the front cover.  I traced the journal cover onto copy paper then laid out the quilt design to the center and filled in with other shapes.  (Refer to photo)  For the back cover extra, random pieces of fabric form the design.

This part is the most intricate and time consumming, but worth it!  The fabric pieces were fused with the HeatnBond.  All pieces for the front are measured and cut with an acyrlic ruler and rotary cutter. NOTE: The small quilting pieces measure 3/4" for most and 1 1/2" for the squares and rectangle shapes.  The border strips are 1/2" wide.


Once the fabric fused pieces are cut, they are ironed onto pieces of the Mixed Media sheet.  Add a decorative stitch around the fused pieces.  NOTE: A simple zig-zag stitch was used.  


The fabric covers are then carefully cut to match using the journal die and Big Shot.  NOTE: You must carefully line up the fabric onto the die before cutting. Concentrate on the open edge and the top edge for allignment.  Cut fabric pieces for the inside of the covers also.  

Adhere the outside cover pieces to the journal using gel medium.  Once glued in place, cover them with another coat of gel medium and set aside to dry.  Repeat the same steps for the inside covers.
NOTE: If any warping appears, wrap the covers in parchment paper or any release paper and weight them with heavy books.  
Add the alphabet wording to the cover with gel medium, coat over the letters and allow to dry before assembling.

***TIP*** (Another way to adhere the cover pieces)
Fuse the pieces for the inside and outside covers onto HeatnBond.  Die-cut them on the journal die. Remove the backing, align the edges carefully and press onto the matboard covers with an iron.  A coating of gel medium is still suggested.

Assemble the journal in whatever method desired.  Embellish as desired.  I used some found sewing elements: large safety pin, blunt tapestry needle, small thread spool.  The closure is made by punching two holes into a thimble.  Tie it onto cording.  Cut a small circle of fabric, stitch around with a running stitch; stuff with a cotton ball and gather up tightly; glue into the thimble.


For the three signature for the inside I used related, decorative papers, a manila folder, graph paper and plain papers.  Two of the signature covers are made by folding over the paper to form pockets.  They were both stitched on the machine with a zig-zag stitch around the edges.  The manila folder makes the third signature cover, which has a fabric pocket  stitched on the front to hold business cards. The pocket is embellished with flowers and leaves cut from fabric covered Mixed Media Foam Sheets.  NOTE: Mixed Media Foam Sheets are part of a new line by Rebekah Meier Designs for Therm o Web.  ***The next journal will show other ideas using products from this line.


Three of the tabs are added to each of the signature covers.

Now off to some quilt shops with the handy journal to take notes or sketch or bring along needed information!


Materials Used

Journal die-cuts, 2 covers, 3 tabs
Alphabet die-cuts, Homemade Alphabet Thinlits™
Fabrics, assorted
Iron on Fusible , Therm o web HeatnBond
Mixed Media Sheet, lightweight iCraft®
Cutting mat
Rotary cutter
Acrylic ruler
Gel Medium
Super Tape, 1/4", 1/2", Therm o web
Papers, decorative, graph, newsprint, copy manila folder
Elastic cording
Jute cording
Embellishments: sewing related items
Paper trimmer
Iron
Sewing machine

For more ideas and inspiration follow the Pinterest Board, Sizzix Heartfelt Journals, plus find ideas and information at Eileen Hull Designs on Facebook.