Showing posts with label holiday ideas. Show all posts

Thursday, December 10, 2020

Making Bells and Candle Holders With Sizzix Dies By Eileen Hull


Tutorials for Making Bells and Tea-Light Holders with Eileen Hull Dies


Bells, bells and more bells ... Bells will be ringing everywhere. One of my favorite Christmas songs is the "Carol of the Bells", thought I would share it here in this post about bells for a little sound of the holiday! 

Now, on with some making! I dont know why but I almost always look passed the original use of the designs of dies to find other ways to use them.  This happened with the new die teacup design by Eileen Hull for Sizzix.  

This tutorial will walk you through the way to use the teacup die in two different ways to create bells.  

TIPS
These tips given, are for both type of bells and should be helpful in constructing them. They are given as a starting point, adjust the procedure to suit your own making style.

  • The first thing is to cut a template from a piece of chip board (something sturdy). This is to mark where to cut the cup shapes to create the bells.
  • The handles need to be removed to form both the bell designs.
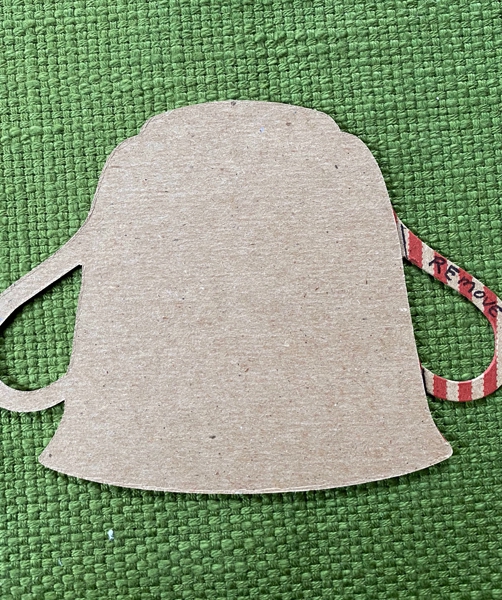

  • This cut edge may not be completely smooth as the opposite side of the cup. No problem! Marking with the template, then removing the handle with sharp scissors on those marks will be fine.
  • Another template can be cut from plain paper to mark the center fold for the three-dimensional bell. This will help in folding and construction.


  • Fold this paper template carefully in half and crease well.  
  • For either bell design, color the edges with ink using the technique you prefer.
  • The 3-dimensional bell can be made from most types of paper. If using a heavy card stock, it may be helpful to mark the fold line and then use a score board to crease the center fold.
  • Refer to the NOTES given in the instructions.
  • Add any embellishments of choice to the lower edge of the single bell shapes, paper or other. A simple bow may be all it needs if using a paper with lots of pattern.
  • Roll the two shapes to curve slightly before joining together with the clapper/spoon if desired. 
  • To adhere paper for clapper/spoon I used double-sided adhesive. This type of adhesive may be helpful to use for some of the embellishments also. 
  • If thinner paper warps from gluing, placing the folded pieces under something heavy may help or carefully press with a dry iron along the edges. 
3D Bell


  • Cut 6 bell shapes from paper of choice. (NOTE: The amount of pieces can vary if desired, but I would use as few as 5 or no more then 7.)
  • Place the folding template on each cut shape and line up edges well. 
  • With a pencil, draw a line down the center of each to fold on.
  • Fold each in half, matching edges well and crease with a bone folder.  
  • Glue the folded shapes together, one at a time. Again, line up the edges of each well. (NOTE: Thinner papers may warp slightly when using a liquid glue.)
  • Before the final two sides are glued together create the center for the bell. 


  • Thread a jingle bell onto a ribbon or cord or wire, long enough to be folded in half to hold the bell and also become the hanger.  
  • Glue or adhere with double-sided tape, the center hanger and string with bel, along the center of the folded bell shapes. If gluing, let the glue set up. 


  • Glue/adhere the last two sides together. Adjust the center hanger if needed.
  • Make one or two bows from ribbon and glue to the top of bell on one or both sides of the hanger if desired.

Single Bell for Ornament or Banner


  • Cut two shapes for each bell from card stock. 
  • Use template to mark and remove the handles from each cup shape (NOTE: Use decorative or plain papers. Plain papers can be embossed with embossing folders after cut and handles removed if desired.) 
  • The bell clapper is cut from the spoon shape for each bell. (NOTE: Two pieces of metallic paper are fused together with double sided adhesive before die-cutting the spoon shape.)
  • Line up two bell shapes with the clapper (spoon) in between. 


  •  Adjust the spoon so the handle sticks out the top slightly and the bowl of the spoon shows at the bottom slightly.  
  • Mark with a dot a spot to punch a small hole to place a paper brad to hold the three layers together.  


  • Embellish the front of the bell if desired. Use other die-cut shapes or other embellishments. 
  • For single ornament - cut a length of thin ribbon or cording for a hanger.  Thread through the top of the bell, placing the hanger (cord) behind the spoon shape where it catches below the paper brad used to hold the layers together. Form a knot at the top of the hanger.  
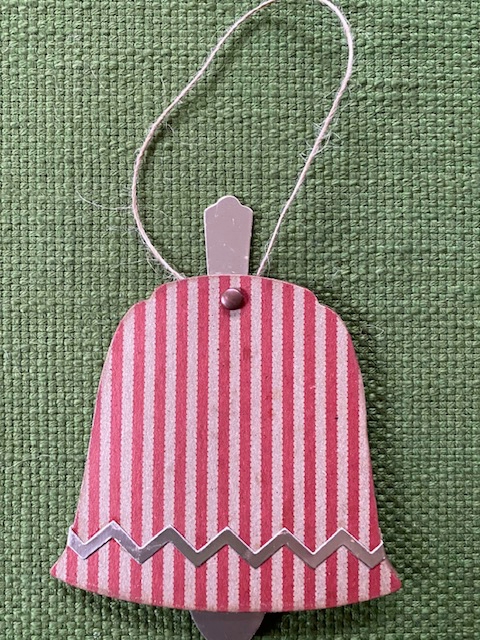


  • For banner design, thread a longer length of cord through each bell so it lies under each paper brad.  (NOTE: To keep each bell in place, apply a small amount glue where the cord lies.)


Another seasonal favorite song to share with you, by John Williams, from Home Alone ... A Candle in the Windows.

The house ornament die was easily adapted to create a simple holder for battery style tea lights.  
As with instructions on adapting the tea cup die into bells, I will include some helpful TIPS.


TIPS

  • They can be made of a kraft colored card stock for a gingerbread look.
  • Because this is a steel rule die, they can also be cut from a thin corrugated board.
  • Each holder will need 4 cut pieces. 
  • Practice simple doodles, lines, dashes and dots before decorating. The use of white ink looks like icing.

Instructions

  • Cut 4 sides from paper of choice.
  • Refer to template to remove specific areas and areas to crease.
  • Mark each with pencil lines before cutting.
  • Use a ruler and craft knife to remove the unused areas.
  • Score the two crease lines.
  • Decorate each house piece with doodles in white ink. 
  • Add double-faced tape to the flap along the side of each house piece.
  • Some epsom salt can be sprinkled inside before inserting the candle. Use another type of fake snow if desired. 

  • Remove the backing from tape and align the other edge of the second house piece onto the adhesive strip. Continue till all four sides are connected.

  • Apply double-sided adhesive tape to  bottom flaps as shown.  NOTE: Notice the top flap in the photo has the adhesive on the outside edge of the flap. The remaining 3, it's positioned on the inside of the flaps.  
  • Begin folding in the flaps with the one with adhesive along the outside edge and alternate each flap till all four are folded onto each other. 


  • Use the handle of a wooden spoon or another device to push down onto the bottom from the inside of the holder, making sure the taped edges hold.
  • Insert a battery tea light inside.


Wednesday, December 2, 2020

Comfort & Joy - Decorating the House for the Holidays


Where does one begin? How does one begin? Is there a right way to begin? When does one begin? 

Well let me just say I begin with a few basics, I stay flexible and I want the house to feel cozy and comfortable and festive when the decorating is complete. I will admit that through the years a few things have stayed the course and for various reasons some things have changed. From the time of being a young married couple in a city apartment, to moving into the first little house with small children, then into a larger home with a growing family, before becoming empty-nesters and downsizing when the kids all moved on decorating for Christmas was a must!  Each brought different holiday decorating situations.  Don’t be afraid to change things around or scale back. You heard that saying ... "been there, done that"!  Some of those"must-do's" can move aside, it is OK!


The holiday decorating usually began the day after Thanksgiving. The long weekend seemed to be perfect to getting the decorations up. For many years we followed a tradition of having a live Christmas tree that usually went up around my December birthday. Many years we as a family would venture out to tree farms around our area to cut our own tree. It was not an easy decision to move away from the “real thing” to “life like”. The Christmas tree will always be the centerpiece of the holiday season. Let it fit your style! My style right now is a tree lit with clear lights and simple snowflake ornaments. There have be different looks in the past. 

An Older Version
Garlands with clear lights are the first things to go up every year. They are hung in archways, above doorways, over large expanses of windows and on bannisters. With so many choices of decorative holiday LED lights, use them where possible around the house. The tiny clear lights add a touch of coziness and warmth.  I find these a help in making the house look like the holidays. 

Artificial greens and seasonal sprays add another layer of a holiday feel, use them in any variety of containers. Just a sprig tucked in somehow can be just the thing. Tying red ribbons onto handles of baskets, candles and containers also add a simple holiday touch. 


It became important for me to keep decorations simple and more seasonal. Snowflakes and icicles and pine ones are easy elements to use for winter holiday and seasonal decor. Add books or magazines, old and new, related to the season in strategic locations. 

Bottle brush trees of all types, sizes and colors are another decorative element that can ce used in simple ways in a variety places.  I began collecting them a while ago and find them a nice addition almost anywhere. Pillow covers sewn from seasonal fabrics, seasonal throws placed over arms or backs of furniture add softness and cozy warmth without much fuss. Even towels embellished with a seasonal design add very simple splash of "holidays"!


If you’re lucky enough to have a mantle, create a scene or fill it with favorite things. Of course it makes the perfect place to hang stockings. 

From Another Year

Add tose other special handmade or "keepsake" holiday decorations in areas for visibility. Now ... Enjoy!


***** Use a section in your Comfort & Joy journal to jot down ideas you want to remember to try. Make sketches or diagrams, paste in images of ideas to try or make. It could be very helpful to also take a snapshot to save as a reminder. 


Monday, October 26, 2020

Everyone Needs An Angel

With the release of the two new Eileen Hull dies recently I had shared a few ideas on how the dies could be used.  I happen to be someone who always wants to find other ways to use the die shapes.  Using the spoon, that is also a shape on the new teacup die, this little angel ornament was created.  You will also find two other little spoon characters I had some fun creating!

To make the angel you will find the steps to create your own here.

 To make the body:

  • Die cut two spoon shapes from mat board
  • Cut lower end of spoon handle from the 2 spoon shapes


  • Glue the 2 spoon shapes together
  • Paint the glued spoon shape and the 2 short, cut handle pieces with flesh colored paint. Dry.

To make dress and sleeves: 

  • Cut or tear fabric for dress and sleeves to measure 6” x 3 1/2” (dress), 3 1/2” x 2” (sleeves)
  • Fold over the top edge of dress piece  1/4” and hand stitch with a running stitch. 
  • Gather the stitching to create a neckline for the dress. 

  • Tie around the neck area of the spoon shape and knot.  
  • Apply some glue under the gathered area of the dresses neck to hold onto the spoon shape.  
  • Fold the sleeve piece into thirds and run a thin line of glue along edge to hold in place. (Place a strip of waxed paper into the sleeve tube to keep the fabric from sticking together.) 
  • Tie the dress to the head part of the spoon shape by gathering and knotting the thread.
  • Place some glue under the gathered neck of the fabric at the front and back. Allow glue to dry. 
  • Fold sleeve tube in half to find center. Glue onto the back of dress near the top.
  • Glue the two cut pieces from the spoon handle into the sleeves to form the arm and hands of the angel. Refer to photo.
Adding hair and face:
  • Make two dots with black paint and the end of a paint brush handle. Dry.
  • Using a fine black permanent pen, draw a smiling mouth.
  • Add a small touch of blush to the face with a cotton swab or brush.
  • When black paint is dry, add a small white dot to each eye for a "sparkle".
Materials for face
  • Wind cotton thread around fingers to create hair to length desired. Tie at the center with a short piece of the thread.

  • Glue onto the head of the angel. (Refer to photo.)
Making wings and halo:

  • Place a piece of double sided adhesive to silver card stock and add another piece of the same card stock to the other side after removing the adhesive backing.

  • Die cut angels wings with the butterfly die. (If card stock is thick, cut one with adhesive, one without and adhere together after cutting.)
  • Repeat the same process with a gold  metallic decorative paper, but use a piece of foam adhesive between two layers. 
  • Glue a punched snowflake onto the halo.

Finishing:

  • Glue the gold halo disc to the back of the head of the angel. Position as desired or refer to photo.
  • Form a hanger from silver cording by tying the ends together in a knot. 
  • Glue the looped cord to the back of the angel along the center back. Placing it so the silver wings will cover the knotted cord.
  • Glue on the angel wings. Set aside till glue dries well.
  • Add a star or other embellishment to the hands of the angel with glue and allow to dry. 

Extra materials-hair,hanger,embellishment

You will find the materials used listed below. I have tried to make the instructions and photos as helpful as I could to help recreate the angel. 


Here are two other little spoon characters created in a similar way for this time of the year. Instead of making a hanging decoration, a pin back could be applied to the backs to make it wearable. 

Material List 

Big Shot machine
Eileen Hull Sizzix die, Teacup 3D & Spoon #664797
Mat board
Scissors
Paint, flesh color, black
Fabric, dress and sleeves
Thread, needle
Paint brush(s) 
Cotton embroidery thread, natural color
Decorative paper, gold
Silver card stock
White glitter card stock
Adhesive sheet 
Foam sheet
Sizzix thinlit, Birds & Butterflies, #661901
Sizzix thinlit, Bookplate, Hinges, Label, #662356
Snowflake punch
Silver cording
Star embellishment
Glue


Friday, December 5, 2014

Designer Craft Connection - Easy Holiday Decoration with "Foamology™" by Fairfield

Another opportunity to work with something new that I had never seen or used before, presented itself with this designer challenge.  I was totally unaware of this line of products called Foamology™by Fairfield.  I requested the 24" x 24" Rigid Tiles to work with.  Here is my creation using just one of the tiles, Faux Wooden "BELIEVE" Plank...


This will be a welcome addition to the country holiday vignette near the front entrance.  The idea was inspired by a similar one my daughter had made out of old recycled wood.

The 24" x 24" rigid tile was cut using a serated knife into two pieces measuring 12" x 24".  The two panels were taped together using wide strapping tape to hold them together.  The long panel was then covered with a natural cotton batting.  NOTE: Add the batting to the panels as shown in the video files for working with these products: http://foamology101.com/videos/.

I cut a piece of brown felt to cover the back of the plank.  NOTE: Fabric or paper could be used also.  

Using the back side of a butter knife, I ran it down the length of the plank about 3" from both sides to make an impression.  Using thinned paint, I  brushed it into the groove made by the knife.  This gave the panel some depth and the look of a wooden plank.

Letters that spell out BELIEVE, were cut from heavy, decorative cardstock using a Silhouette and a decorative font.  Spray adhesive was used to adhere the letters to the plank.  A little bit of gold spary glitter was applied before spray the entire surface with a clear acrylic spray finish.  A  little strip of "bark-like" ribbon was glued on and a small evergreen spray added to finish the look.

Enter the contest to win a prize here:
Rafflecopter/Giveaway - Enter Here