Showing posts with label holiday decor. Show all posts

Wednesday, December 2, 2020

Comfort & Joy - Decorating the House for the Holidays


Where does one begin? How does one begin? Is there a right way to begin? When does one begin? 

Well let me just say I begin with a few basics, I stay flexible and I want the house to feel cozy and comfortable and festive when the decorating is complete. I will admit that through the years a few things have stayed the course and for various reasons some things have changed. From the time of being a young married couple in a city apartment, to moving into the first little house with small children, then into a larger home with a growing family, before becoming empty-nesters and downsizing when the kids all moved on decorating for Christmas was a must!  Each brought different holiday decorating situations.  Don’t be afraid to change things around or scale back. You heard that saying ... "been there, done that"!  Some of those"must-do's" can move aside, it is OK!


The holiday decorating usually began the day after Thanksgiving. The long weekend seemed to be perfect to getting the decorations up. For many years we followed a tradition of having a live Christmas tree that usually went up around my December birthday. Many years we as a family would venture out to tree farms around our area to cut our own tree. It was not an easy decision to move away from the “real thing” to “life like”. The Christmas tree will always be the centerpiece of the holiday season. Let it fit your style! My style right now is a tree lit with clear lights and simple snowflake ornaments. There have be different looks in the past. 

An Older Version
Garlands with clear lights are the first things to go up every year. They are hung in archways, above doorways, over large expanses of windows and on bannisters. With so many choices of decorative holiday LED lights, use them where possible around the house. The tiny clear lights add a touch of coziness and warmth.  I find these a help in making the house look like the holidays. 

Artificial greens and seasonal sprays add another layer of a holiday feel, use them in any variety of containers. Just a sprig tucked in somehow can be just the thing. Tying red ribbons onto handles of baskets, candles and containers also add a simple holiday touch. 


It became important for me to keep decorations simple and more seasonal. Snowflakes and icicles and pine ones are easy elements to use for winter holiday and seasonal decor. Add books or magazines, old and new, related to the season in strategic locations. 

Bottle brush trees of all types, sizes and colors are another decorative element that can ce used in simple ways in a variety places.  I began collecting them a while ago and find them a nice addition almost anywhere. Pillow covers sewn from seasonal fabrics, seasonal throws placed over arms or backs of furniture add softness and cozy warmth without much fuss. Even towels embellished with a seasonal design add very simple splash of "holidays"!


If you’re lucky enough to have a mantle, create a scene or fill it with favorite things. Of course it makes the perfect place to hang stockings. 

From Another Year

Add tose other special handmade or "keepsake" holiday decorations in areas for visibility. Now ... Enjoy!


***** Use a section in your Comfort & Joy journal to jot down ideas you want to remember to try. Make sketches or diagrams, paste in images of ideas to try or make. It could be very helpful to also take a snapshot to save as a reminder. 


Tuesday, July 21, 2020

Christmas In July Continues - A Banner Season

Continuing with another "Christmas in July" idea using the new snowman die from Eileen Hull to create this banner for holiday decorating.


Most dies are made to be used with paper only but I have a thing with always stretching my ideas to see just where I can take them.  For some reason most projects that I make it's difficult to not mix things up. Sometimes that means spending time experimenting first with the wide variety of materials that are available.  This project features one of the the new Eileen Hull chapter 3 dies used in a different direction, follow along with the steps given, for something new to give away or add to your holiday or seasonal decor.

Materials
Eileen Hull Sizzix die, Snowman
Snowflake die
Alphabet die
White felt
Thermoweb Ultra fusible iron-on adhesive
Foam adhesive sheet
Fabric scrap
Black heavyweight paper
Brown heavyweight paper
Orange card stock
White decorative paper
Metallic foil
Cording or ribbon
Ultra bond adhesive
Thin raffia
Red bead or tiny Pom-Pom
White pen

NOTES & TIPS:
White felt is layered together to make the snowman bodies. Decorative fabric is also layered together for the scarves. Instructions will be given on the process of using a fusible adhesive with both types of fabrics.  *** Follow the instructions that come with the fusible adhesive for heat settings and process. Tips will be given here to help with the process. Most iron-on fusible come with a paper backing on one side.

Glue together 2 layers of the black and brown papers before die-cutting them for the top hat and branch arms.  Use heavyweight paper on hand and paint them to the color desired.

Preparing felt and fabric before die-cutting shapes

The dies used for the snowflakes and letters are older dies that are no longer available but there are some newer designs available.  Substitute another element for the snowflake and another style of alphabet.


Fabric Prep


  • Cut 2 pieces of felt large enough for the nine snowmen shapes and a piece of fusible adhesive to match. 
  • Press the felt if needed before layering.
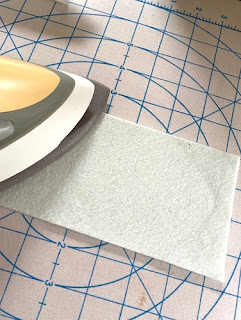
  • Place the fusible down onto one piece of the felt with the paper backing facing up. Place iron onto the paper side of fusible. The best method is to press the iron down and hold for several seconds before moving the iron to another area. Once the entire piece is pressed down in this fashion, the iron can be slide back and forth over the fusible. Allow it to cool down.  Remove the paper backing from the fusible. TIP: If fusible was not heat set enough it may remain attached to the paper backing. Repeat that area again; cool and release.

  • Place the second felt piece over the fused adhesive. Press as before till both pieces are fused together. NOTE: Depending on the thickness of material used it may take a little longer to adhere the layers. Once shapes are die-cut and any edges are not completely fused, repress those edges carefully. 


  • The same process can be used for fusing thinner fabrics together (snowmen scarves). 

 Assembling snowmen for the banner
  • Die-cut ALL pieces from desired materials.
  • Lay out all the pieces needed for each snowman before gluing into place. 

  • Decorate black hats by gluing a strip of raffia around the hat (Refer to photo for placement). Allow glue to dry then add a piece of punched sprig and a red bead to finish the hats. 
  • Add all pieces by gluing onto the snowman shapes. Start  by placing the hats on first in whatever fashion desired. Next add the scarves. Add the eyes and nose, finish with the two branch arms. Set the snowmen aside till all pieces dry.  
  • Cut a piece of a foam adhesive sheet for die cutting the letters used to spell out - let it snow.  Remove one of the backing sheets from the foam. Place a foil sheet over the foam adhesive and press onto the adhesive we’ll.  Remove the clear foil sheet cover.  Die-cut the letters from the foam without removing the other release paper.  
  • Prepare another piece of foam adhesive sheet with for the snowflake spacers using the white decorative paper. Die-cut 4 snowflakes from the covered foam and 4 from paper only.
  • Place the foil/foam letters onto the snowman near the bottom (Refer to photo).
  • With white pen, add a small dot to each eye.
Stringing Banner
  • Lay the snowman out in-line, facing up to arrange. Note: Notice that they are each close enough to have it appear they are holding hands. The snowflakes act as spacers between each group of snowmen and those next to them appear to be touching the snowflakes. 
  • Carefully turn them over, keeping them spaced.
  • Run a bead of glue along the neck area to hold the cord. (Refer to photo). Note: If desired a small paper punched circle or square could be glued over the area where the cord runs along the back of each snowman for extra hold. 

  • Remove the paper backing from the snowflakes and line them up at each end and between the groups as shown in the photo.  Align the other paper snowflakes over the snowflakes with adhesive. 
NOTE: If you are in need of further instruction or clarification, feel free to ask. If you follow me on Facebook or are a member of Eileen Hull's Fan Club, you can ask a question there.  Until I can resolve a problem replying on by blog, I may not be able to quickly answer any concerns. 

Friday, June 12, 2015

Deflecto Design Team - Hooray For the Red, White & Blue

When summer arrives, all things red, white and blue come out to decorate the house during this time. With Memorial Day, Flag Day, the 4th of July and Labor Day all falling within the summer season, it is the appropriate time for such decorations.


The mantle above the fireplace is one spot that always finds a special decoration to fit a theme.  This year I changed things up just a bit.  Using the Angled Sign Holders (20001CR) I created postcard size cards using various papers and adding die-cut letters using my Silhouette machine to spell out AMERICA.  Adding to the mantle decor is a very simple garland made from torn strips of fabric that are knotted onto a jute cord.


The VersaGrip™ Sign Holder (20007CR) made the perfect thing to hang another handmade banner to a window area.  The longer clamp was clipped to the top edge of the curtain and the smaller clip holds the string from the banner.  Rosettes made from coordinating papers are attached to the clip with heavy duty glue dots.


Another banner was made from handmade papers and some scanned images.  It hangs from the front steel door with star shaped magnets that were die-cut from Deflecto Magnet Sheets with Supergrip Sign Holders (20002CR) attached to hold the banner cord.

Monday, June 6, 2011

June's Designer Craft Connection - Red, White & Blue

"Every heart beats true, 'neath the Red, White and Blue"  -  George M. Cohan

The theme for this months blog post is "patriotic" and what better way to express the love of country with this color scheme. Here is a easy project to make so you can show a little patriotic pride.
Cut royal blue cardstock into 4"x 6" rectangles.  Cut a "V" pattern into one of the 4" edges.  Score and fold over the opposite edge about a 1/2".  Cut a length of a wired edge ribbon and apply to each of the the paper shapes.  Fold over about 1/2" of ribbon on each of the 6" sides to the back and glue down with glue.  Star shapes and letters are cut from white and red cardstock using Sizzix dies for stars and letters.  Simply glue letters onto the stars and then onto the ribbon covered paper shapes.
To make the banner: Cut a long length of 1/8" white ribbon, enough to span the area where it will hang.  ( I used a length approximately 100".) Each of the blue "flags" is attached to the ribbon by placing the folded 4" edge over the ribbon.  Adhere a piece of tape along the edge of the folded flap.  (NOTE: A very fine line of glue can also be carefully applied instead of taping, as long as the ribbon can move freely through the flap.)  Continue adding all the "flags" leaving a small space between words.  Tie a loop for hanging at each end. Two bows were formed using a 1/2" patriotic ribbon and wired to the end loops after hanging the banner.
An additional quick and easy patriotic decoration -
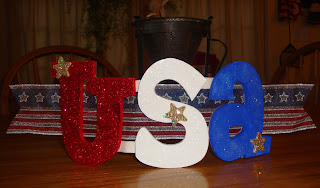
For this project I painted wooden letters in red, white and blue.  Glittered each letter with  a coordinating glitter. Each letter is glued onto length of wired ribbon. A 3/4" wooden block is glued to the back of each letter along the bottom as a stand. Apply a small wooden, gold glittered star to each letter for easy embellishment.

Julie McGuffee has another "give away" for the blog readers once again.  Please check out her blog for the prize and directions.  So get hopping -   hit the craft connection button after reading here and see what patriotic ideas you can find.  Since this is probably my favorite color combination, I will be looking for ideas too.