Just a little bit of sparkle can dress up anything. Thanks to Connie Crystal for the opportunity to work with some of the products. Find some sparkling ideas on the Sparkle blog.
There are a number of other designers who are also participating in this manufacturer challenge using products from Connie Crystal. This product is new to me and I can see many uses for the crystal sheets to add some extraodinaire glitz to a wide variety of projects.
To show off the sparkle of the crystal sheets that I received, I first created a black felt handbag as a surface. To give the bag a special finish I attached the crystal pendant that I also received onto the handbag's flap.
I cut two single strips of the crystals from the sheet. The strips were handsewn along the edge of the handbag flap, front and back. The extra was trimmed away.
From the remaining crystal sheet, I cut away a 4-square count of the crystals to create a simple pattern in the mesh. I attached it in a few places with Fabri Tac glue and then stitched around it with handsewing to hold it into place. Attach a piece of Velcro onto the flap and handbag front to help keep the bag closed.
Any plain purse or handbag can take on a whole new look with some Connie Crystal sheets.
Check out this link to see the other blog posts: DCC Pagehttp://designercraftsconnection.blogspot.com
Materials used for the project:
Kunen Glitterfelt™- Black - 4 sheets
Sewing Machine
Black Thread
Lining Fabric
Beacon Fabri Tac Glue
Connie Crystal crystal sheet - black
Tiny Scissors
Handsewing Needle
Wednesday, March 18, 2015
Wednesday, March 11, 2015
Deflecto Design Team - "Slainte" (Cheers) To The Frames
March is National Craft Month and the group of Deflecto designers are getting "crafty" this month. Please check out the ideas from the group for some inspiration and the Deflecto Facebook page. The first thoughts given to the use of any frame is of course for showing photos. For the three Deflecto frames shown here, each is being used very differently.
The Green Border 4" x 6" Frame was decorated with some ribbons and adhesive backed shamrock shapes in a very easy, simple fashion. A computer generated sign was printed with a statement and can be used as a decorative element on a table for any St. Patrick's Day celebration.
What has become another favorite of mine is the 3-Sided Frame. Simply cut three decorative papers to fit into each side of the frame. Wrap with some gold, wired ribbon, tie some bows. Add other embellishments if desired. Insert a narrow vase into the center of the frame to hold flowers. This would work as a simple centerpiece or table decoration. Use different papers, ribbons and embellishments to fit any theme or occasion for your table or buffet decorations.
The Slanted Acrylic 5" x 7" was made into a chalkboard memo board. A sheet of chalkboard material was attached with double-sided adhesive onto the frame. NOTE: Fold a strip of black card stock, the same width of the chalkboard material, and tape to the underside of this piece before applying the piece to the frame. This will act as a ledge to hold a chalkboard marker in place. Cut a decorative piece of paper to insert into the frame and tie a length of ribbon onto the top for a little decorative element.
The Green Border 4" x 6" Frame was decorated with some ribbons and adhesive backed shamrock shapes in a very easy, simple fashion. A computer generated sign was printed with a statement and can be used as a decorative element on a table for any St. Patrick's Day celebration.
What has become another favorite of mine is the 3-Sided Frame. Simply cut three decorative papers to fit into each side of the frame. Wrap with some gold, wired ribbon, tie some bows. Add other embellishments if desired. Insert a narrow vase into the center of the frame to hold flowers. This would work as a simple centerpiece or table decoration. Use different papers, ribbons and embellishments to fit any theme or occasion for your table or buffet decorations.
The Slanted Acrylic 5" x 7" was made into a chalkboard memo board. A sheet of chalkboard material was attached with double-sided adhesive onto the frame. NOTE: Fold a strip of black card stock, the same width of the chalkboard material, and tape to the underside of this piece before applying the piece to the frame. This will act as a ledge to hold a chalkboard marker in place. Cut a decorative piece of paper to insert into the frame and tie a length of ribbon onto the top for a little decorative element.
Tuesday, March 10, 2015
Arnold Grummer Papermaking Blog - Sweet and Simple Paper Casting
It's National Craft Month so there is a lot of crafting going on for many reason! Come join the fun!!!
These little basket boxes would be a sweet addition on a Easter table setting. Each is made using a die-cut box as the base. What makes them become special are "extras" added to the surface, mainly the casted images.
Paper castings are so easy to make using any of the Arnold Grummer casting molds or any variety of molds that may be available. Use this link to find a pamphlet that you can download filled with information about creating casting here.
After the paper castings are complete, the coloring can begin. For the images on boxes I chose to use both chalks and Ranger Perfect Pearl powders. The castings were trimmed of the paper around them to make them smaller and allow the papers used on the boxes to frame them. One set was trimmed straight, the other with deckle designed decorative scissors.
Box Of Chicks
Die-cut the box from white mat board. Form the box using redline tape. NOTE: One side of the box is folded to the inside of the box to create an open box. It is helpful to cut away the small flap before folding to the inside. Some glue may need to be added to hold in place. Apply dye based ink to the surface of the box. Cut four squares, slightly smaller then the sides of the box. Trim the edges if desired with decorative scissors. Glue a length of ribbon around the center of the box. Glue the Daisy casted squares at a diagonal onto two (or four sides) of the box. If using only two images, form two small bows from the ribbon and glue to the center of the two opposite sides and embellish with a button of choice.
Butterfly Basket
Die-cut the box from chipboard. Form the box with redline tape. NOTE: One side of the box is folded to the inside create an open box. Follow the same directions as above. Apply paint to the surface of the box. Cut papers to apply to the sides of the box. NOTE: I used a small sheet of handmade paper from my stash of sheets using leftover scraps for interesting effects. Glue the Butterfly squares onto the front and back of the box, centering them so background paper frames the image. Create a handle from a stiff strip of paper. Cover the handle by wrapping jute cord around the strip. Glue onto the sides of the box, then add a button for embellishment. Form a bow from desired ribbon, attach to the top, center of the handle.
These boxes show an Easter theme, but either design could be used for other occasions such as showers, weddings and birthdays or to fit any other holiday theme, buy changing colors, papers and casted images.
Other material information:
Sizzix Big Shot & Eileen Hull Box Die & Mat Board
Beacon 3-in-1 Glue
Visit the Arnold Grummer website and when placing an order use code MAR20 for a 20% saving.
Next week I will be sharing another casted idea for Easter using a different type of mold for a cute little decoration.
These little basket boxes would be a sweet addition on a Easter table setting. Each is made using a die-cut box as the base. What makes them become special are "extras" added to the surface, mainly the casted images.
After the paper castings are complete, the coloring can begin. For the images on boxes I chose to use both chalks and Ranger Perfect Pearl powders. The castings were trimmed of the paper around them to make them smaller and allow the papers used on the boxes to frame them. One set was trimmed straight, the other with deckle designed decorative scissors.
Box Of Chicks
Die-cut the box from white mat board. Form the box using redline tape. NOTE: One side of the box is folded to the inside of the box to create an open box. It is helpful to cut away the small flap before folding to the inside. Some glue may need to be added to hold in place. Apply dye based ink to the surface of the box. Cut four squares, slightly smaller then the sides of the box. Trim the edges if desired with decorative scissors. Glue a length of ribbon around the center of the box. Glue the Daisy casted squares at a diagonal onto two (or four sides) of the box. If using only two images, form two small bows from the ribbon and glue to the center of the two opposite sides and embellish with a button of choice.
Butterfly Basket
Die-cut the box from chipboard. Form the box with redline tape. NOTE: One side of the box is folded to the inside create an open box. Follow the same directions as above. Apply paint to the surface of the box. Cut papers to apply to the sides of the box. NOTE: I used a small sheet of handmade paper from my stash of sheets using leftover scraps for interesting effects. Glue the Butterfly squares onto the front and back of the box, centering them so background paper frames the image. Create a handle from a stiff strip of paper. Cover the handle by wrapping jute cord around the strip. Glue onto the sides of the box, then add a button for embellishment. Form a bow from desired ribbon, attach to the top, center of the handle.
These boxes show an Easter theme, but either design could be used for other occasions such as showers, weddings and birthdays or to fit any other holiday theme, buy changing colors, papers and casted images.
Other material information:
Sizzix Big Shot & Eileen Hull Box Die & Mat Board
Beacon 3-in-1 Glue
Visit the Arnold Grummer website and when placing an order use code MAR20 for a 20% saving.
Next week I will be sharing another casted idea for Easter using a different type of mold for a cute little decoration.
Monday, March 2, 2015
Designer Craft Connection - Crafting for National Craft Month
March marks National Craft Month!!! This month we will be sharing ideas, tips and recreating projects that we have seen somewhere and always wanted to try.
I have many, many "saved" ideas in my files with hopes of someday getting time to try them. With the creation of Pinterest, another way was presented, to find and save so many wonderful ideas. One of the pinboards that I created is "Projects to Try"and there is where my ideas came from.
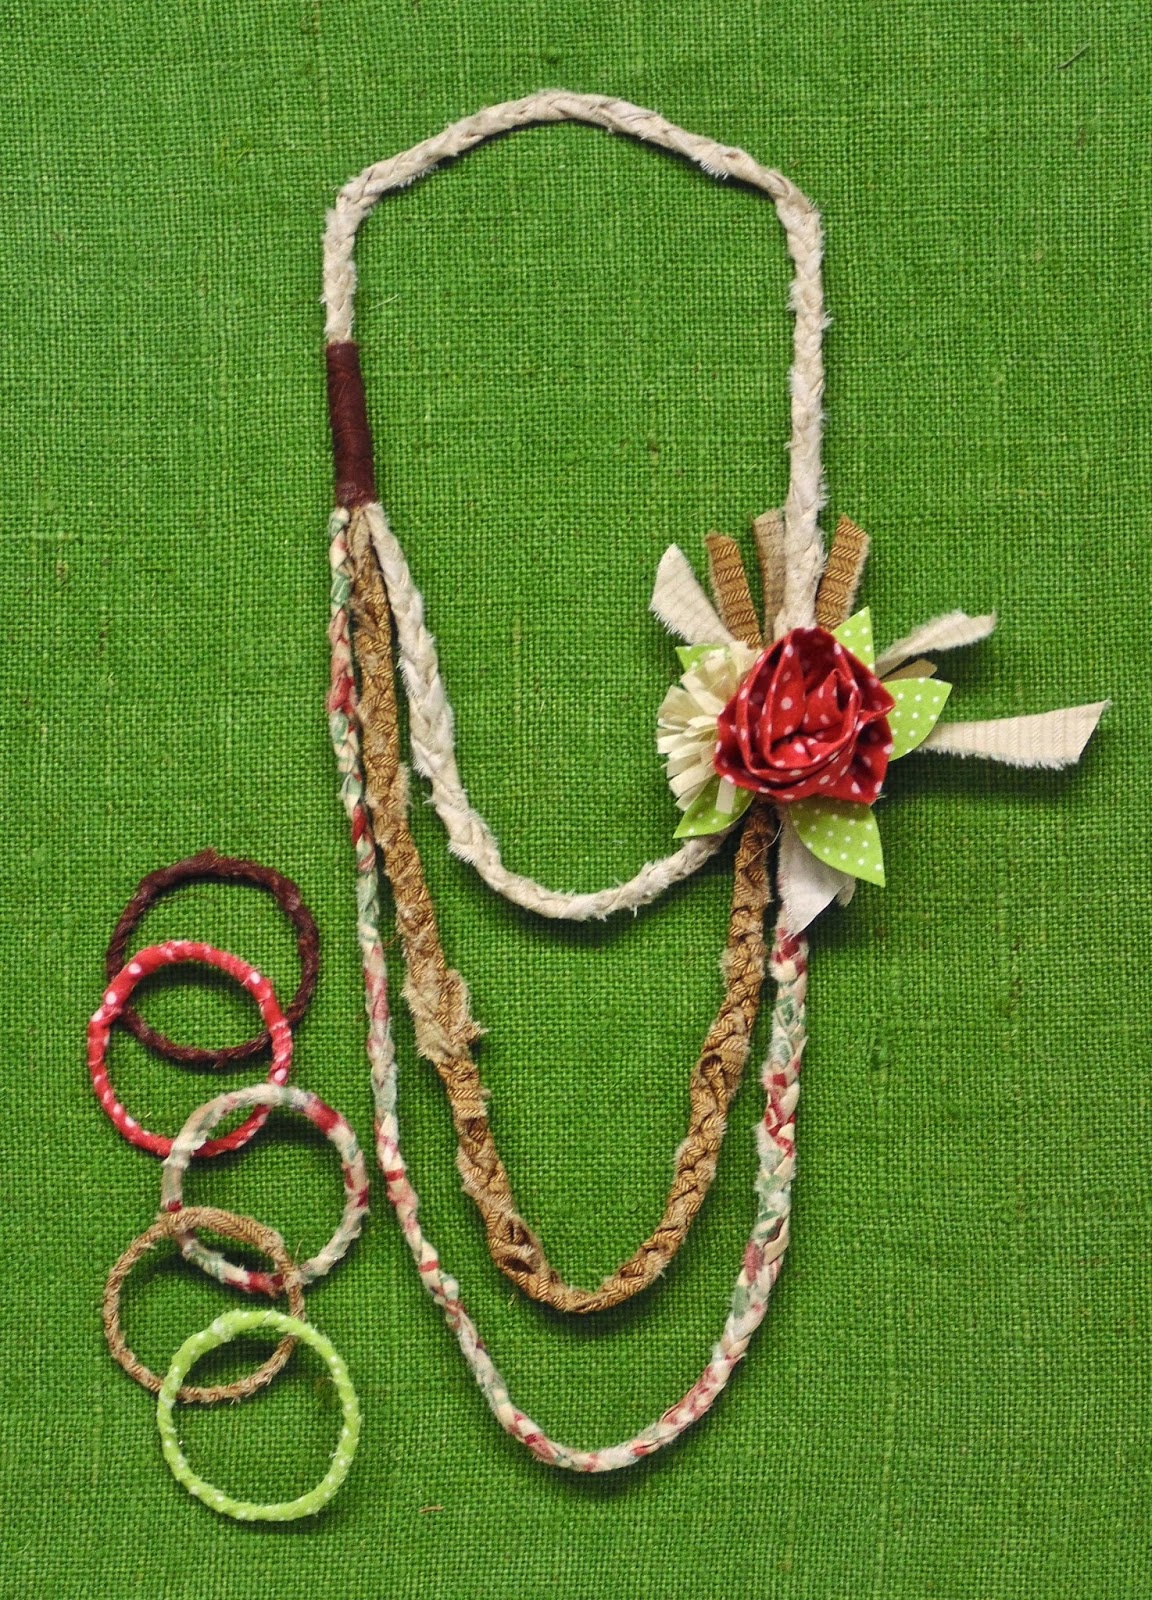
These projects use one of my favorites - fabric! The links for the "pins" for both the braided necklace and the wire wrapped bangles are found here:
Fabric Scrap Necklace
Fabric Wrapped Bracelets
Each of these links give some instructions and visuals to follow also. I took liberties with the instructions to make the necklace and bangle bracelets suit my taste.
This simple, light jewelry can be made from scraps of fabrics in any color combinations you would like. Colorful combinations would be fun for summertime accessories on solid colored tops or dresses.
I chose left over fabric scraps from a recent quilting project. To make the braids for the necklace, tear the fabric into 1" strips. If the pieces need to be longer, knot two strips together before braiding. NOTE: The knots become part of the braid. Use safety pins to hold the three strips together to help make the braiding easier. Three various lengths of braids create the necklace.
To cover the area where the layers of braids are sewn together on one side, use a small piece of contrasting fabric and sew to cover. On the opposite side, create an embellishment of your choice to cover this spot. Two fabric flowers and leaves are made to be attached to this area.
After completing the necklace it only made sense to continue by making some easy bangle bracelets. Heavy gauge wire, fabric strips and a little glue are all that's needed. Tear the fabrics into 1" strips. Start wrapping the fabric around the wire bangle. NOTE: Glue the end of the strip to the wire, overlapping the fabric to itself at the end. Continue to wrap around the wire bangle till the end of the strip. Glue the end onto the wrapped fabric to hold. NOTE: Use inexpensive metal or plastic bangles if available.
While trying to decide just what I would be sharing in this post, and the going over some of my Pinterest pin boards for ideas, I have become inspired to try several more ideas and what better time then now - National Craft Month!
Now take some time to check out the other designers post, just use the Designer Craft Connection button located in the right sidebar to see other ideas, tips and a giveaway.
This "crafty" month will bring another manufacturer challenge from Connie Crystal so check back!
I have many, many "saved" ideas in my files with hopes of someday getting time to try them. With the creation of Pinterest, another way was presented, to find and save so many wonderful ideas. One of the pinboards that I created is "Projects to Try"and there is where my ideas came from.
These projects use one of my favorites - fabric! The links for the "pins" for both the braided necklace and the wire wrapped bangles are found here:
Fabric Scrap Necklace
Fabric Wrapped Bracelets
Each of these links give some instructions and visuals to follow also. I took liberties with the instructions to make the necklace and bangle bracelets suit my taste.
This simple, light jewelry can be made from scraps of fabrics in any color combinations you would like. Colorful combinations would be fun for summertime accessories on solid colored tops or dresses.
I chose left over fabric scraps from a recent quilting project. To make the braids for the necklace, tear the fabric into 1" strips. If the pieces need to be longer, knot two strips together before braiding. NOTE: The knots become part of the braid. Use safety pins to hold the three strips together to help make the braiding easier. Three various lengths of braids create the necklace.
To cover the area where the layers of braids are sewn together on one side, use a small piece of contrasting fabric and sew to cover. On the opposite side, create an embellishment of your choice to cover this spot. Two fabric flowers and leaves are made to be attached to this area.
After completing the necklace it only made sense to continue by making some easy bangle bracelets. Heavy gauge wire, fabric strips and a little glue are all that's needed. Tear the fabrics into 1" strips. Start wrapping the fabric around the wire bangle. NOTE: Glue the end of the strip to the wire, overlapping the fabric to itself at the end. Continue to wrap around the wire bangle till the end of the strip. Glue the end onto the wrapped fabric to hold. NOTE: Use inexpensive metal or plastic bangles if available.
While trying to decide just what I would be sharing in this post, and the going over some of my Pinterest pin boards for ideas, I have become inspired to try several more ideas and what better time then now - National Craft Month!
Now take some time to check out the other designers post, just use the Designer Craft Connection button located in the right sidebar to see other ideas, tips and a giveaway.
This "crafty" month will bring another manufacturer challenge from Connie Crystal so check back!
Wednesday, February 11, 2015
Deflecto Design Team - Hearts & Flowers
Three lovely frames all on there own - can take on a new look with various crafting supplies and techniques.
The easiest way to transform a simple clear acrylic frame is with a sheet of stickers. A sticker sheet, with a variety of hearts that are placed around the outside edges of the frame is so simple that this could be used as a party favor, as a give away or a group project. Add a decorative paper if desired or just add a wallet size photo to the frame. Tie on a cord or ribbon also, if desired. (NOTE: Any themed stickers could be used for this project. Make at a birthday party or sleepover.)
This is my favorite frame to embellish. I absolutely love the look of frames like this with only a photograph inside, but it sure lends itself to many ways to add some special touches. Continuing with the "heart" theme - a simple washi tape design was placed onto the back panel of the frame. Add a trimmed photo. After the frame is placed back together a ribbon and bow was added, along with some stick-on red jeweled hearts. (NOTE: Any look can be achieved with this frame.)
The final acrylic frame comes with a colored border that a narrow strip of ribbon outlines. A photo mat was cut to fit the frame from a textured paper before adding a photo. A variety of paper flowers were created from various types of papers, then placed to adorn the corners of the frame. (NOTE: All the flowers and leaves are made using die-cuts.)
Check out the Deflecto Crafts Facebook page for ideas and information!
The easiest way to transform a simple clear acrylic frame is with a sheet of stickers. A sticker sheet, with a variety of hearts that are placed around the outside edges of the frame is so simple that this could be used as a party favor, as a give away or a group project. Add a decorative paper if desired or just add a wallet size photo to the frame. Tie on a cord or ribbon also, if desired. (NOTE: Any themed stickers could be used for this project. Make at a birthday party or sleepover.)
This is my favorite frame to embellish. I absolutely love the look of frames like this with only a photograph inside, but it sure lends itself to many ways to add some special touches. Continuing with the "heart" theme - a simple washi tape design was placed onto the back panel of the frame. Add a trimmed photo. After the frame is placed back together a ribbon and bow was added, along with some stick-on red jeweled hearts. (NOTE: Any look can be achieved with this frame.)
The final acrylic frame comes with a colored border that a narrow strip of ribbon outlines. A photo mat was cut to fit the frame from a textured paper before adding a photo. A variety of paper flowers were created from various types of papers, then placed to adorn the corners of the frame. (NOTE: All the flowers and leaves are made using die-cuts.)
Check out the Deflecto Crafts Facebook page for ideas and information!
Friday, February 6, 2015
Designer Craft Connection Manufacturer Challenge - Offray Ribbon
Participating in manufacturer challenges are always fun and surprising. This challenge, using a variety of Offray® ribbons was not any different.
Of the five different ribbon bolts that I was sent, the wired, printed bolt was where I felt I should draw my inspiration. The color combination that I received made me think of the beach and outside entertaining.
Picture this tablesetting on a porch or patio or even a beach blanket. The placemat was woven using the 1 1/2" wide wire edged printed ribbon, along with both the natural and white 3/8" grograin ribbons.
The ribbons along the four sides are held in place with Beacon® Fabri Tac™ glue, then machine sewn around the edge. Trim neatly and the ends folded to the back and glued with Fabri Tac™.
A simple and no-sew napking ring was formed from a piece of thick white canvas, cut 1 1/2" wide and 7" long. A piece of the same ribbon is glued to one side of the canvas. Form the ribbon covered strip into a circle and glue to ends to together, overlapping about 1/2". Embellish the napkin ring with a starfish.
To add to the tablescape I repurposed an empty candle jar into a vase. Lengths of the natural 3/8" grograin ribbon was cut into strips long enough to fit on the candle jar from the top, down around the bottom, and up to the top of the jar (plus adding an additional 2"). Use Beacon® 3-in-1 glue to add the ribbon strips to the outside of the candle jar. Cut two circles from felt for the bottom of the jar. Cut a small circle from the center of each. Glue the two layers to the bottom. Trim the ribbons at the top evenly and then glue to the inside edge. To finish the vase, glue a length of the same ribbon near the top and a starfish for embellishment.
Each of these projects could be made with other colors and widths of other Offray™ ribbons for any desired theme or look. There was one more project that is not quite completed, using the other ribbons that I received. Once finished I will add it to this post. NOTE: This will be a longer table runner, made with the two grograin ribbons and the 1 1/2" white and natural organza ribbons that I received. It will be woven like the placemat and finished in the same way. Once completed, I may sew the printed ribbon as a binding around the edges. A table runner made using sheer ribbons, mixed with a sturdier grosgrain, would add to any tablescape. White for weddings, colors to suit any holiday.
Photos of woven runner before and after binding of the wired and printed ribbon was added:
Ribbon is for much more than bows - the manufacturer challenge should prove that point. Enjoy the many ideas and designs you fill find in the participating blogs. Thank you OFFRAY™ for this opportunity!
Of the five different ribbon bolts that I was sent, the wired, printed bolt was where I felt I should draw my inspiration. The color combination that I received made me think of the beach and outside entertaining.
Picture this tablesetting on a porch or patio or even a beach blanket. The placemat was woven using the 1 1/2" wide wire edged printed ribbon, along with both the natural and white 3/8" grograin ribbons.
The ribbons along the four sides are held in place with Beacon® Fabri Tac™ glue, then machine sewn around the edge. Trim neatly and the ends folded to the back and glued with Fabri Tac™.
A simple and no-sew napking ring was formed from a piece of thick white canvas, cut 1 1/2" wide and 7" long. A piece of the same ribbon is glued to one side of the canvas. Form the ribbon covered strip into a circle and glue to ends to together, overlapping about 1/2". Embellish the napkin ring with a starfish.
To add to the tablescape I repurposed an empty candle jar into a vase. Lengths of the natural 3/8" grograin ribbon was cut into strips long enough to fit on the candle jar from the top, down around the bottom, and up to the top of the jar (plus adding an additional 2"). Use Beacon® 3-in-1 glue to add the ribbon strips to the outside of the candle jar. Cut two circles from felt for the bottom of the jar. Cut a small circle from the center of each. Glue the two layers to the bottom. Trim the ribbons at the top evenly and then glue to the inside edge. To finish the vase, glue a length of the same ribbon near the top and a starfish for embellishment.
Each of these projects could be made with other colors and widths of other Offray™ ribbons for any desired theme or look. There was one more project that is not quite completed, using the other ribbons that I received. Once finished I will add it to this post. NOTE: This will be a longer table runner, made with the two grograin ribbons and the 1 1/2" white and natural organza ribbons that I received. It will be woven like the placemat and finished in the same way. Once completed, I may sew the printed ribbon as a binding around the edges. A table runner made using sheer ribbons, mixed with a sturdier grosgrain, would add to any tablescape. White for weddings, colors to suit any holiday.
| Uncomplete, woven table runner using sheers and grosgrain ribbons. |
Ribbon is for much more than bows - the manufacturer challenge should prove that point. Enjoy the many ideas and designs you fill find in the participating blogs. Thank you OFFRAY™ for this opportunity!

Tuesday, February 3, 2015
Arnold Grummer Papermaking - Love Is In The Air
The holidays came and went in an instant, January found me traveling to Califonia to a Craft & Hobby Industry trade show and then off to visit family,and there went January! It's been a while since the last post I shared on paper making. Now that February has arrived I still felt the need to spread a little LOVE!
Being fond of banners of all type, I once again created this one using the "bordering technique" on each handmade paper sheet made using the pour method to create the panels of the banner. For an excellent source for adding color by bordering, and so many other techniques, I would recommend a copy of "trash-to-treasure paper making" by Arnold Grummer.
Some hearts are made using the triple heart template and red paper pulp.

After each sheet was complete embellishing began. Red burlap is used to off-set the digital die-cut letters from black card stock. Using fabric with small white hearts, I ironed on a fusible webbing to the scrap of fabric. The top strips were then cut using a Sizzix Big Shot and a border die. From red card stock rosettes are cut and formed. The white centers of the flowers are die-cut from a white glitter craft foam, finished with a small green button. Three leaves for each flower rosette are cut from a solid green paper. Iron on the fusible backed border and glue all the other elements onto each paper panel using Beacon™ 3-in-1 glue. Attach each finished panel to jute cording with small binder clips.
Visit the Arnold Grummer website for products, videos and more. If making a purchase this month use the coupon code - Two20 - when ordering for a 20% discount.
Materials needed:
Pour Mold
Triple Heart Template
Blender
Baster
White paper scraps
Red paper scraps
Red burlap
Black cardstock
Red cardstock
Green cardstock
White glitter craft foam
Small round buttons
Beacon 3-in-1 glue
Jute cording
Small binder clips
Heart fabric scraps
Iron-on fusible
Being fond of banners of all type, I once again created this one using the "bordering technique" on each handmade paper sheet made using the pour method to create the panels of the banner. For an excellent source for adding color by bordering, and so many other techniques, I would recommend a copy of "trash-to-treasure paper making" by Arnold Grummer.
Some hearts are made using the triple heart template and red paper pulp.
After each sheet was complete embellishing began. Red burlap is used to off-set the digital die-cut letters from black card stock. Using fabric with small white hearts, I ironed on a fusible webbing to the scrap of fabric. The top strips were then cut using a Sizzix Big Shot and a border die. From red card stock rosettes are cut and formed. The white centers of the flowers are die-cut from a white glitter craft foam, finished with a small green button. Three leaves for each flower rosette are cut from a solid green paper. Iron on the fusible backed border and glue all the other elements onto each paper panel using Beacon™ 3-in-1 glue. Attach each finished panel to jute cording with small binder clips.
Visit the Arnold Grummer website for products, videos and more. If making a purchase this month use the coupon code - Two20 - when ordering for a 20% discount.
Materials needed:
Pour Mold
Triple Heart Template
Blender
Baster
White paper scraps
Red paper scraps
Red burlap
Black cardstock
Red cardstock
Green cardstock
White glitter craft foam
Small round buttons
Beacon 3-in-1 glue
Jute cording
Small binder clips
Heart fabric scraps
Iron-on fusible
Monday, February 2, 2015
Designer Craft Connection - I LOVE This Tool!
February's blog theme was to choose a technique or tool that I LOVE. For me that's a tough choice!
If I am not making a quilt or clothing, I can honestly say that my "go to" tool seems to always be my Sizzix Big Shot™ and dies. Whether designing a project for a gift, shared ideas or myself, I normally find some way to include the use of these items. No matter what type of materials I could be working with, it's still the most used tool in my workroom. Cutting fabric, felt, metal, thin plastics and wood, cork, chalkboard and magnetic sheets, I LOVE this little machine.
Make simple decorations or more intricate ones with the wide variety of shapes available from Sizzix.
I made this simple "String of Hearts" in a couple hours yesterday with scraps of red papers and a set of Sizzix Heart Thinlits™ nesting dies and the Big Shot™.
Simply cut four hearts from different papers for each various sized hearts. Fold each of the heart shapes in half. Glue the hearts together. Before gluing the last fold of the fourth heart, insert bakers twine along the middle fold of the hearts. Space each different sized heart on the twine, spacing evenly. Form a loop at the top of the string for hanging. (NOTE: I began the heart placements at the bottom of the twine by placing two small jeweled red hearts at the very end of the twine, followed by two larger jeweled hearts. Then continue with the sets of paper hearts - smallest to largest - up the twine to the hanging loop.)
I just made the one string, but I could see making a few more to hang along the arched area above the fireplace for decoration. These hearts could be made from white papers and used for a wedding theme decoration, or switch out the shapes and use snowflakes, holly leaves, fall leaves, egg shapes, just to name a few, for other holiday decorations. These were made from paper scraps, but consider using fused fabric, felt or fun-foam for a start.
If I am not making a quilt or clothing, I can honestly say that my "go to" tool seems to always be my Sizzix Big Shot™ and dies. Whether designing a project for a gift, shared ideas or myself, I normally find some way to include the use of these items. No matter what type of materials I could be working with, it's still the most used tool in my workroom. Cutting fabric, felt, metal, thin plastics and wood, cork, chalkboard and magnetic sheets, I LOVE this little machine.
Make simple decorations or more intricate ones with the wide variety of shapes available from Sizzix.
| Use nested heart thinlit dies (6) and two sizes of red jeweled hearts at bottom of string |
Simply cut four hearts from different papers for each various sized hearts. Fold each of the heart shapes in half. Glue the hearts together. Before gluing the last fold of the fourth heart, insert bakers twine along the middle fold of the hearts. Space each different sized heart on the twine, spacing evenly. Form a loop at the top of the string for hanging. (NOTE: I began the heart placements at the bottom of the twine by placing two small jeweled red hearts at the very end of the twine, followed by two larger jeweled hearts. Then continue with the sets of paper hearts - smallest to largest - up the twine to the hanging loop.)
I just made the one string, but I could see making a few more to hang along the arched area above the fireplace for decoration. These hearts could be made from white papers and used for a wedding theme decoration, or switch out the shapes and use snowflakes, holly leaves, fall leaves, egg shapes, just to name a few, for other holiday decorations. These were made from paper scraps, but consider using fused fabric, felt or fun-foam for a start.
Subscribe to:
Posts (Atom)