Showing posts with label seasonal. Show all posts

Monday, September 21, 2020

The Great Outdoors ... Brought Inside

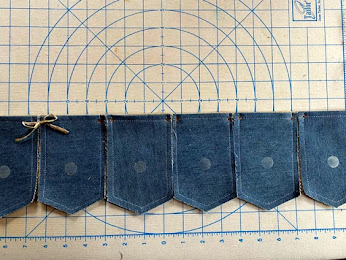
The term "the great outdoors" can conjure up many different ideas.  At this moment, and for this project it is to create something to bring bits of nature inside.  Using the Eileen Hull Tiny Book Case die, I came up with this banner to represent a tiny bit of the outdoors for display somewhere in the inside, plus with a twist.


Materials

Eileen Hull die, Tiny Book Case
Eileen Hull die, homemade alphabet, thinlit
Eileen Hull dies, book plate & labels, thinlit

Various Sizzix dies, 660694, 663607, thinlit

Fabric, lightweight denim
Fusible lightweight interfacing, Pellon soft-flex
Iron
Sewing machine
Thread
Hole punch
Eyelets
Eyelet setter
Jute cording, thin
Raffia ribbon
Metallic-like card stock
Coordinating card stock and decorative paper
Foam adhesive
Metallic foil, patina and copper
Velcro thin clear fasteners
Artificial/real elements for placing inside pockets.


INFO, TIPS & IDEAS TO CONSIDER BEFORE BEGINNING
  • When creating with die-cut shapes by Eileen, I usually like to find ways to combine a variety of materials within the projects.  Experimenting is fun!
  • When working with fabrics it is helpful to use some type of backing for many projects to add body to the fabricmif it helps the design.
  • The type of backing can change depending on the project. There are a variety of fusible and backing adhesives that could be used. 
  • If the design calls for sewing with a machine, use a backing/interfacing that is meant for sewing. (Some interfacings can “gum up” the sewing machine needles.) Be aware!
  • The pockets can be filled with any variety of elements. Use all dried naturals or purchased plant-like stems or flowers or a mix of both.  If ambitious, create plant stems or flowers from die-cuts. 
  • This banner can be made to be reversible if desired. Use the same fabric for both sides or a different color/type for the other. 
  • To connect the pockets, they are tied together using a raffia type ribbon, but thin cord, jute, or ribbon can be used.
  • Gather all supplies before beginning. 

Instructions
  • Select fabric for pockets. Cut 2 pieces for each pocket needed of the main fabric and backing. 
  • Add a backing of choice to the main fabric for each piece.
  • When complete, die-cut each fabric backed pocket piece using the the Tiny Bookcase die.

  • After cutting all pieces needed, mark each for trimming away part of the section with the "V" and the side box flaps. Refer to photo.

  • Once all pieces are marked, trim the "V" section along the mark. Then fold the edge over, so the folded top edge of the pocket aligns with the top of the two side box flaps, as in the photo.  

  • Press the folds of each piece before trimming away the side box flaps. Then stitch on the sewing maching across the top edge of each about 1/4" from the fold. 
  • Match up two pieces, pin if necessary to hold in place. Stitch around the sides and bottom "V" to form each  pocket. Use about a 1/4" seam around the edge. 
  • When all the pockets are formed,  punch a hole with a tool and add an eyelet into each hole.  These holes will be for connecting the pockets together with raffia, cord or ribbon. Refer to the photo to see the eyelet placement and the tying between the pockets.

  • Add a length of thin jute cording to the last eyelet on each end before also tying a bow in each end eyelet. Refer to photo. The cord was looped through the eyelet, then one end of the cord was fed back through to tie a knot to hold it in place.
  • Use clear, thin velcro circles for holding the letter labels on the front of the pockets. Align them on each as shown in the photo. This is side of the velcro circles that are a bit stiffer then the reverse piece. 
  • To create the letter labels, I choose to layer together a decorative paper and a solid card stock with a foam adhesive sheet together.  Die-cut the shape for labels from the layered papers. NOTE: I choose to make 2 sets of changeable words, using a different die design for each. Plus used a different top paper. 
  • Each of the labels are glued onto a die-cut frame, cut from metallic card stock.
  • To make the letters to spell out the words, metallic foil was placed onto one side of foam adhesive, cut and then placed in the center of each label shape.


  • Add the other side of the clear thin Velcro dots to the backs of the letter labels. Press them into place onto the pockets over the opposite Velcro dot. 


Now find a good spot to hang the banner and bring a little bit of the great outdoors inside!

Tuesday, June 30, 2020

Christmas In July - New Die Release

A MESSAGE FROM EILEEN HULL:

Thanks for coming to the Eileen Hull/Sizzix Chapter 3 Release Party Blog Hop! Check out the creative ways the Inspiration and Education Teams have used the Mitten and Snowman dies! We hope that you will be inspired too and share how you use the dies in the Eileen Hull Fan Club.

But wait, there’s more - the Release Party continues! You won’t want to miss the Facebook Live at Eileen Hull Designs at 12:00 noon Eastern time on Wednesday, July 1! Join the chat- and a random commenter will win the Snowman die. We are so glad you joined us to celebrate the Chapter 3 release.

Please hop with us through all of the projects and leave comments on the different designers' blogs. A lucky commenter will win the Mitten Box die…


Never too early to begin thinking ahead to Christmas!  New dies being released conjure up inspiration and new ideas.  Eileen Hull has added two steel rule dies with a Winter theme. Here are my first attempts using these new designs.


Mitten Book

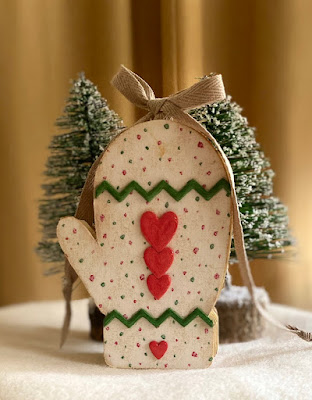
This little book combines all the piece from the die to create a little book with an accordion style spine to hold pages and easy embellishments. It uses a cotton fabric added to the covers. Fabric can be added to the mat board using various forms of adhesives. Coming from a sewing background, with the desire to experiment with a variety of products, I’ll be using an iron on fusible for the mitten covers. It’s something you may not have tried or thought of but it does work! I will share tips.


  • Cover both sides of mat board with fabric using fusible adhesive. Use a piece of mat board large enough to cut two mitten shapes. 
  • From solid color card stock, cut mitten shapes for pages.
  • Cover a piece of mat board for the box shape with decorative paper on both side, then cut one shape. Remove/cut away the two small side flaps. 


  • Cut a rectangle pieces from card stock for the accordion folded spine, measuring 2” x 6” approximately. Using a scoring board and tool, make score lines 3/8" apart, along the strip of paper. Accordion fold the piece. (Diagrams for folding and gluing below. The finished folded spine was trimmed to the length of 5 1/8" long.)


  • If adding pockets for tags on the pages, apply them before assembling the book. (The credit card cut was folded under to make a shorter pocket for the tag -2 1/4".)


  • Cut and place of double-sided tape to one mountain fold on spine to attach the pages.
  • Cut 2 pieces of flat braid for the ties, 12"-13". Glue the braid from bottom edge of mitten piece, down the center to top of mitten piece. Repeat for other cover. 


  • Glue the paper covered base to the inner covers of each mitten piece. Aligning the bottom edge of mitten with the folds of the base piece. Hold in place with binder clips till glue dries. 


  • Attach each page onto the folded spine .
  • Color the hearts and zig-zag shapes; glue to embellish the front and bach covers. (NOTE: The shapes were coated with Glossy Accents.)

TIPS:  To use iron-on fusible it's best to follow instructions on product. DO NOT use steam (it can warp the mat board). Lay the fusible onto the backside of the fabric; press to adhere. Remove the backing sheet and place onto the mat board, then press with iron to adhere. Die-cut the shapes, if any edges lift, re-press with iron.
NOTE: I would be happy to answer further questions about the project and materials if requested. 

Materials

New Eileen Hull Sizzix Die, Box, Mittens
Eileen Hull Sizzix Die, Credit Card Sleeve & Tags 662810
Mat board
Cotton fabric
Fusible adhesive (I use Thermoweb Heat n Bond Ultra Hold)
Decorative paper for box base, pockets
Card stock, pages
Card stock, accordion fold spine, tags
Scoring board, scoring tool
Adhesive tape
Flat braid, ties, 24”
Ribbon
Inks or paints
Glue
Paint brush
Ranger Glossy Accents 
Binder clips


Snowman Cards


The cuts from the new Snowman Box die are used here to create the two cards. The same idea could be used on a canvas board for display. Again a variety of materials can be used for cutting any of the pieces on this steel-rule die. Some suggestions are to use fabric for the background, hats or scarves. Use felt or batting for the snowman or snow cloud. 

  • Cut or tear paper or fabric for card background. Attach the background by sewing or gluing onto card front.
  • Apply modeling paste onto the snow cloud piece using a brush or pallet knife. Set aside to dry.
  • Paint the snowman piece with a shimmery, metallic white acrylic paint. Set aside to dry.
  • Paint twig arms, carrot nose, coal eyes and top hat (or any of the other pieces) appropriate colors. (NOTE: All the extra pieces could also be cut from papers or other materials.)
  • Apply washi tape to stocking cap, scarves and top hat band.
  • Arrange and glue all the pieces onto front of cards as desired or shown. 
  • Add a pom-pom to stocking cap; green sprig and red berry to hat.
  • Punched snowflakes and evergreen springs are added for extra background embellishments. 
Materials

New Eileen Hull Die - Box, Snowman
Paint, TCW Shimmery Goodness
TCW Light & Fluffy Modeling Paste
Blends inks, Nutmeg, Ebony
Orange paint
Washi tapes
Decorative background papers
Green, white paper scraps
Punches, snowflakes, greens
Glue
Pom Pom
Paint brush

This is a group blog hop to promote Eileen's latest dies. 

Here is the list of participants to use too!  Just another way to visit each of the  individual blogs.

Friday, September 16, 2011

Autumn

"No spring nor summer beauty hath such grace, as I have seen in one autumnal face."
-John Donne

September first to me ushers in Autumn.  This is the season I enjoy the most. Because of family health issue the Summer season came and went for me.  Honestly with the extreme weather we had this year, just like much of the country, I missed much of the hot temps, and that is OK with me.

There is a change in the air the past few days and signs that seasons are changing.  I spent a little time today bringing out some of the seasonal decorations.  I think a banner needs to be created for the fireplace mantle.  What material should I use? What should it say?  I'll share the finished project as soon as it's complete.

I came across a wonderful magazine a few weeks back while making a quick stop at the store. I'm always looking for new magazines to browse through. This is a new one to me but enjoyed all the wonderful ideas throughout the publication. The photography is wonderful and filled with decorating ideas for many styles. Autumn Cottage is one of those magazines that I will place where all can share and enjoy flipping through.

Some other favorites that will remain on the coffee table for constant viewing during the season:

 Country Sampler - love reading how others decorate with the country style and seeing so many interesting country designs.

Midwest Living - especially at this time of the year, this magazine shares many ideas for areas around us.

Martha Stewart Halloween (Special Edition) - always filled with many ideas that I can learn from and share with family.


Flea Market Style Fall/Winter 2011 -  a must have for anyone who loves to hunt for "junk".

Check them out!