Showing posts with label handmade crafts. Show all posts

Tuesday, October 26, 2021

TCW Meets Sizzix

An opportunity to work with two different companies products is always fun!  The Crafters Workshop was kind to offer a samples to work with along with Eileen Hull’s Sizzix dies.  I’m lucky enough to be a somewhat familiar with the stencils and products from TCW and the little project I’m sharing here shows a way. 


Combining the base shape from Eileen’s new Notepad die, her new damask stamp by Maker Forte, TCW(The Crafters Workshop) stencils and paints and other assorted materials and a technique for creating backgrounds from another mixed media designer, Rebekah Meier, I ended up with my own interpretation and a smaller version of “prayer flags”. 


NOTE:

Here’s a little information on the meaning behind “prayer flags”: Traditionally prayer flags are used to promote peace, compassion, strength and wisdom to everyone. By hanging flags in high places, the “Lungta” (wind horse) will carry the blessings depicted on the flags to all beings. As wind passes over the surface of the flags, which are sensitive to the slightest movement of the wind, the air is purified and sanctified by the (sacred utterances) Mantras. 

There are usually five colors on traditional prayer flags; blue - representing the sky, white - representing the air, red - symbolizing fire, green - symbolizing water and yellow-symbolizing the earth.  All five colors together signify balance. 

Information about traditional prayer flags and creative ideas for making, sharing and using more updated  prayer flags are easy to find on the internet.  

Materials

Eileen Hull Sizzix Notepad die (66588)

Eileen Hull Maker Forte stamp, vintage damask

TCW Stencils, #944s and other assorted designs

TCW Stencil Butter paints

Archival ink pad, brown

Acrylic paint, white

Distress Oxide sprays

TCW Clear Gesso, matte

Brush

Cosmetic sponges

Palette knife

Pellon EZ Steam II fusible web

Printed napkin

White cotton fabric

Iron

Pressing board

Flat braid or ribbon, 1/2” wide 

Verse stamps

Fabri-Tac glue

Stampers Anoonymous Tim Holtz Tiny Text (CMS394)


Create background for the flags

  • Add one layer of a decorative napkin to one side of EZSteam sheet. 
  • Press slightly with iron. 
  • Brush over napkin with the clear gesso and allow to dry well. 
  • Cover with parchment paper and press lightly with iron to smooth. 
  • Stamp damask background image randomly onto napkin with archival ink. 
  • Spray randomly and lightly with distress oxide sprays; dry. 
  • Cover and iron the stamped, sprayed side well. When cool, peel the backing sheet from opposite side. 
  • Lay a piece of white cotton fabric over the adhesive and iron well to adhere to the fusible.
  • Fold and cut four pieces from sheet. 
  • Die-cut notepad shape from each piece.
  • Using the stencils and acrylic paints randomly stencil parts of the stencils onto the cut flags with cosmetic sponges. 
  • Add other design elements if desired using small bottle caps or pencil erasers for circles; the edge of an old keycard or palette knife for lines.  

  • Stamp or hand print a verse to add to each flag. 
  • Attach the flags onto a flat braid by sewing or gluing.  
  • If desired, hang the flags, as a collection or single, to fly near a door or window to catch the wind. If choosing to fly the flags outside, use a protective coating that can give outdoor protection.

TIPS

For ideas and information on mixed media collage techniques a good reference is an e-book by Rebekah Meier, "Paper Art Collage, mixed media layering techniques, from Bella Crafts Publishing.  Another source, if it can be found, is a pamphlet by Rebekah called Techniques for Mixed Media for Fabric Elements, by Fabric Editions, Inc. 


Monday, October 18, 2021

New Large Journal Die Is A Recipe For New Ideas

There has been a new release by Sizzix with a nice variety of designs from Eileen Hull. This post will feature the large journal die. The size brings with so many options for making some wonderful creative projects.  Of course the first thoughts include journal making and book making. Albums for all occasions can be created for personal use or gift giving.  


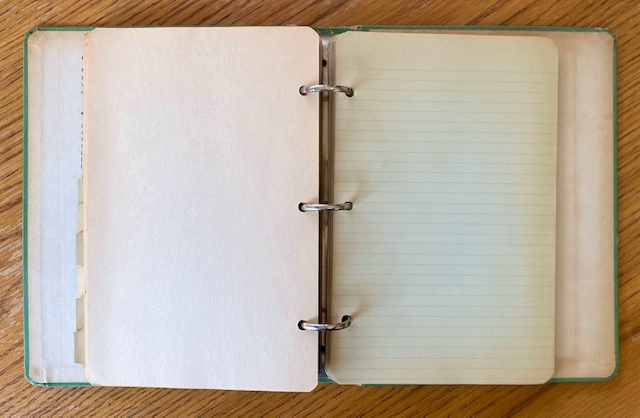
My first make with this new die was inspired by an old recipe binder that was found some time ago at a second hand store. The original binder is the exact same size as the book that was made from the die.  With a few different adaptations and editions here is a very nice book for any any size collection of recipes.


Materials

Eileen Hull Large Journal die

Eileen Hull Journal die

Eileen Teacup 3D die

Mat board

Sizzix Big Shot Plus Machine

Double sided adhesive sheets/tape

Decorative papers

Adhesive backed clear covering, matte finish

Elastic

Paper brads

Note book inserts (6" x8")

Leather cord

Hole punch

Tiny stapler


NOTES/TIPS

When the process of making this recipe book began I had not yet have the large journal die in my possession, but only the pieces already cut from mat board.  Also in my stash of decorative papers had found the perfectly "recipe" related papers to use. The related papers had to be applied to the precut mat board and then trimmed carefully around the edges with an Xacto-knife.

As mentioned above, an old find of a binder-like recipe book become the inspiration for the finished recipe book, mainly because the new Eileen Hull die was exactly the same size. 

***The older version contains dividers with food categories along with an envelope that recipe clippings can be placed. At the back of the book there are blank pages for attaching recipe clippings also and followed by lined paper for writing recipes down.***  


The inserts used in the new version are lined notebooks purchased at the near by "Dollar" store with the perfect measurement to fit the large journal. Because these notebooks come with various decorated covers some of the coordinated papers from the stash on hand were used to cover them. To create something similar to the envelope pockets of the old version, a folder was made by cutting  two pieces from coordinating papers or a heavy card stock from the orignal journal die. 

CONSTRUCTION PROCESS

  • Cover mat board with papers of choice and adhesives of choice. Both sides are covered for this project.   
  • Die cut two covers. (NOTE: Be aware if using directional papers.)  
  • Cover the front and back cover pieces, both the outside and inside areas with clear laminate material. (A matte finish, clear, transparent, adhesive backed covering was used, example: Con-Tact paper.)  
  • Decide how many inserts will be included in the book and complete the construcion of the book accordingly. 
  • Double-sided adhesive was applied to the spine to help the hold the spine together. String the spine of the journal with choice of elastic. (NOTE: This book has four individual bands strung in the spine.) 
  • For the recipe book closure: Cover two small pieces of mat board with a metallic paper. Die-cut two spoon shapes from the pieces. Attach the two spoon shapes together.  Punch holes into the spoon (Refer to photo.) 
  • Place spoon onto front cover and mark the holes onto the cover where desired. Pierce the marks. Add spoon to cover with brads.(NOTE: Longer brads may be needed.)  
  • Cut a length of leather flat cording for closure. Refer to photo and pierce holes into the back cover, equally spaced. Pierce through the leather also. (NOTE: There was some difficulty piercing the thinner leather cord, a slightly wider leather strip could be easier, this was what I had on hand.) Hold the leather strip in place with brads. 

  • Bring leather cord around the edge of recipe book, thread under the spoon shape and around and loop to close. 
  • Create the pocket folders from desired papers and the orignal journal die. Cut 2 pieces with the journal die. Fold over the spine edge on one piece. Slip the unfolded piece into the folded one and allign the holes on the two pieces. Insert small paper brads into the holes. (NOTE: Pierce through the center hole before inserting brad.)  


  • The sides of the folder are stapled with tiny staples from the front on each side to help hold clippings. 
  • Cover the insert books with coordinating papers using perferred adhesive. (NOTE: Doubled-sided tape strips were used for the project.)  Excess paper was carefully trimmed around the edges with an X-acto knife. Inserts the covered books into the journal. 


  • The folders are placed at the center of the book inserts with a strip of double-sided adhesive. 


ADDITIONAL IDEAS:  Cut the labels from card stock and place on the covers of the insert books to categorize. Or make tabs to place on the edges of the covers to categorize if desired. An extra folder can the attached to the inside back cover. 


***INCLUDING A BONUS PROJECT HERE***

Along with the large journal die, another new 3D embossing folder was included in this release. Here is a seasonal card using the sweater design for the background and also the pumpkin to showcase this design.

For the background, a textured brown paper was used along with the sweater embossing folder. To give the background the look of tweed sweater, the surface has a white ink applied to it.

Materials

Eileen Hull Large Journal die (label strip)
Various Sizzix thinlit dies (pumpkin, leaves, flower)
Big Shot Machine
Blank card/envelope
Decorative glitter paper
Orange cardstock
Brown texture paper
Printed paper/Vellum/Kraft
White ink (Blends-Coconut)
Felt scraps
Raffia ribbon
Brads


  • Cut a background layer 1/4" smaller on each side as the card size used. 
  • Cut a piece of textured brown paper for the next layer.  
  • Using the sweater 3D embossing folder, emboss the brown paper following directions for embossing. 
Using a white ink (NOTE: I used Eileen's White Coconut Blends), to shade the embossed brown paper. 
  • Cut a pumpkin like shape from a orange piece of card stock: emboss with the sweater folder also.  
  • Die-cut leaves from green felt scraps.  
  • Die-cut flower shapes from yellow felt scraps.  
  • Cut a stem from kraft colored paper scrap. 
  • Die-cut label shape from a pattern paper and vellum.  
  • Stamp a verse onto the vellum piece. Layer onto the pattern paper piece. 
  • Refer to photo position of layers and elements to finish card.

Sunday, July 25, 2021

Christmas In July Ornament Idea


With this latest release of die by Eileen Hull for Sizzix comes great shapes. For now the Ornament Box will be the one to work with for this project.

Materials

Big Shot

Eileen Hull Sizzix Ornament box die

Mat board

Decorative papers

Foil paper (Rinea papers) 

Double sided adhesive tape/sheet

Tissue paper/napkin

Foiling sheet, gold

Liquid adhesive for foiling

Gel medium

Brush

Ribbon 

Glue

Paper cutter

Gold cording

Artificial greens

TIPS

**** Just a few ideas tips of materials and the process used in creating a slightly different version with the Ornament Die***  

A decorative tissue paper was used to cover the circle die-cuts, but napkins or thin decorative papers or even fabric could also be used. Also if desired, cover the mat board with a material of choice on one side and add a foil paper or use the same type of material on both before continuing to cut them with the die.  Foil by Renea were used in this project. 

Refer to photos for cuts and sizes that were used to complete this project.  A small piece of styrofoam was cut to fit inside the inner box to hold the artificial greens in place, but that is optional. The same design could be used to hold small treats instead.  They can be hung on a Christmas tree or could be used at table settings for holiday entertaining.  The bottom of the circles could also be trimmed off to be even with the bottom of the box to stand flat for table settings. 

Paper covered inside box & front and back of covered circles


Constructing the Ornament Box

  • Die cut two circles from mat board
  • Die cut two circles from foil paper (red Rinea foil). It can be backed with double sided adhesive before die cutting or can be glued into place on the back side of the tissue covered circles.
  • Die cut one of the box component from mat board.
  • Refer to the photo that shows where to trim the four diagonal ends off the piece. 

  • Cut two side pieces from a piece of mat board that measures approximately 1 1/8” wide x 1 7/8” high.


  • Using glue or double sided adhesive tape, assemble the open box shape.
  • Cut decorative paper to cover the box shape. One piece is cut approximately 6 3/8” long x 2 3/4” (this will cover the larger sides of the box).  It a second piece of paper approximately 1” x 8 1/2”. (This will be attached to the narrow sides, bottom and over the top edges of the box piece.) 


  • Cut circles from decorative tissue or napkin for covering the mat board circles. Cut the pieces approximately 1/4” larger then the circle piece.


  • Apply the tissue to one side of the circles using gel medium and brush. Clip around the tissue so the extra tissue can bend around the edge to the back side; use the gel medium to adhere the extra tissue in place. Brush the front layer of tissue with another coat of gel medium and let dry before continuing.

  • Adhere the foil circle to the back side covering over the tissue edges; press in place well.
  •  When both circles are covered and the inner box shape is covered, created the 3 dimensional ornament by gluing the box between the circle shapes.
  • Coat the hanger shape die with foiling adhesive. Dry to tacky and rub on the gold foiling. Add another layer if needed also applying to edges and back sides. Glue into place at the top of each circle shape. 
  • Die cut 2 or more of the zigzag design from foil covered mat board
  • Apply the zigzag shaped, foil covered pieces onto the circles in any desired fashion. 
  • Insert a small spray of artificial greens into the box 
  • Add a length of cording through the hanger and knot.
  • Tie a length of ribbon into a bow and add on front near the top, near hanger.

Decorate away!


Tuesday, May 25, 2021

Creating With The Unusual


Thinking outside the box can be challenging but it helps to stretch ones imagination. There’s bound to be failures but many times it opens up creative possibilities.  Visits to any variety of shopping establishments for the the “usual” purchases can take on something entirely different with an open mind and willingness to experiment.

Besides always first searching through the items I have collected and are on hand, one of the other places I find a good spot to visit are the area “dollar” stores.  That’s exactly where I found o few items to experiment with for this very project. From a package of two manila , padded mailing envelopes comes the end project of this unconventional, padded folio.  

  • Open up the mailing envelope by cutting it open along the sides and bottom. 
  • From the two pieces cut two covers from the die. NOTE: I did not use wide (3 hole) spine. I trimmed it to 2. Also cut a spine from mat board and trimmed to a 2 hole spine to add strength. Though the spine was not used in this project for individual inserts, adding this extra piece as a re-enforcement will help if an additional inserts is desired.
  • Before reconstructing the die-cuts into a new padded folder it's best t0 remove a little of the plastic bubble lining from around the edges. This will help hold the edges together with adhesive tape or glue.

A new padded folio journal was created from the two pieces. 

The procedure is as follows:

  • Using the instructions from the tutorial by Jennie Atkinson, I made four folded folio inserts to fit the front and back covers and two more inserted to the insides. I created a large one for the back cover, a tiny one for the front following the size specifications from Jennie.The inside two are slightly smaller then large one. A big "THANKS" to Jennie for the instructions and inspiration!
  • Here is a link to Jennie's YouTube video showing the process - VIDEO LINK
  • For the small version, the measurements are:  6 x 6 patterned card stock scored at 1.75” all around and then cut as per the original tag book. Final size is 2.5” square.
  • The two inside folder folios begin with paper cut to 9 3/4" square, scored at 2 3/4" on all four sides. One folder was cut in the same way as the original instruction. One was cut with the corner square cut diagonally and folded over. (Refer to photo)
  • Inserts were made with the bookbinding die three of the folders, for placement in the center of them.  
  • Use the new thinlit die to create a waterfall insert in the fourth folder.  

Front cover small folder folio/open


Back cover large folder folio/closed

           
Back cover large folder folio/open

                   
Inside Right folder folio/closed


Open folder folio


Inside Left folder folio


Open folder folio


Materials

Eileen Hull Sizzix die, Folio Journal

Eileen Hull Sizzix thinlit, Bookbinding & Label

Eileen Hull Sizzix thinlit, card, Waterfall & Tags

Big Shot

Padded mailing envelope

Adhesive tape

Glue

Decorative papers (I selected papers from Simple Stories, Simple Vintage Farmhouse Garden collection)

Assorted embellishments from the same collection

Various other decorative papers 

Various others embellishments

Woven edge seam binding

Distress ink and applicator

Decorative edge scissors, pinking

Velcro, thin clear fasteners, 5/8”, 3/8”


Tuesday, March 30, 2021

Spring Foward with Cheery Ideas

Spring brings with it more sun, more daylight, longer days, green grass, budding trees and plants ... what's not to love! 

Here are a few little projects, old and new, to show the versatility of Eileen Hull's dies and other Sizzix dies. 

I'll begin with the basket created with the older LOAF PAN die. The die-cut piece was then  embossed and filled with little felt flowers made from another Eileen Hull thinlit die.  Wire handles are added that are made by using the TWIST & STYLE tool by Eileen also. You can find a link to the older blog post here (LINK).


Next comes one of my very favorite dies, the GIFT BOX! This die makes a great square box that can be refigured in so many ways.  Here I used it to create a square basket to hold some spring flowers. I covered poster board with fabric before cutting the shapes. The scalloped edge is also from the die and made with more poster board covered with white fabric.  The basket handle is twisted strips of torn, green fabric, again made using the TWIST& STYLE tool. 

The second piece in this photo used the Eileen Hull 3D VASE die-cut to hold the handmade, paper mache primitive bunny. 


Here is the latest little projects made using Sizzix dies.  The little bunny pins are made using the oval shape from Eileen Hull's TINY BOOK die.  The ears are cut from a leaf die-cut from the FOLIO PAGE & FLOWER thinlit die set.  The tiny felt flowers, leaves, bow and hearts are other various Sizzix dies.  Again I layered a muslin fabric to a sheet of kraft colored card stock to cut the oval and ears. I sealed the edges of the fabric shapes with some clear gesso to keep the edges from fraying too much.  A pin tack was glued to the back side of the oval.


Also the TULIP were made from a different Sizzix die and the sculpture foam. All placed on a TAG cut from another SIzzix die. These were made as little gifts to give to a few friends that I was recently able to finally see, actually in person, in a safe setting after months and months of FaceTime or Zoom meetups!

NOTE: Some of the dies used in these projects are not available through Sizzix any longer. They may possibly be found by searching online.

Sunday, August 23, 2020

Junk Journal My Way


The usual definition of a junk journal ...  A book which is often made using found and recycled materials to be used as a way to collect and record memories, thoughts, ideas and inspiration. 


Making any type of journal is always fun, making a "junk journal" can likely become more fun and maybe even a bit of a challenge.  My thoughts on creating one immediately went to creating one from fabric as the base of my journal. 

The process began with finding a variety of basic fabrics from my stash that would easily lend themselves to be used for the covers, signatures or pages.  The choices were chosen because of the neutral color, the ease of sewing and could be altered with my choice of paint, inks, stamps, stencils or other mediums.  


When making a “junk journal” it’s handy to have a great collection of all types of materials and ephemera at your figure tips. All those bits and pieces that seem to be laying around are a very good place to start. I gathered gel plate prints, stamped pieces and extra die-cuts that could be interesting additions. 


For this blog post I will be be focusing mainly on one idea.  Always wanting the challenge of experimenting with the unusual, I went to my collection of reusable/recycled materials, I will be using cereal bags to make some of the inserts for this journal. I had seen ideas using the cereal bags in various ways quite awhile ago.  How to instructions/ideas can be found by searching “how to fuse cereal bags” online. Several can be found online, along with You Tube videos.  


Working with cereal bags

  • Open the bags along the seams by pulling them apart. 
  • Wipe or wash (only if absolutly necessary) the inner side of the bags. 
  • Set iron to a medium setting (wool or nylon).
  • Lay the cereal bags to be fused onto a silicone sheet or parchment paper. Place another layer of parchment paper over the bags. Begin in center and move out to the edges with the iron moving for the fusing process. Lift cover paper to check the fusing, replace and iron again.
  • Cut, fold and stitch to make folders or pockets for journal inserts.  
Tips: Never place the iron directly onto the cereal bags, they will melt onto the iron. 
A bag from a large cereal box can be prepared and folded in half to create a decent size of fused material to work with. 

Edges can be trimmed after fusing. I like to use a acrylic ruler and craft designated rotary cutter.


Place bits of papers, threads or coloring between layers before fusing. NOTE: I've experimented with re-inkers. Results were decent and unexpected. 


  • For this journal I created two types of folder inserts and a folded pocket from the fused bags. One is a simple folded piece, cut longer in length for adding a pocket, as a page insert. 


  • A second one was created into an accordion style folder insert. It was also stitched with the pocket edge embellished with washi tape. 
  • Once the folder insert is made I stitched around the piece using a zigzag design with my sewing machine.  NOTE: The edges can be left without stitching, cut with decorative scissors or covered with washi tape. 


  • The folded pocket begins with a fused square slightly smaller then the pages length, but wider then one side of a page. Fold to create a pocket of any depth.
  • The side edges are covered with washi tape before sewing sides and bottomi onto one side of a page.  

Making the journal
  • The majority of this journal is made from various fabrics. Canvas is used for the covers plus a spine extension. 
  • Before die-cutting the covers and extra spine, the canvas was coated con one side with a clear gesso. 
  • Once covers are die-cut, add a zigzag stitch around the edges. 
  • To join the covers and spine extension refer to the photos. Once the 3 pieces are aligned, stitch them together.
NOTE: The extension expands the journal to 7 sections for inserts instead of 5.


  • The cover is embellished with a colored piece of distressed webbing (Lutradur), with a clear matte collage medium. Topped with a handstitched monogram. 
  • Cording is laced into the spine to hold the signatures instead of elastic. 
  • A length of seam binding is used for a tie plus a found button for a closure.
  • The extra length of cords are knotted along the top of the spine and held together with a scrap of the webbing. REFER to the photos.


  • Prepare fabrics for others pages by using using a sewable fusible interfacing between layers of thin fabrics. Experiment with a variety of fabric combinations. NOTE: Refer to photo for examples. I chose to use white or light neutral fabrics so that they could be painted, inked, stamped or embellished. Use a clear gesso on the fabric before stamping or stenciling or adding other mediums that could "bleed" through the fabrics.


  • Fold the prepared fabrics in half and cut from the page section on the die.  After die-cutting, stitch around the edges of each of the fabric pages.  
  • With pages cut, begin adding pockets, folders, paper bags, envelopes and any interesting inserts. 
The finishing of a junk journal may be ongoing and that's the challenge and enjoyment in making this type of journal.  My journal still has several "blank spaces" to continue adding any variety of elements to those spaces. Hope you enjoy the journey I took! 

Materials

Eileen Hull Pocket Notebook die, Sizzix

Big Shot
Various Fabrics, canvas, batting, muslin
Sewable fusible 
Clear gesso
Iron
Sewing machine
Collage medium, matte
Cereal bags
Cording or cord elastic
Various found objects