|
| Original Phone Stand |
 |
| Stand with phone |
 |
| Original gel printed tapes |
Time to share a fun technique! The new Eileen Hull Phone Stand @Sizzix can be decorated in a number of ways. One of the samples I created was done with a technique using a gel press plate and clear adhesive material. While playing around with one of the many ways to pull prints from a gel plate, I experimented with something a little different from the technique that uses clear packing tape. With nothing wider in clear tape available then the 2” rolls, I thought to give clear contact paper a try. I had two type in my possession, one clear and glossy and one clear with a matte finish. Why not give them both a try!
Cut strips from the roll of contact adhesive paper slightly wider then the width of the phone stand. Two strips should be enough to cover the phone stand.
*** Through the photos, my hope is to show the steps taken when using this technique the best way I can. All gel prints are a series of layering designs on the plate but when using the tape or contact paper the images seem to make the layering more visable. This alone gives the pulled prints a different look. ***
To make the design on the gel plate use the steps that follow -
NOTE: The most important thing to remember and do is to add the layers of design and WAIT for each application to dry COMPLETELY before moving on to adding more.

- Gather all materials before beginning. Set up an area for the gel plate with everything you may use within quick reach. NOTE: I use a smaller gel plate as a palette for any paints that will used be better applied then directly to the larger plate, such as brayering small areas, sponging areas of stencils, adding extra design elements in specific areas.


- Masks from die-cut designs are placed randomly onto the gel plate. NOTE: Masks are cut from waxed paper with the Eileen Hull Heart Mandala thinlit die. On a small separate gel plate, apply some paint. With a small brayer, add paint randomly around the masks on plate. NOTE: I left some areas without the first color of paint. With a second color of paint, place some drops around the plate in open areas. Spread the drops with the brayer to mix slightly with the first color. Allow to dry; remove the masks from the plate.

- The next layer uses designs from a variety of stencils and other colors of paint to build the design. Again, allow to dry before continuing with more layers if desired.


- The third layer is randomly stamping in different areas of the gel plate with word stamps or other images using an archival ink in black or neutral shade. NOTE: Some images were stamped with Oxide inks. Allow to dry well.

- The final layer is adding small elements for design purposes. I used the end of a wide plastic straw for circles and the tips (prongs) of a small cocktail fork for tiny dots. Step away and let the paint dry well (30 to 40 minutes).
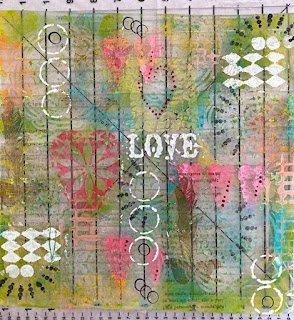
- Place the strips of clear contact adhesive over the gel plate. If any areas of the plate are uncovered, use strips of packing tape to cover the entire plate. Press down the layers of clear adhesive to the plate well by hand or burnish it with the side of a bone folder.
- Pull the tape/contact paper up from the gel plate. Pull slowly, if necessary place back down and burnish more if needed, (some bits of paint just may not come up with the tape, that’s OK).

- They can be layered onto paper surfaces of all types like old book pages, by applying a coat of gel medium first to hold them in place.
- For a more transparent look, brush the back side with mica powders before adhering to projects.

- NOTE: the tape/contact paper will have only small sections that still keep its tackiness, but not really enough, making them strips lose much of the sticking ability. Another way of adhering the pieces are needed. For the phone stand, double-sided adhesive tape was used.

Gel printed strips are now ready to be cut and applied to the Eileen Hull Phone Stand die-cut shape.


Materials
Eileen Hull Heart Mandala thinlit die
Gel Press Plate
Brayer
Paints
Permanent ink pad
Stencils
Stamps
Sponge applicator
Clear contact paper/Packing tape
Mica powder(s)
Brush
Double-side adhesive tape or Gel Medium