Showing posts with label decorations. Show all posts

Monday, August 23, 2021

Circles Have No End ... To Ideas


The theme for this months blog is “Four Seasons Crafting with Chapter 3 Dies”, I chose to use the Ornament Box die. Sunflowers seem to be perfect for Summer and Autumn decorations. Using the simple circle shape set my mind searching for ideas. What different ways can this shape be used? Can any of the other shape designs on the die be used? Combining three of the shapes included on this die brought a out the sunflower garland. ***An added bonus of two other ideas are also included using the circle cut in simple ways. 

TIPS & NOTES: 

(Please read these tips and notes before beginning the project.)

Before listing the steps to make the sunflower garland here are some tips on materials and process that I used.  The garland can be made with any amount of flowers needed for a short expanse to a larger one.  The projects colors lend itself to the summertime and autumnal seasons but using a different color pallete with the same instructions can make lovely decorations for any season.  

Being a lover of paper, of course papers can be used to make these flowers, but it’s always fun to experiment with other materials to combine for texture and uniqueness. After paper my “go to” is always fabrics! 

Crepe paper is used for some of the petals but petals can also be cut from coffee filters that are colored by dying them with inks or diluted paints. The coffee filters are stronger then tissue paper. Make sure the grain of the crepe paper is running vertically on the elongated oval die shape before cutting out the pieces needed. 

The zig-zag design on the die is used for added embellishment around the centers of the flowers. A light weight cotton print was backed with a light weight cotton fusible fabric to help keep the shape to these pieces. (This is optional but wanted to use/show as many shapes from this die as possible.) A ready made rick-rack or other trim could also be used as an extra embellishment. 

The leaves were cut from two shades of green felt using a shape from a nested set of thinlit dies by Sizzix (likely retired now), use another leaf die or make a paper pattern, trace and cut your own leaf design. 

These steps can be altered as needed or desired for your own look or interpretation.


Materials

Eileen Hull Ornament Box die

Leaf dies

Sizzzix Big Shot 

Fabrics 

Felt

Fusible adhesive

Crepe paper, yellow/gold 

Coffee filter, colored with ink or paint (optional)

Metallic mesh ribbon (optional)

Ribbon 

Corrugated board

Double sided adhesive

White craft glue

Ribbon or cording 

Iron

Pressing board


Instructions:

  • After choosing fabric for the circle centers of the flowers, adhere a fusible interfacing between two layers of the fabric. 


  • Cut the circle shape from the layered fabric for each of the flowers needed.  
  • Cut circles from a mesh ribbon for each flower.


  • Glue the mesh circles over the fabric circles, by applying glue around the outer edge.
  • From the crepe paper, using the narrow oval shape on the die, cut 18 pieces for the petals of each flower. (If using an additional type of material for the petals cut half the amount (9) from each). 


  • Fold each of the petals in half. 
  • Slightly crease the folded edge and glue the fold in place.  
  • When glue dries, shape the petals by slightly pulling out from the center. 


  • Glue the 18 folded petal shapes around the edge of the fabric circles.
  • Space evenly around to fill and slightly overlapping if necessary. 
  • Cut leaves from green felt, two large, one small. 
  • Cut a circle from corrugated to back each flower.  
  • Apply a double-sided adhesive to a green fabric and cut circles to match the amount of flowers made.  
  • Apply the adhesive backed circles to one side of the corrugated circles.  
  • Glue leave in place on the back of each flower (refer to photo for placement).   
  • Lay a length of ribbon along the top of each flower and attach with glue to hold in place. (Space the flowers apart as evenly as possible.) 
  • Glue the green fabric covered circles to the back of each flower.  
  • Cut 3 zig-zag shapes for each flower. These are glued around the center of the flowers for added embellishment. (Refer to photo below) Overlap the end of each zig-zag shape slightly. Adjust the curve of these pieces to the circle shape. 

Close-up of petal, trim, leaves


Half Moon Felt Garland

Cut circles from felt.  Fold each in half and press in the fold. On a length of thin cord, glue the half moon shapes along the cord.  Leave a small space between each.  Loop a strip of torn fabric between each. It these to the length desired. Embellish the felt pieces with embellishments if desired or leave plain. Refer to photo for placement of components.


Tiny Notes

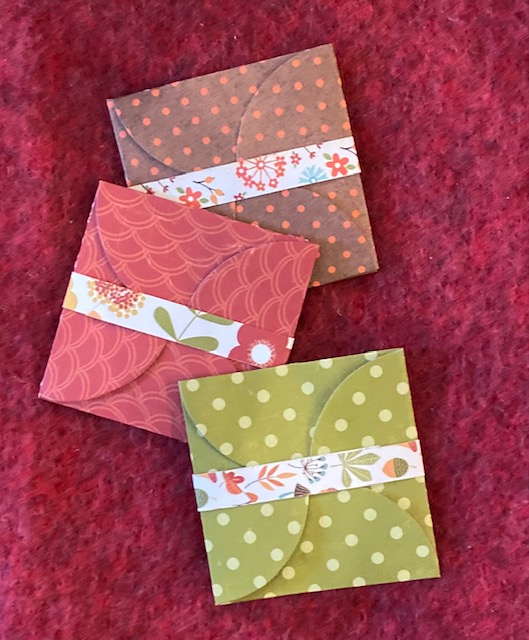
Cut four circles from decorative, double sided papers. Fold each circle in half. Place the four together as shown.  Hold in place with some small clear pieces of tape on the inside.  Apply a 3” square of solid paper onto the inside center, along the folds. Make a band from a strip of the paper to wrap around the tiny note card. Tuck one in anywhere with a special message! How nice to find a little note in a lunch bag or box, a backpack pocket, a coat pocket and more.



Tuesday, July 21, 2020

Christmas In July Continues - A Banner Season

Continuing with another "Christmas in July" idea using the new snowman die from Eileen Hull to create this banner for holiday decorating.


Most dies are made to be used with paper only but I have a thing with always stretching my ideas to see just where I can take them.  For some reason most projects that I make it's difficult to not mix things up. Sometimes that means spending time experimenting first with the wide variety of materials that are available.  This project features one of the the new Eileen Hull chapter 3 dies used in a different direction, follow along with the steps given, for something new to give away or add to your holiday or seasonal decor.

Materials
Eileen Hull Sizzix die, Snowman
Snowflake die
Alphabet die
White felt
Thermoweb Ultra fusible iron-on adhesive
Foam adhesive sheet
Fabric scrap
Black heavyweight paper
Brown heavyweight paper
Orange card stock
White decorative paper
Metallic foil
Cording or ribbon
Ultra bond adhesive
Thin raffia
Red bead or tiny Pom-Pom
White pen

NOTES & TIPS:
White felt is layered together to make the snowman bodies. Decorative fabric is also layered together for the scarves. Instructions will be given on the process of using a fusible adhesive with both types of fabrics.  *** Follow the instructions that come with the fusible adhesive for heat settings and process. Tips will be given here to help with the process. Most iron-on fusible come with a paper backing on one side.

Glue together 2 layers of the black and brown papers before die-cutting them for the top hat and branch arms.  Use heavyweight paper on hand and paint them to the color desired.

Preparing felt and fabric before die-cutting shapes

The dies used for the snowflakes and letters are older dies that are no longer available but there are some newer designs available.  Substitute another element for the snowflake and another style of alphabet.


Fabric Prep


  • Cut 2 pieces of felt large enough for the nine snowmen shapes and a piece of fusible adhesive to match. 
  • Press the felt if needed before layering.
  • Place the fusible down onto one piece of the felt with the paper backing facing up. Place iron onto the paper side of fusible. The best method is to press the iron down and hold for several seconds before moving the iron to another area. Once the entire piece is pressed down in this fashion, the iron can be slide back and forth over the fusible. Allow it to cool down.  Remove the paper backing from the fusible. TIP: If fusible was not heat set enough it may remain attached to the paper backing. Repeat that area again; cool and release.

  • Place the second felt piece over the fused adhesive. Press as before till both pieces are fused together. NOTE: Depending on the thickness of material used it may take a little longer to adhere the layers. Once shapes are die-cut and any edges are not completely fused, repress those edges carefully. 


  • The same process can be used for fusing thinner fabrics together (snowmen scarves). 

 Assembling snowmen for the banner
  • Die-cut ALL pieces from desired materials.
  • Lay out all the pieces needed for each snowman before gluing into place. 

  • Decorate black hats by gluing a strip of raffia around the hat (Refer to photo for placement). Allow glue to dry then add a piece of punched sprig and a red bead to finish the hats. 
  • Add all pieces by gluing onto the snowman shapes. Start  by placing the hats on first in whatever fashion desired. Next add the scarves. Add the eyes and nose, finish with the two branch arms. Set the snowmen aside till all pieces dry.  
  • Cut a piece of a foam adhesive sheet for die cutting the letters used to spell out - let it snow.  Remove one of the backing sheets from the foam. Place a foil sheet over the foam adhesive and press onto the adhesive we’ll.  Remove the clear foil sheet cover.  Die-cut the letters from the foam without removing the other release paper.  
  • Prepare another piece of foam adhesive sheet with for the snowflake spacers using the white decorative paper. Die-cut 4 snowflakes from the covered foam and 4 from paper only.
  • Place the foil/foam letters onto the snowman near the bottom (Refer to photo).
  • With white pen, add a small dot to each eye.
Stringing Banner
  • Lay the snowman out in-line, facing up to arrange. Note: Notice that they are each close enough to have it appear they are holding hands. The snowflakes act as spacers between each group of snowmen and those next to them appear to be touching the snowflakes. 
  • Carefully turn them over, keeping them spaced.
  • Run a bead of glue along the neck area to hold the cord. (Refer to photo). Note: If desired a small paper punched circle or square could be glued over the area where the cord runs along the back of each snowman for extra hold. 

  • Remove the paper backing from the snowflakes and line them up at each end and between the groups as shown in the photo.  Align the other paper snowflakes over the snowflakes with adhesive. 
NOTE: If you are in need of further instruction or clarification, feel free to ask. If you follow me on Facebook or are a member of Eileen Hull's Fan Club, you can ask a question there.  Until I can resolve a problem replying on by blog, I may not be able to quickly answer any concerns. 

Friday, June 12, 2015

Deflecto Design Team - Hooray For the Red, White & Blue

When summer arrives, all things red, white and blue come out to decorate the house during this time. With Memorial Day, Flag Day, the 4th of July and Labor Day all falling within the summer season, it is the appropriate time for such decorations.


The mantle above the fireplace is one spot that always finds a special decoration to fit a theme.  This year I changed things up just a bit.  Using the Angled Sign Holders (20001CR) I created postcard size cards using various papers and adding die-cut letters using my Silhouette machine to spell out AMERICA.  Adding to the mantle decor is a very simple garland made from torn strips of fabric that are knotted onto a jute cord.


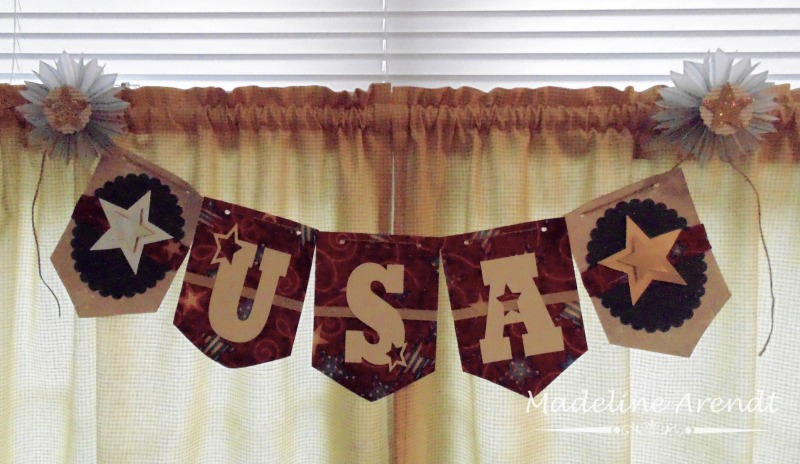
The VersaGrip™ Sign Holder (20007CR) made the perfect thing to hang another handmade banner to a window area.  The longer clamp was clipped to the top edge of the curtain and the smaller clip holds the string from the banner.  Rosettes made from coordinating papers are attached to the clip with heavy duty glue dots.


Another banner was made from handmade papers and some scanned images.  It hangs from the front steel door with star shaped magnets that were die-cut from Deflecto Magnet Sheets with Supergrip Sign Holders (20002CR) attached to hold the banner cord.

Monday, June 1, 2015

Designer Craft Connection - Let's Party!

Summer is here and it brings along with it - PARTY TIME!  Of course,  parties are great no matter the reason or the time.


Every party calls for beverages and why not make serving them fun.  There are several containers on the market that can make beverages at parties special.

Using a Mason jar, a drinking mug and replicas of milk bottles, then adding some extras to embellish, the end product are unique additions for your party table.

Create a fabric lid for the containers from fabrics to suit a theme.  Make a pattern by drawing a circle.  Use a 6 1/2" circle for the larger vessels and a 4 3/4" circle for the bottles.  In the center of each pattern, trace the diameter of the corresponding jar/mug and bottles.  Trace the circles onto the fabrics of choice, then cut out using pinking shears.  Make another set of circle patterns the same size as the diameter of the container  opening.  NOTE: The measurements are approximately 2 3/4" for the jar/mug and 1 3/4" for the bottles.  Trace these circle patterns onto vinyl iron-on material, two per cover; cut out.  NOTE: Cut these circles slightly smaller than the tracing line.  Place and press these vinyl circles onto the fabric circles, centering them.  Follow the manufacturer instructions to apply these to the fabric.  Applying them to both sides will make these reusable and keep them from absorbing any liquid.

Fold each circle to find the center and carefully cut and X in the center.  For the jar or mug, place the fabric onto the top and  center the vinyl circle then screw a jar lid ring on.  Add some ribbon or other trim for decoration if desired onto the edge of the lids.  For the bottles, place the fabric circles onto the tops and hold in place with clear rubber bands.  Add ribbon or trim for decoration if desired.

Die-cut corresponding tags in shapes to match the theme from chalkboard material.  Punch a small hole into the shapes and attach a thin cord for tying.  Use chalkboard markers to add names to the tags.

Friday, December 5, 2014

Designer Craft Connection - Easy Holiday Decoration with "Foamology™" by Fairfield

Another opportunity to work with something new that I had never seen or used before, presented itself with this designer challenge.  I was totally unaware of this line of products called Foamology™by Fairfield.  I requested the 24" x 24" Rigid Tiles to work with.  Here is my creation using just one of the tiles, Faux Wooden "BELIEVE" Plank...


This will be a welcome addition to the country holiday vignette near the front entrance.  The idea was inspired by a similar one my daughter had made out of old recycled wood.

The 24" x 24" rigid tile was cut using a serated knife into two pieces measuring 12" x 24".  The two panels were taped together using wide strapping tape to hold them together.  The long panel was then covered with a natural cotton batting.  NOTE: Add the batting to the panels as shown in the video files for working with these products: http://foamology101.com/videos/.

I cut a piece of brown felt to cover the back of the plank.  NOTE: Fabric or paper could be used also.  

Using the back side of a butter knife, I ran it down the length of the plank about 3" from both sides to make an impression.  Using thinned paint, I  brushed it into the groove made by the knife.  This gave the panel some depth and the look of a wooden plank.

Letters that spell out BELIEVE, were cut from heavy, decorative cardstock using a Silhouette and a decorative font.  Spray adhesive was used to adhere the letters to the plank.  A little bit of gold spary glitter was applied before spray the entire surface with a clear acrylic spray finish.  A  little strip of "bark-like" ribbon was glued on and a small evergreen spray added to finish the look.

Enter the contest to win a prize here:
Rafflecopter/Giveaway - Enter Here


Monday, July 1, 2013

Designer Craft Connection July - Celebrations

Celebrations are a time when you can joyously gather with family and friends to mark an event or occasion. Births, birthdays, weddings, anniversaries, graduations, retirements and holidays are such moments.

This week we celebrate as a country, from "sea to shining sea our country's Independence Day.  So with that in mind I will give a shout out in this months post for the "red, white & blue"!

I'm taking a little twist on this and not posting a handmade project but homemade food goodies. Later this week I will be attending the annual 4th of July party at my youngest son's house.  To help out I will be making two recipes that have become summer favorites for such celebrations.  (NOTE: since I cannot really made these too far in advance I will be sharing the recipes and adding photos to this post either Wednesday evening or Thursday morning.)  My plan is to incorporate some handmade touches for decorations and presentation of the two recipes.  

Both  of these recipes are tried and approved by many, so with a few days to go before  the 4th, you may want to make one for your celebration.  

Mock Crab Spread
(How this recipe got its name I'm not really sure. It has absolutely NO crabmeat in it.  I think it's because of the texture that it got the name. Though it can be made for any occasion, for some reason it just tastes great in the summer.)

8 ounce block Swiss cheese
2 tablespoons of finely diced green pepper
2 tablespoons of thinly sliced green onion
2 tablespoons of finely chopped green olives
1 tablespoon of finely snipped chives
1 Roma tomato, seeded and chopped into
1/3 cup of mayonnaise
Several dashes of Tabasco or Cholula sauce

Grate the cheese with a coarse grater. Add the next five ingredients and mix. Add in the mayo and dashes of sauce and blend well.  Chill well so flavors can combine.  Serve with crackers of choice.
(NOTE: We prefer Town House crackers with this spread. Also this recipe can be doubled. It will not hurt if you add more of any of the ingredients.  More or less mayo can be used if desired.)

The next recipe is another "oldie" and I'm sure many have seen or had this one.  My faded, stained recipe card just states - 

"Chocolate Cake"
Step #1-Bring to a boil, 2 sticks of margarine, 1 cup of water and 4 tablespoons of cocoa.
             Set aside to cool. 
Step #2-Mix in a large bowl, 2 cups of sugar, 2 cups of sifted flour, 2 eggs, 1 teaspoon of baking soda,
             1/2 cup of sour cream.  Set aside.

When the ingredients from step#1 are cool, add to the dry ingredients and mix well.
Grease a cookie sheet with sides (Use a jelly roll pan, approximately 15" x 10")
Bake for 20 minutes at 350 degrees.
Icing:
Bring to a boil, 1 stick of margarine, 6 tablespoons of milk, 4 tablespoons of cocoa.  Remove from heat and add a teaspoon of vanilla and 1 box of confectioners sugar (sifted).  Blend well.  Ice cake while hot.  (NOTE: Sometimes the frosting can run over the edge so place on a large sheet of parchment paper. This is a great sheet cake for outdoor parties or picnics.  Never a crumb left with this one!)
My decorated sheet cake for the 4th

No matter how or where you may be celebrating the "4th" add some handmade or homemade goodness to the day and enjoy the holiday.  After the fireworks on Thursday, I'll be watching the "Capitol Fourth" that I already have set to record and "Yankee Doodle Dandy" before calling it a day.

Here are a few photos of decorations I have made for the house to celebrate summer and the summer holidays:
Torn fabric scraps, tied onto a wire wreath form.

A simple flag banner made from purchased flags, glued onto a string.

Simple banner made from papers and ribbon.

Just FYI: There will be another blog hop coming on July 15th with several designers participating.
Projects will feature an interesting product - Rowlux Illusion Film.  It really is an interesting product and can't wait to see what develops in the way of ideas with this one!

Wednesday, April 13, 2011

Spring Time Decor Around The House

"Spring is when life's alive in everything."  --- Christina Rossetti
It is always fun to decorate for the holidays.  We all know the biggest is Christmas with Halloween following close behind.  Like I mentioned in a previous post - being "empty nesters" and moving into a new house, much of what we had around, was either given away or thrown away.  Creating new decorations for the house, to share with the readers of the blog, was truly enjoyable 

Let me start with an idea to fill a variety of containers with seasonal flowers or holiday related items.  Baskets are one of my favorites to use around the house and I have all types: willow, metal, wire and wicker.  I have used several different artificial flowers around the house.  As it gets closer to the Easter holiday, I will include some fresh flowers   here and there.  I also used some other interesting containers to hold things like natural looking eggs in other places.
With banners being popular right now, I created two different type.  One is simply rabbit shaped chipboard, that was easily coated with glue and then covered with a variety of Martha Stewart's colored glitters.  They are tied onto a strip of torn cotton fabric, with matching bows adorning each end of the garland.


A second banner was made using egg shaped cut-outs from Michael's creatlogy™ line of creative shapes.  The eggs were covered with fabric.  Using Therm-o-web Heat-n-Bond, I could iron the fabrics to the front and back of the eggs.  The fabrics were trimmed and a strip of constrasting, torn cotton fabric was wrapped around each shape.  The edges were finished by glueing on a cotton lace and pearl bead trim.  I enlarged Sizzix Round-a-bout letters to spell "HAPPY EASTER".  The letters were traced onto yellow fabric that was also backed with Heat-n-Bond, then ironed onto the eggs.  To finish the decorations on the eggs, I added a crystal glitter to the letters for some sparkle, plus Sizzix die-cut butterflies, 3-D flowers and leaves.  Each of the eggs were tied onto a length of white tulle, then added large tulle bows on each end.


Larger butterflies were cut from five different papers using another Sizzix die and then painted with colored glitter glues.  They are adorning a pair of old shutters that frame the opening above the fireplace.


What would Easter be without bunnies or chicks?  Here are my needle-felted version of both.  The bodies are two Styrofoam balls ( 2 1/2" and 3"), they are covered with wool roving from National Nonwovens. (NOTE: the chick was first covered with a light yellow roving, but I added a variegated roving that I had purchased at a quilt show.  I like the color variation it give the chick.)


One Easter decoration I remember as a child were decorated eggs made of sugar with an Easter scene inside.  When I found a large egg at Hobby Lobby, similar to "Funkin" pumpkins, I knew I had to make my version of this childhood egg.  I cut an opening in the egg using an X-acto knife.  The egg was aqua blue, so it needed to be painted.  It was given three coats of an eggshell white acrylic paint.  The final coat was an iridescent glitter glue.  The inside was sponge painted with sky blue and white paint.  A platform for the inside was made from two cut pieces of styrofoam.  A green artificial spray was glued to the base as a tree.  The base was glued into the bottom of the egg and left to dry for several hours.  Moss was glued to the the platform to cover, then a fuzzy chick, a glittered egg, some ribbon flowers and a little frog was added to the inside.  A length of tiny lace edging was glued around the opening and the egg was finished with a decorative ribbon and bow.


The family will be coming for Easter dinner and that means some added decorations for the table.  The place settings will consist of a placemat made from a colored paper with the edges punched using a Martha Stewart's Punch Around the Page set.  Napkins are folded into a rabbit shape and adorned with a band punched with another decorative border punch.  A little basket will be placed at each setting and tagged with a name.  They are cut from Sizzix Scoreboard Box with lid die and then covered with a strip of paper ribbon with a natural wood covering.  Each will be filled with paper grass and Lindt chocolate carrots and bunnies.


My favorite Easter decoration is a large basket with real grass growing inside.  It will hold a cute muslin bunny and dyed eggs and maybe some tiny pots of primroses or violets.

Hope my ideas inspire you!  Feel free to contact me for any information concerning the projects.  Please continue to hop along through the other blogs for more inspiration.  You can see them all by clicking forward or back from the blue web ring button that you will find just to the right of this post.