When summer arrives, all things red, white and blue come out to decorate the house during this time. With Memorial Day, Flag Day, the 4th of July and Labor Day all falling within the summer season, it is the appropriate time for such decorations.
The mantle above the fireplace is one spot that always finds a special decoration to fit a theme. This year I changed things up just a bit. Using the Angled Sign Holders (20001CR) I created postcard size cards using various papers and adding die-cut letters using my Silhouette machine to spell out AMERICA. Adding to the mantle decor is a very simple garland made from torn strips of fabric that are knotted onto a jute cord.
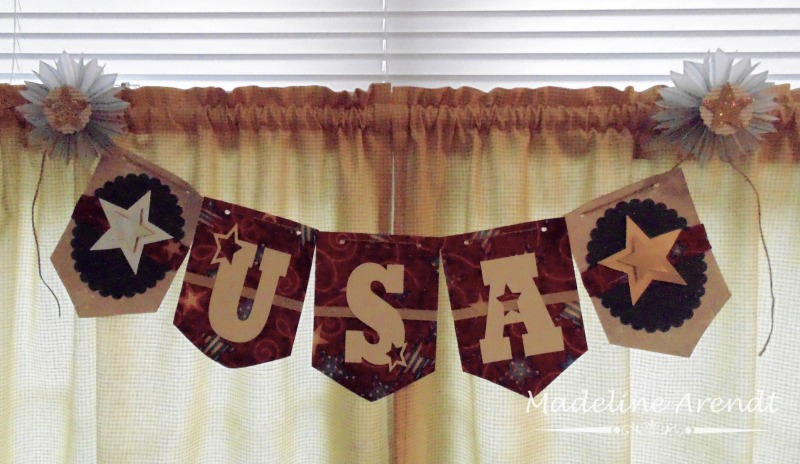
The VersaGrip™ Sign Holder (20007CR) made the perfect thing to hang another handmade banner to a window area. The longer clamp was clipped to the top edge of the curtain and the smaller clip holds the string from the banner. Rosettes made from coordinating papers are attached to the clip with heavy duty glue dots.
Another banner was made from handmade papers and some scanned images. It hangs from the front steel door with star shaped magnets that were die-cut from Deflecto Magnet Sheets with Supergrip Sign Holders (20002CR) attached to hold the banner cord.
Showing posts with label Deflecto. Show all posts
Friday, June 12, 2015
Wednesday, February 11, 2015
Deflecto Design Team - Hearts & Flowers
Three lovely frames all on there own - can take on a new look with various crafting supplies and techniques.
The easiest way to transform a simple clear acrylic frame is with a sheet of stickers. A sticker sheet, with a variety of hearts that are placed around the outside edges of the frame is so simple that this could be used as a party favor, as a give away or a group project. Add a decorative paper if desired or just add a wallet size photo to the frame. Tie on a cord or ribbon also, if desired. (NOTE: Any themed stickers could be used for this project. Make at a birthday party or sleepover.)
This is my favorite frame to embellish. I absolutely love the look of frames like this with only a photograph inside, but it sure lends itself to many ways to add some special touches. Continuing with the "heart" theme - a simple washi tape design was placed onto the back panel of the frame. Add a trimmed photo. After the frame is placed back together a ribbon and bow was added, along with some stick-on red jeweled hearts. (NOTE: Any look can be achieved with this frame.)
The final acrylic frame comes with a colored border that a narrow strip of ribbon outlines. A photo mat was cut to fit the frame from a textured paper before adding a photo. A variety of paper flowers were created from various types of papers, then placed to adorn the corners of the frame. (NOTE: All the flowers and leaves are made using die-cuts.)
Check out the Deflecto Crafts Facebook page for ideas and information!
The easiest way to transform a simple clear acrylic frame is with a sheet of stickers. A sticker sheet, with a variety of hearts that are placed around the outside edges of the frame is so simple that this could be used as a party favor, as a give away or a group project. Add a decorative paper if desired or just add a wallet size photo to the frame. Tie on a cord or ribbon also, if desired. (NOTE: Any themed stickers could be used for this project. Make at a birthday party or sleepover.)
This is my favorite frame to embellish. I absolutely love the look of frames like this with only a photograph inside, but it sure lends itself to many ways to add some special touches. Continuing with the "heart" theme - a simple washi tape design was placed onto the back panel of the frame. Add a trimmed photo. After the frame is placed back together a ribbon and bow was added, along with some stick-on red jeweled hearts. (NOTE: Any look can be achieved with this frame.)
The final acrylic frame comes with a colored border that a narrow strip of ribbon outlines. A photo mat was cut to fit the frame from a textured paper before adding a photo. A variety of paper flowers were created from various types of papers, then placed to adorn the corners of the frame. (NOTE: All the flowers and leaves are made using die-cuts.)
Check out the Deflecto Crafts Facebook page for ideas and information!
Friday, October 31, 2014
Clips, Holders, Hooks, Tags and More - Create, Display, Enjoy - Oh My
Little bags of clips, tags, holders, hangers and more arrived at the beginning of the month. Here we are on the very last day of the month and I would like to share a few projects that I created using some of the fun items we received from Deflect-o®.
First project was one I created as decoration for Halloween. Making black bats from paper pulp, I needed a way to hang them. Some neat little banner hangers were part of the package. They have a double sided adhesive tab that comes with them for adhering to a surface. I placed them above the wooden door frame and hung the bats using invisible thread from the holders. A garland can be added to cover the white hangers from showing. (Having these be clear would be even better.)
Taking the clear plastic Fexible Pouches, Icreated a reversible banner with some decorative papers and die-cut shapes and letters. Add some ribbons or fabric strips to hang the pouches from a cord. The plastic pouches make the banner something that could be used for an outdoor decoration too.
To hang inside, I used the white banner hangers once again.
Using three of the frames from the very first package of product I received, here are three ideas using the frames for more than photos and also incorporating some of the clips, hooks, and more.
Chalkboard designs are all the rage and they also are great to have around for reminders, notes, tags or decorative elements for the house, office or workspace. Here are a few simple ideas to use the chalkboard sign tags and another sign holder, this one magnetic. These boards can be used over and over. Use specialty white chalk markers that are removable with water.
First project was one I created as decoration for Halloween. Making black bats from paper pulp, I needed a way to hang them. Some neat little banner hangers were part of the package. They have a double sided adhesive tab that comes with them for adhering to a surface. I placed them above the wooden door frame and hung the bats using invisible thread from the holders. A garland can be added to cover the white hangers from showing. (Having these be clear would be even better.)
Taking the clear plastic Fexible Pouches, Icreated a reversible banner with some decorative papers and die-cut shapes and letters. Add some ribbons or fabric strips to hang the pouches from a cord. The plastic pouches make the banner something that could be used for an outdoor decoration too.
To hang inside, I used the white banner hangers once again.
Using three of the frames from the very first package of product I received, here are three ideas using the frames for more than photos and also incorporating some of the clips, hooks, and more.
Fun magnets were made by adhering decorative papers to magnet sheets and then die-cut into flower shapes.
There are a few other items that I hope to work into other projects still to come. What's fun is the opportuntiy to find new uses for items that many of us think only have one purpose.
Subscribe to:
Posts (Atom)


