Wednesday, May 17, 2017

Journal Journey - Part #4

Continuing the adventure of creating journals with the fabulous JOURNAL die by Eileen Hull for Sizzix.  The latest edition again uses the die as the starting point.  For decorating the covers and inserts I used the wonderful mixed media materials by Rebekah Meier Designs for Thermoweb.  I have only "scratched the surface" of the ways to use these but will be happy to share how they were incorporated into the journal making.


Just to familarize you with the product line here are some images and discriptions.


 Mixed Media Art Paper and Tape take paint, ink and other art mediums very well.  Tears and cuts easily and use with die cutting systems.  Stamp, stencil and emboss. Wonderful surface to be used in many ways.

Mixed Media Adhesive Sheets are doubled-sided making them very versatile.  Can be used to layer paper, fabrics and foils.

Mixed Media Foam Sheets are double-sided also.  Can be used to add dimension to collage projects of all types.  Can be painted, inked, cut, textured.

NOTE: The three variety of sheets all measure 9" x 12".

Mixed Media Medium is a multi-purpose adhesive that will work in a variety of ways.

Mixed Media Transfer Foils come in five new colors and can add that special touch to all your creative crafting.  The names alone make you want to use them! (Antique Pearl, Old Gold, Vintage Tin, New Penny, Patina)

Experimenting has only just begun!

Now let me begin to walk you through the steps I took -


NOTE: In making the outer and inner linings for the journal covers, they can be completed seperately, then die-cut individually before being adhered to the matboard covers OR layered onto the matboard pieces first before cutting the covers.  *Both ways will work, but aligning the edges can be tricky! I did the former with good results!


For the front cover: Using a adhesive sheet, I randomly layered a variety of torn bits to one side of the sheet.  Brush on a thin coat of the Mixed Media Medium to adhere any loose edges of papers.  Next, using a sheet of the art paper, I colored it with Colorbox® Blends Sunshine.  The process I used was to blend the ink onto the sheet, working in small sections at a time; spritzing each section with water and blending the ink into the sheet with my finger.  In areas I went and added more color using the same technique.  NOTE: The water does not hurt the adhesive on the sheet, but I did not over saturate the sheet with water.  If that happens, blot with a paper towel to help remove the excess. ***SIDE NOTE: These blotting sheets might make interesting elements for collage.  Set the sheet aside to dry before cutting.


Make the front and back covers for the journal.  (Refer the NOTE above.)  After cutting the covers, blend the edges with Nutmeg Colorbox® Blends.

Before putting the journal together I stenciled a design onto the front and back covers, using a stencil paste and some of my favorite stencils.  NOTE: Stencils are designs by Rebekah Meier for TCW


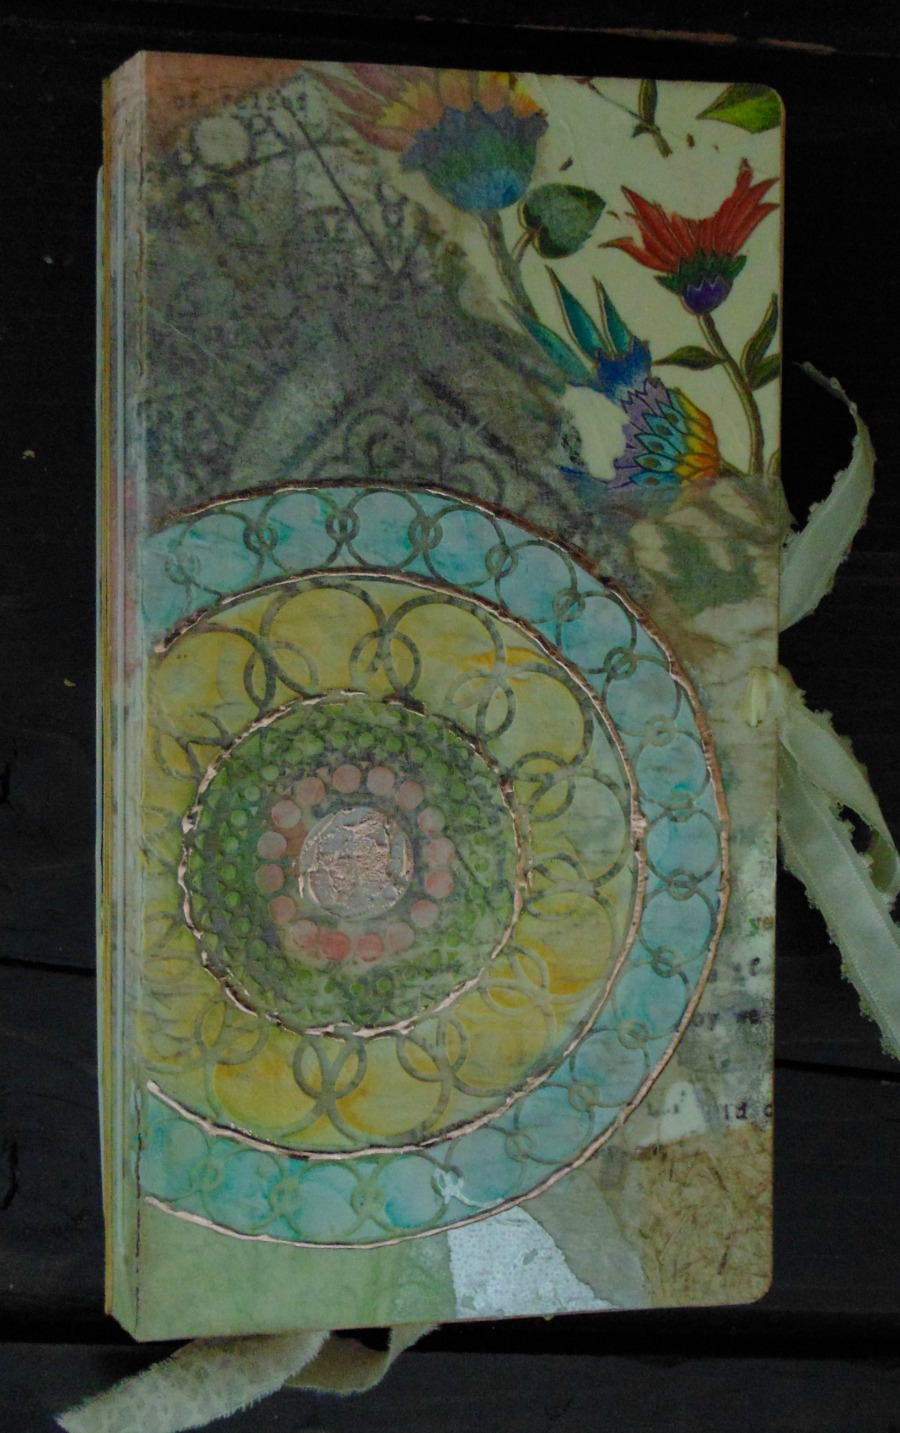
Once the stencil paste dryed I went back and added touches of color by painting on the ink from the Colorbox® Blends with a wet brush.  Some bits of foiling were added.  Apply the iCraft® deco foil™ liquid adhesive to areas of the stenciled design.  Allow to dry following manufacturers instruction before adding the transfer foil.  

Assemble the journal following the directions.  For the closure on this journal I added a decorative button and ribbon.

To finish the front cover, die-cut the label from the Journal die.  Stamp and emboss a title.  The edges of the label were wiped with clear embossing ink and dipped in clear embossing powder then heated for a slight textured effect.  Flowers and leaves are die-cut using an Eileen Hull die.  To make them, adhere small bits of fabrics (flowers) and tissue paper (leaves) to some of the Mixed Media Foam Sheets.  Die-cut the shapes and add extra color with inks.  The centers of the flowers have a bit of foil added for some metallic sparkle.


Inside the journal I added three signatures.  The first signature cover is made from a sheet of the art paper that was printed by Rebekah Meier on a gel plate and given to me as a sample.  I added some other stenciling and coloring to it; placed a piece of decorative paper onto the adhesive side before forming it into the cover with a small pocket.


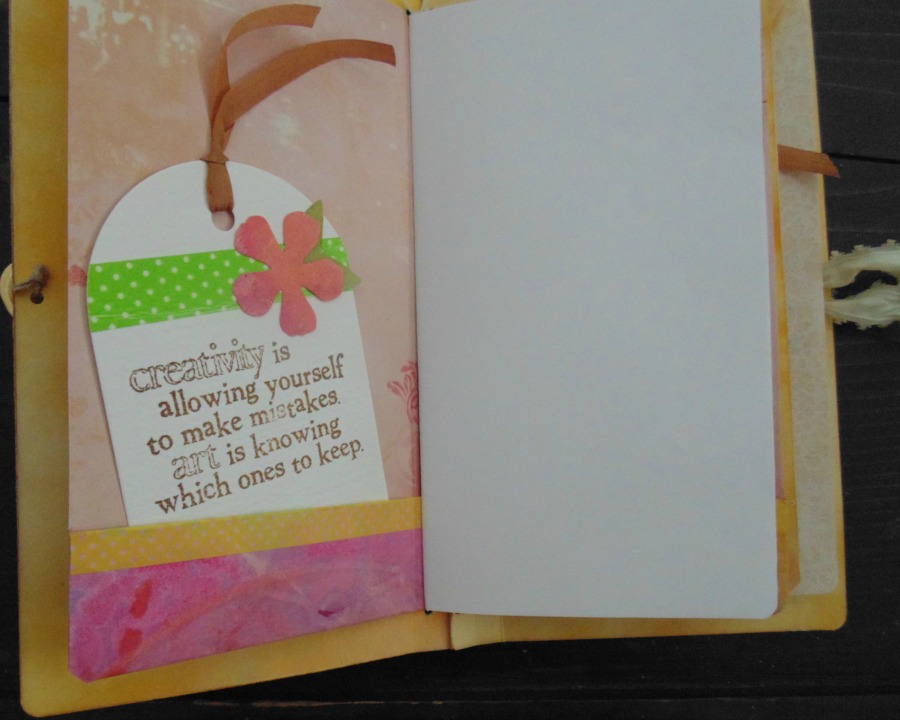
The second signature was made from an old manila folder.  It has leftover art paper pieces added to the front (yellow torn stripe) and inside (pink print). I like the transparency of the  sheet with a stamped design over part of it.


The third signature cover is made by placing a piece of tea dyed fabric onto a adhesive sheet then onto a piece of manila folder.  Cut the signature cover and round the edges. Stencil a design and add shading onto fabric if desired.  A strip of colored art tape is added and stamped on.


Combining all these really wonderful elements from this product line,  I only see possibilities to be creative with!  Get your hands on some and HAVE FUN!

Thanks Eileen and Rebekah for endless possibilites!

Thursday, May 11, 2017

Journal Making Adventure Continues - Part Three

Coming to you with the third edition of journal making!  Here's the latest version using Eileen Hull's "Journal" from her latest collection - HeartFelt by Eileen Hull Designs for Sizzix.


For this journal I decided to make one themed for quilting.   Since sewing has been a large part of my life, it was natural that quilting would probably become a part of my activities.  Years earlier I made a few quilts on my own with the "teach yourself"method!  It was about 10 years ago that I become involved with a small group of women in the neighborhood, and we formed a "quilting group".  We still meet monthly, except summer.  We share ideas, tips, tricks, projects and help when necessary.  From time to time we make treks around the area to shops that share our sewing and quilting desires, hence the inspiration for this journal.


Now let me walk you through the steps and materials used to create this.

It all begins with the base pieces of the journal.  I decided on one of many of my favorite quilt blocks to place at the center of the front cover.  I traced the journal cover onto copy paper then laid out the quilt design to the center and filled in with other shapes.  (Refer to photo)  For the back cover extra, random pieces of fabric form the design.

This part is the most intricate and time consumming, but worth it!  The fabric pieces were fused with the HeatnBond.  All pieces for the front are measured and cut with an acyrlic ruler and rotary cutter. NOTE: The small quilting pieces measure 3/4" for most and 1 1/2" for the squares and rectangle shapes.  The border strips are 1/2" wide.


Once the fabric fused pieces are cut, they are ironed onto pieces of the Mixed Media sheet.  Add a decorative stitch around the fused pieces.  NOTE: A simple zig-zag stitch was used.  


The fabric covers are then carefully cut to match using the journal die and Big Shot.  NOTE: You must carefully line up the fabric onto the die before cutting. Concentrate on the open edge and the top edge for allignment.  Cut fabric pieces for the inside of the covers also.  

Adhere the outside cover pieces to the journal using gel medium.  Once glued in place, cover them with another coat of gel medium and set aside to dry.  Repeat the same steps for the inside covers.
NOTE: If any warping appears, wrap the covers in parchment paper or any release paper and weight them with heavy books.  
Add the alphabet wording to the cover with gel medium, coat over the letters and allow to dry before assembling.

***TIP*** (Another way to adhere the cover pieces)
Fuse the pieces for the inside and outside covers onto HeatnBond.  Die-cut them on the journal die. Remove the backing, align the edges carefully and press onto the matboard covers with an iron.  A coating of gel medium is still suggested.

Assemble the journal in whatever method desired.  Embellish as desired.  I used some found sewing elements: large safety pin, blunt tapestry needle, small thread spool.  The closure is made by punching two holes into a thimble.  Tie it onto cording.  Cut a small circle of fabric, stitch around with a running stitch; stuff with a cotton ball and gather up tightly; glue into the thimble.


For the three signature for the inside I used related, decorative papers, a manila folder, graph paper and plain papers.  Two of the signature covers are made by folding over the paper to form pockets.  They were both stitched on the machine with a zig-zag stitch around the edges.  The manila folder makes the third signature cover, which has a fabric pocket  stitched on the front to hold business cards. The pocket is embellished with flowers and leaves cut from fabric covered Mixed Media Foam Sheets.  NOTE: Mixed Media Foam Sheets are part of a new line by Rebekah Meier Designs for Therm o Web.  ***The next journal will show other ideas using products from this line.


Three of the tabs are added to each of the signature covers.

Now off to some quilt shops with the handy journal to take notes or sketch or bring along needed information!


Materials Used

Journal die-cuts, 2 covers, 3 tabs
Alphabet die-cuts, Homemade Alphabet Thinlits™
Fabrics, assorted
Iron on Fusible , Therm o web HeatnBond
Mixed Media Sheet, lightweight iCraft®
Cutting mat
Rotary cutter
Acrylic ruler
Gel Medium
Super Tape, 1/4", 1/2", Therm o web
Papers, decorative, graph, newsprint, copy manila folder
Elastic cording
Jute cording
Embellishments: sewing related items
Paper trimmer
Iron
Sewing machine

For more ideas and inspiration follow the Pinterest Board, Sizzix Heartfelt Journals, plus find ideas and information at Eileen Hull Designs on Facebook.

Tuesday, April 25, 2017

HeartFelt Journal #2

Coming to you with another Journal idea using one of Eileen Hull's newest dies from Sizzix - Journal!  Once again I incorporated a few different touches.


Let's begin-

The first thing is always - go to my "stashes" of this and that to see what might lend itself to a new project.  Immediately a remnant of vinyl caught my eye.  Originally I was going to use it the "correct way"(the leather looking side) but found I liked the look of the wrong side.  A piece was cut to cover the matboard cover completely, with a about an additional 3/8 of an inch added to the top and bottom.  It took the Uniform Colorbox® Blends nicely.  NOTE: In this step of applying the ink, some experimenting took place with blending the inks with some water on a palette to get coverage.  I wll attempt to follow up with a tutorial for this application.


Follow directions on forming the journal, using Super Tape or a strong glue for center binding area.  Cover the journal with the fabric.  To hold the vinyl side onto the matboard, I used strips of Super Tape running vertically along the side edges and near the center of the covers to hold it in place.  Mark and pierce the holes for binding.  Fold over the edges along the top and bottom, tucking them neatly and glue in place (refer to photo).


The cover has a shadow like design that was made using a TCW stenci by Rebekah Meier and the Coconut Colorbox® Blend.


The cover embellishments are die-cut letters from textured paper, using Eileen's Thinlits™ Homemade Alphabet and fabric flowers made using her Twist & Style Tool.

Place the letters on the cover using a gel medium.  Apply a coat of medium over the entire surface of the cover.  Dry.  Brush the letters randomly with iCraft® deco foil™ liquid adhesive.  Dry well.  Place iCraft® deco foil™ over the letters and rub to release the foil onto areas with adhesive.

Flowers are made from torn strips of cotton fabric.  Use various lengths of fabric strips and twist them with the Twist & Style tool following manufacturer directions.  Centers of the flowers are made using a button and floral wire twisted with the tool also. Make the stems long.  The wire stem is also used to form leaves for the flowers.  Arrange flowers on cover and glue into place.


Bind the journal for the inserts.  This time, white grograin ribbon was used for three inserts and tied into a bow for part of the embellishment.   A piece of white elastic cording was attached for the closure.  It has a small old key tied onto it.

The latch piece from the die is used as a pen/pencil holder.  NOTE: Refer to my previous post on HeartFelt Journal for directions on how to attach this piece.

The inserts for this journal were made using old manila folders, copy paper, lined and graph sheets from downloads found online and a pocket folder, recycled from the bag of a cereal box.


Wash and dry the cereal bag.  Cut one piece to measure the same as the inserts.  Cut a second the same width but two to three inched longer in length for top flaps.  Fold over the top edge of the smaller piece and stitch across the edge using a zig-zag stitch on a sewing machine.  Do the same for the larger piece.  Align the two pieces together at the bottom and sides.  NOTE: It may be helpful to clip or pin them to hold in place while sewing.  Stitch around the three sides with the zig-zag stitch.  Fold in half and stitch along the fold line/center with a straight stitch to make two pockets.  For the top flaps, cut the sides and center area at a slight angle, fold over or tuck into the pocket.

Now...journal away!

Follow the new Pinterest Page - Sizzix HeartFelt Journals for journal ideas!


Thursday, April 20, 2017

HeartFelt Journal

Journals - Junk journals, Travel journals, Art journals, Collage journals, Writing journals - whatever you want to call them or use them for, they can easily begin with Eileen Hull's Journal.  Eileen's newst collection of dies from Sizzix are called Heartfelt.  In this collection is her fabulous Journal die.  I have several dies that were designed by Eileen and I can honestly say that they are my "go to" dies for many, many of my projects.


Here I will share the first one that I made using the Journal die.  First let me just say I LOVE trying different approaches to using all the creative elements at my finger tips.  It seems that I always go first to fabrics and papers.   Another LOVE is "found" items, the reuse/recycling of any materials, so for this journal I combined these and more.

Here is a walk through the steps taken:

Begin by die-cutting the journal from matboard and assembling the covers by using a strong glue or Thermoweb Super Tape™.

I then covered the inside with a fabric remnant and adhered it will gel medium.  Fold over the edges of the fabric for neat, even edges.  Apply a top coat of gel medium and allow to dry.  Poke the holes with a hole punch or piercing tool when dry.

The cover was made with Kraftex®. It is a paper-like fabric that can be used in many ways.  Die-cut it, paint it, sew it, wash and distress it, stitch it,  fold it!  It's a great surface to work with.  I measured a piece that was slightly longer then the length of the cover (top to bottom) so I could add stitching.
To give the Kraftex® a faux leather look, I wet the material with warm water by running it under the faucet.  Once wet enough, wrinkle it up as much as possible.  This step can be repeated over again.  Once enough wrinkles are made, smooth it out and allow the material to dry.  NOTE: You can hasten the drying with a hair dryer or ironing it slightly, just don't iron out all the wrinkles.  When dry, using the nutmeg Colorbox™ Blends by Eileen Hull, lightly pass the ink over the entire surface, adding as little or as much color as desired.  Allow ink to dry.


To form the cover, place the matboard journal on the faux leather piece and make the folds necessary to fit. Once the fit is correct, creases the folds well with a bone folder.  Poke the holes for the binding and finish with any perferred binding.  For this journal a thin jute cord was used for the signatures and the edging stitches.  Make markings with a pencil along the top and bottom edges, approximately 1/4" apart.  Stitch along both edges using a blanket stitch (even a simple running stitch works).  Coat the faux leather cover with an application of gel medium.  Allow to dry.


The embellishments are made from washed wool that were finds on an thrift store trip with Eileen last Fall.  Of course the shapes are from Eileen's other collections of Sizzix dies.  The larger "Romance" flower has a couple layers colored with the wildberry Colorbox™ Blends.   Two of the "extras" on the journal die were colored and used.  The label/faceplate piece was used as part of the button closure, while the "closure" piece was attached to inside flap of the cover as a pen holder.


Simple pearl stick-ons, pearl buttons, old rusted keys and silk ribbon finish off the cover of the journal.

The page inserts are made from the packing paper that was used in mailings that I received.  * You know - never throw anything away, it might come in handy! *  The papers were ironed flat, then measured and trimmed with a paper trimmer.  Make three signature with the paper pages by folding in half and trimming the three outside edges with deckle decorative scissors.  Paint, draw, letter or just add some washi tape for decoration on the front pages.


NOTE: Some the packing paper I had was almost as thin as tissue paper and I fused sheets together with Pellon Wonder-Under® following manufacturer instructions.  These sheets add some interest since they were slightly translucent but still will take ink.  One sheet had some Blends slightly wiped over areas before fusing.  


This a wonderful, versatile die that makes journal making easy, fun and as creative as you would like!  I will be sharing some other journal ideas using another interesting cover material,  combining some new products for mixed media by another designer friend and another take on "faux leather" with brown paper.  Ideas are endless!

Go to Eileen Hull Designs FB Page to see more ideas for journals and other creative ideas.

Saturday, April 15, 2017

Long Time Gone

Where, Oh where, have I been?  It's been some time since I last wrote anything on my blog, but I am finally feeling up to returning to all that has been put aside for what seems like forever!  Just as the Dixie Chicks say in their song I've been "a long time gone" and I'm coming back and it will be in the way I choose!

It's been well over a year since my life took an unexpected turn.  To write about it helps me find a way to move forward.  Most things in life are learning experiences and all this has been just that for me.  Sometimes we get forced into learning something we didn't want but have absolutely NO choice - this has one of those.

As the saying goes, to make a long story short (at least I'll try) - After overcoming several "fears" that I have, I had to face a situation that probably we all fear - and that is cancer.  First came tests, biopsies, consultations, more tests, surgery, recovery, more consultations, lots and lots of soul searching and questioning, then treatments and even more tests.  The protocol I followed was to be every two weeks for six months.  Yes finally, they are over with and had a few bumps in the road.  I was luckier than many, from the start, but it sure is something that was difficult to deal with.  I'll just say it was a hard situation to learn from.  There are so many people to thank for helping me down this road.  Their support and care, was so very, very appreciated!  It's not a situation that you can really say is completely over, though.  There will still be more tests moving forward, and I'm thrilled to say the first one is complete with good results.  Talking with others who have had to deal with any diagnosis of cancer, it becomes a part of you,  like it or not.

It's been a slow process to feeling like myself again.  Energy was a big factor in this process, especially when you don't like to have anything slow you down.  It's a situation that is difficult to handle!

I'm happy to be done with where I was just a year ago.  It's a time to be grateful for so much.  Grateful for those who were helpful, thoughtful, understanding, encouraging and patient.

Much had to be put aside to take the steps needed to get to today.  Now I believe I'm ready to move on.  The plan is to start doing all that was put on hold and that will mostly be what I enjoy the most - being creative and sharing with others.  I have already lead a "crafting" evening with a group of ladies where I live, with another planned for next month.  Joined a singing group ... what was I thinking!  Working on ideas and samples for classes to finally teach at home.  Lots of projects in various stages await me every day.  Really having time to enjoy my kids and grandkids! Looking forward to my oldest grandchild going off to college and my youngest  son getting married this September.

So now, finally, this new post needs to be published!  More to follow very soon too!

Peace


Sunday, June 19, 2016

Father's

Today is one of those days to honor and celebrate those special guys in our lives.  I sit at the computer writing this before making a trip to visit with those "special guys" that have left us - a grandfather, a father, a father-in-law and most importantly the father of my three children.  In the five years since we had so say good-bye, he is thought of daily and missed more than imagined.

He would have enjoyed seeing his grandson becoming a wonderful young man, wondering where did those years go from that little guy we used to watch to heading into his Senior year of high school with thoughts of the future waiting for him.  He would love seeing the sweet, quiet Maddie becoming  a strong young lady who is finding herself and will spark and delight!  He would have been delighted to see Tess loving school and seeing in her maybe a future teacher.  He would love having a conversation with this very wise eight year old.  He would love having the chance to play and enjoy Zoe and see how she is blossoming into a fun-packed little dynamo.

I see so much of him in each of the children and grandchildren - he has truly left his mark on on of us and we love him for it.

This is a post I made to my blog 5 years ago on the very same date about those special guys!

Father's


Today is their day - well their "Special" calendar day.  So to dad's everywhere, I hope that they will enjoy the day.  Some will be golfing, some lounging, some grilling,  some even working and many sharing some time with those they love and love them back.

For my husband and I, we will be remembering.  Both of our fathers are gone, but we will have memories to think of and share.  Those photos of "family" that are many in our house,  are filled with thoughts of them and how their  "fatherhood" shaped us.
Dad with baby daughter long ago

Dad with sons (future dads)-David was only a gleam.

Then there is our oldest son (father of two sweet little girls, Tess and Zoe) and our son-in-law (father of two tweens, Joseph and Maddie), they are both spending their day working.  Both are firemen/paramedics and today is their shift day.  Both are great daddy's to their children.

A very young father

The rest of us will gather here with another special dad.  He has much to be proud of in his three children and the family additions.  We honor him for the wonderful teacher, worker, friend, neighbor, son, brother, sweetheart, husband and loving Dad he is!

Wednesday, March 30, 2016

ETI Resin Project For New Bathroom

This post will show the project that was created for a bathroom edition in my basement near my workroom.  It was a much-needed addition to the workspace.  The purpose of the room was mostly for a source for water and clean up space. When planning this room I knew that I wanted to use resin from ETI somehow.


I knew that I wanted something different but functional.  At first, I wanted something like an old farm sink but that just wasn't in my budget.  After searching for sinks online I came across the rectangular vessel sink.  Faucets were my next concern and I wanted an old-fashioned look and found just the right ones.  The next thing to create was a unique base to capture the look I wanted.  The best place to look for something unique was our area, Flea Market.  At first, I was looking for old planks of wood but then I found some old barn doors and chose one to use.

All the old, original hardware was removed first.  After deciding on the size needed for the vanity top, some of the boards were removed to get the correct width for the top.  Next, the remaining piece was cut to the correct length of the top.  A piece of particle board was cut to fit under the barn door for added support.  It was attached to the base before the process of adding the resin began.

I have worked with ETI resin in smaller projects but this was my first attempt to do something so large.  It was a learning experience for sure! I did make a few errors in prepping for the project. To cover the door to the thickness I wanted, I had to do several pours of the resin.

Close-up of the first pour to fill the grooves between boards
Once the top was completed, it was decided where the sink would be placed and a hole for the drain was drilled through the layers.


Two of the pieces that were removed from the door were used as the backsplash along the back and right side of the vanity.  To coat these with the resin I elevated them with  small cans on a plastic covered table and prepared the resin.  Using a utility, bristle brush the resin was just brushed onto the boards.  Two coats of the resin were added to the boards.  They were then attached to the wall to finish the vanity top.

I love the results!  The resin brought out all the interesting imperfections of the wood to give the top its very unique look.

Now go to the other designers blogs and see what they have come up with using ETI products!

Ann Butler Designs – ETI Blog Hop March 31, 2016


Wednesday, March 16, 2016

Shiny Travel Accessories With Metallic Oly-Fun

It was a couple of years ago that I became aware of Oly-Fun by Fairfield. It comes in a nice variety of colors and is easy to work with.  It can be sewn, painted, glued, die-cut and manipulated.  When I became aware of the newest editions of Metallic Oly-Fun I looked forward to working with it.

With three of the four new color samples, I decided to create some easy travel accessories.  Each of these are made by layering the metallic Oly-Fun with cotton batting and a printed fabric.

Shoe Bad with Brass Oly-Fun

Curling Iron Bag with Silver Oly-Fun
Zippered Pouch with Gold Oly-Fun
There is a giveaway with this blog hop.  One bolt of Oly-Fun Metallic of your color choice will be the prize (US and Canada only).  Readers enter to win via Rafflecopter on the Designer Craft Connection blog.