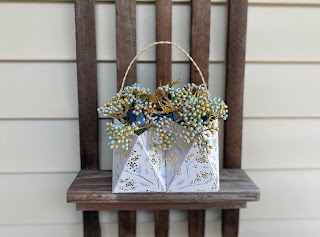
I wanted to share this idea with others. I didn’t want the box to be rigid as it would be but using mat board. Still needed a base that would cut well and fold easily along the score lines. Using a heavyweight watercolor paper between two sheets of decorative card stock gave the box flexibility and the sturdiness I had hope for.
When making this double basket I was able to include the use of of cork sheets by Sizzix as the top layer of the geometric boxes.
MATERIALS
- Big Shot machine
- Geometric Box die
- Watercolor paper, 140#
- Sizzix Cork roll
- Decorative card stock
- Double-sided adhesive sheets
- Mat board, small square
- Glue
- Sizzix thinlit dies
- Distress ink
- Cosmetic sponge
- White gel pen (optional)
- Cord, for handle (optional)
THE PROCESS OF CONSTRUCTING THE BOXES
- Choose a decor paper for outer layers.
- Cover both sides of the watercolor paper with double sided adhesive.
- Cover 2 squares of mat board with cork and decorative paper and double sided adhesive.
- Remove liner paper and layer cork to one side of watercolor paper.
- Remove liner paper on other side and layer with the decorative paper.
- Die-cut 4 box pieces of the layered papers NOTE: These will create 2 boxes.
- Cut two box bottoms from cork covered mat board.
- Fold all the box pieces on the score lines.
- Remove a thin layer of the paper from the joining edges of each piece.
- Glue two of the box pieces together to form the box.
- Complete the second box.
- Glue the bottoms into the boxes.
- Align the boxes next to each other.
- Matching the point of the triangle and the straight edge of the bottom together.
- Apply glue to one of the boxes and press the other to it to attach them together. NOTE: Double sided tape could also be used to attach them together but align them carefully
EMBELLISH THE BOXES AS DESIRED
- I chose to ink along the edges of the top and bottom of the pieces and also along the angled folds.
- I die-cut some shapes using thinlits from the cork sheet.
- Glue the cut designs onto 6 of the boxes triangles
- Lightly add some color onto the thinlit designs with a paint brush with your choice of coloring. NOTE: These shapes can be colored before adhering to box.
Optional - Use a white gel pen to create dashes around the triangles
Thread jute cord through holes punched into the sides and knotted for a handle


No comments:
Post a Comment