Monday, October 26, 2020

Everyone Needs An Angel

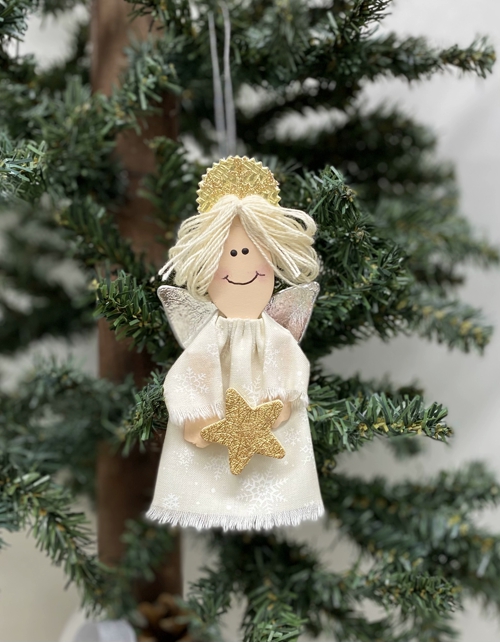
With the release of the two new Eileen Hull dies recently I had shared a few ideas on how the dies could be used.  I happen to be someone who always wants to find other ways to use the die shapes.  Using the spoon, that is also a shape on the new teacup die, this little angel ornament was created.  You will also find two other little spoon characters I had some fun creating!

To make the angel you will find the steps to create your own here.

 To make the body:

  • Die cut two spoon shapes from mat board
  • Cut lower end of spoon handle from the 2 spoon shapes


  • Glue the 2 spoon shapes together
  • Paint the glued spoon shape and the 2 short, cut handle pieces with flesh colored paint. Dry.

To make dress and sleeves: 

  • Cut or tear fabric for dress and sleeves to measure 6” x 3 1/2” (dress), 3 1/2” x 2” (sleeves)
  • Fold over the top edge of dress piece  1/4” and hand stitch with a running stitch. 
  • Gather the stitching to create a neckline for the dress. 

  • Tie around the neck area of the spoon shape and knot.  
  • Apply some glue under the gathered area of the dresses neck to hold onto the spoon shape.  
  • Fold the sleeve piece into thirds and run a thin line of glue along edge to hold in place. (Place a strip of waxed paper into the sleeve tube to keep the fabric from sticking together.) 
  • Tie the dress to the head part of the spoon shape by gathering and knotting the thread.
  • Place some glue under the gathered neck of the fabric at the front and back. Allow glue to dry. 
  • Fold sleeve tube in half to find center. Glue onto the back of dress near the top.
  • Glue the two cut pieces from the spoon handle into the sleeves to form the arm and hands of the angel. Refer to photo.
Adding hair and face:
  • Make two dots with black paint and the end of a paint brush handle. Dry.
  • Using a fine black permanent pen, draw a smiling mouth.
  • Add a small touch of blush to the face with a cotton swab or brush.
  • When black paint is dry, add a small white dot to each eye for a "sparkle".
Materials for face
  • Wind cotton thread around fingers to create hair to length desired. Tie at the center with a short piece of the thread.

  • Glue onto the head of the angel. (Refer to photo.)
Making wings and halo:

  • Place a piece of double sided adhesive to silver card stock and add another piece of the same card stock to the other side after removing the adhesive backing.

  • Die cut angels wings with the butterfly die. (If card stock is thick, cut one with adhesive, one without and adhere together after cutting.)
  • Repeat the same process with a gold  metallic decorative paper, but use a piece of foam adhesive between two layers. 
  • Glue a punched snowflake onto the halo.

Finishing:

  • Glue the gold halo disc to the back of the head of the angel. Position as desired or refer to photo.
  • Form a hanger from silver cording by tying the ends together in a knot. 
  • Glue the looped cord to the back of the angel along the center back. Placing it so the silver wings will cover the knotted cord.
  • Glue on the angel wings. Set aside till glue dries well.
  • Add a star or other embellishment to the hands of the angel with glue and allow to dry. 

Extra materials-hair,hanger,embellishment

You will find the materials used listed below. I have tried to make the instructions and photos as helpful as I could to help recreate the angel. 


Here are two other little spoon characters created in a similar way for this time of the year. Instead of making a hanging decoration, a pin back could be applied to the backs to make it wearable. 

Material List 

Big Shot machine
Eileen Hull Sizzix die, Teacup 3D & Spoon #664797
Mat board
Scissors
Paint, flesh color, black
Fabric, dress and sleeves
Thread, needle
Paint brush(s) 
Cotton embroidery thread, natural color
Decorative paper, gold
Silver card stock
White glitter card stock
Adhesive sheet 
Foam sheet
Sizzix thinlit, Birds & Butterflies, #661901
Sizzix thinlit, Bookplate, Hinges, Label, #662356
Snowflake punch
Silver cording
Star embellishment
Glue


Wednesday, September 30, 2020

NEW Die Release for Eileen Hull

Two new ScoreBoard dies are released from Eileen Hull! They include a new 3D Bigz L Tea Cup that can be filled with any assortment of treats and more for a variety of occasions. The cup shape, along with the spoon and little label, holds many possibilities. Also there is the XL Post Box die! Another box shape that goes together quickly with a slit to slip in something special! 


To showcase the newest Eileen Hull dies for Sizzix, I've chosen to feature them using my very favorite holiday movie as the theme - "It's a Wonderful Life", and that famous line from the movie ... "teacher says, anytime a bell rings, an angel gets its wings".

The shape of the teacup is perfect for a bell and the spoon as the bell clapper, plus as a base for and angel. The addition of the mailbox die as the second release, just made me want to find a way to configure the box into a little boxed book. 

Here are the finished projects...

Silver Bell Ornament from Tea Cup Die


Angel Ornament from Spoon Die

Here is a list of those who are taking part in the  Bloy Hop to showcase ideas using these newest Sizzix dies by Eileen Hull. Just click and check them out and get some inspiration!

Tonya Trantham

Elizabeth Robinson

Julia Aston

Pam Bray

Maggi Harding

Lisa Hoel

Anna-Karin Evaldsson

Karen Bearse

Susie Bentz

Jenny Marples

Mitsyana Wright

Jennie Atkinson

Anita Houston

Madeline Arendt   This is ME!

Sarah Lizzie Dodd

Sue Eldred

Debbie Bankston

THERE IS A GIVEAWAY!  Leave a comment on the Facebook Live Release Party post, to be entered to win the new Teacup die. Comment on the Blog Hop under each designer, to be entered to win the Post Box die.  Random winners will be picked and announced on October 6, Tuesday's Facebook Live. 

Monday, September 21, 2020

The Great Outdoors ... Brought Inside

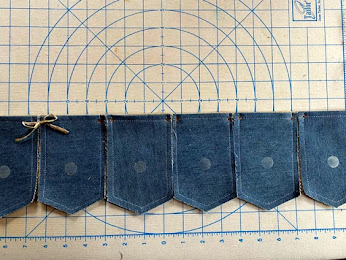
The term "the great outdoors" can conjure up many different ideas.  At this moment, and for this project it is to create something to bring bits of nature inside.  Using the Eileen Hull Tiny Book Case die, I came up with this banner to represent a tiny bit of the outdoors for display somewhere in the inside, plus with a twist.


Materials

Eileen Hull die, Tiny Book Case
Eileen Hull die, homemade alphabet, thinlit
Eileen Hull dies, book plate & labels, thinlit

Various Sizzix dies, 660694, 663607, thinlit

Fabric, lightweight denim
Fusible lightweight interfacing, Pellon soft-flex
Iron
Sewing machine
Thread
Hole punch
Eyelets
Eyelet setter
Jute cording, thin
Raffia ribbon
Metallic-like card stock
Coordinating card stock and decorative paper
Foam adhesive
Metallic foil, patina and copper
Velcro thin clear fasteners
Artificial/real elements for placing inside pockets.


INFO, TIPS & IDEAS TO CONSIDER BEFORE BEGINNING
  • When creating with die-cut shapes by Eileen, I usually like to find ways to combine a variety of materials within the projects.  Experimenting is fun!
  • When working with fabrics it is helpful to use some type of backing for many projects to add body to the fabricmif it helps the design.
  • The type of backing can change depending on the project. There are a variety of fusible and backing adhesives that could be used. 
  • If the design calls for sewing with a machine, use a backing/interfacing that is meant for sewing. (Some interfacings can “gum up” the sewing machine needles.) Be aware!
  • The pockets can be filled with any variety of elements. Use all dried naturals or purchased plant-like stems or flowers or a mix of both.  If ambitious, create plant stems or flowers from die-cuts. 
  • This banner can be made to be reversible if desired. Use the same fabric for both sides or a different color/type for the other. 
  • To connect the pockets, they are tied together using a raffia type ribbon, but thin cord, jute, or ribbon can be used.
  • Gather all supplies before beginning. 

Instructions
  • Select fabric for pockets. Cut 2 pieces for each pocket needed of the main fabric and backing. 
  • Add a backing of choice to the main fabric for each piece.
  • When complete, die-cut each fabric backed pocket piece using the the Tiny Bookcase die.

  • After cutting all pieces needed, mark each for trimming away part of the section with the "V" and the side box flaps. Refer to photo.

  • Once all pieces are marked, trim the "V" section along the mark. Then fold the edge over, so the folded top edge of the pocket aligns with the top of the two side box flaps, as in the photo.  

  • Press the folds of each piece before trimming away the side box flaps. Then stitch on the sewing maching across the top edge of each about 1/4" from the fold. 
  • Match up two pieces, pin if necessary to hold in place. Stitch around the sides and bottom "V" to form each  pocket. Use about a 1/4" seam around the edge. 
  • When all the pockets are formed,  punch a hole with a tool and add an eyelet into each hole.  These holes will be for connecting the pockets together with raffia, cord or ribbon. Refer to the photo to see the eyelet placement and the tying between the pockets.

  • Add a length of thin jute cording to the last eyelet on each end before also tying a bow in each end eyelet. Refer to photo. The cord was looped through the eyelet, then one end of the cord was fed back through to tie a knot to hold it in place.
  • Use clear, thin velcro circles for holding the letter labels on the front of the pockets. Align them on each as shown in the photo. This is side of the velcro circles that are a bit stiffer then the reverse piece. 
  • To create the letter labels, I choose to layer together a decorative paper and a solid card stock with a foam adhesive sheet together.  Die-cut the shape for labels from the layered papers. NOTE: I choose to make 2 sets of changeable words, using a different die design for each. Plus used a different top paper. 
  • Each of the labels are glued onto a die-cut frame, cut from metallic card stock.
  • To make the letters to spell out the words, metallic foil was placed onto one side of foam adhesive, cut and then placed in the center of each label shape.


  • Add the other side of the clear thin Velcro dots to the backs of the letter labels. Press them into place onto the pockets over the opposite Velcro dot. 


Now find a good spot to hang the banner and bring a little bit of the great outdoors inside!

Sunday, August 23, 2020

Junk Journal My Way


The usual definition of a junk journal ...  A book which is often made using found and recycled materials to be used as a way to collect and record memories, thoughts, ideas and inspiration. 


Making any type of journal is always fun, making a "junk journal" can likely become more fun and maybe even a bit of a challenge.  My thoughts on creating one immediately went to creating one from fabric as the base of my journal. 

The process began with finding a variety of basic fabrics from my stash that would easily lend themselves to be used for the covers, signatures or pages.  The choices were chosen because of the neutral color, the ease of sewing and could be altered with my choice of paint, inks, stamps, stencils or other mediums.  


When making a “junk journal” it’s handy to have a great collection of all types of materials and ephemera at your figure tips. All those bits and pieces that seem to be laying around are a very good place to start. I gathered gel plate prints, stamped pieces and extra die-cuts that could be interesting additions. 


For this blog post I will be be focusing mainly on one idea.  Always wanting the challenge of experimenting with the unusual, I went to my collection of reusable/recycled materials, I will be using cereal bags to make some of the inserts for this journal. I had seen ideas using the cereal bags in various ways quite awhile ago.  How to instructions/ideas can be found by searching “how to fuse cereal bags” online. Several can be found online, along with You Tube videos.  


Working with cereal bags

  • Open the bags along the seams by pulling them apart. 
  • Wipe or wash (only if absolutly necessary) the inner side of the bags. 
  • Set iron to a medium setting (wool or nylon).
  • Lay the cereal bags to be fused onto a silicone sheet or parchment paper. Place another layer of parchment paper over the bags. Begin in center and move out to the edges with the iron moving for the fusing process. Lift cover paper to check the fusing, replace and iron again.
  • Cut, fold and stitch to make folders or pockets for journal inserts.  
Tips: Never place the iron directly onto the cereal bags, they will melt onto the iron. 
A bag from a large cereal box can be prepared and folded in half to create a decent size of fused material to work with. 

Edges can be trimmed after fusing. I like to use a acrylic ruler and craft designated rotary cutter.


Place bits of papers, threads or coloring between layers before fusing. NOTE: I've experimented with re-inkers. Results were decent and unexpected. 


  • For this journal I created two types of folder inserts and a folded pocket from the fused bags. One is a simple folded piece, cut longer in length for adding a pocket, as a page insert. 


  • A second one was created into an accordion style folder insert. It was also stitched with the pocket edge embellished with washi tape. 
  • Once the folder insert is made I stitched around the piece using a zigzag design with my sewing machine.  NOTE: The edges can be left without stitching, cut with decorative scissors or covered with washi tape. 


  • The folded pocket begins with a fused square slightly smaller then the pages length, but wider then one side of a page. Fold to create a pocket of any depth.
  • The side edges are covered with washi tape before sewing sides and bottomi onto one side of a page.  

Making the journal
  • The majority of this journal is made from various fabrics. Canvas is used for the covers plus a spine extension. 
  • Before die-cutting the covers and extra spine, the canvas was coated con one side with a clear gesso. 
  • Once covers are die-cut, add a zigzag stitch around the edges. 
  • To join the covers and spine extension refer to the photos. Once the 3 pieces are aligned, stitch them together.
NOTE: The extension expands the journal to 7 sections for inserts instead of 5.


  • The cover is embellished with a colored piece of distressed webbing (Lutradur), with a clear matte collage medium. Topped with a handstitched monogram. 
  • Cording is laced into the spine to hold the signatures instead of elastic. 
  • A length of seam binding is used for a tie plus a found button for a closure.
  • The extra length of cords are knotted along the top of the spine and held together with a scrap of the webbing. REFER to the photos.


  • Prepare fabrics for others pages by using using a sewable fusible interfacing between layers of thin fabrics. Experiment with a variety of fabric combinations. NOTE: Refer to photo for examples. I chose to use white or light neutral fabrics so that they could be painted, inked, stamped or embellished. Use a clear gesso on the fabric before stamping or stenciling or adding other mediums that could "bleed" through the fabrics.


  • Fold the prepared fabrics in half and cut from the page section on the die.  After die-cutting, stitch around the edges of each of the fabric pages.  
  • With pages cut, begin adding pockets, folders, paper bags, envelopes and any interesting inserts. 
The finishing of a junk journal may be ongoing and that's the challenge and enjoyment in making this type of journal.  My journal still has several "blank spaces" to continue adding any variety of elements to those spaces. Hope you enjoy the journey I took! 

Materials

Eileen Hull Pocket Notebook die, Sizzix

Big Shot
Various Fabrics, canvas, batting, muslin
Sewable fusible 
Clear gesso
Iron
Sewing machine
Collage medium, matte
Cereal bags
Cording or cord elastic
Various found objects


Tuesday, July 21, 2020

Christmas In July Continues - A Banner Season

Continuing with another "Christmas in July" idea using the new snowman die from Eileen Hull to create this banner for holiday decorating.


Most dies are made to be used with paper only but I have a thing with always stretching my ideas to see just where I can take them.  For some reason most projects that I make it's difficult to not mix things up. Sometimes that means spending time experimenting first with the wide variety of materials that are available.  This project features one of the the new Eileen Hull chapter 3 dies used in a different direction, follow along with the steps given, for something new to give away or add to your holiday or seasonal decor.

Materials
Eileen Hull Sizzix die, Snowman
Snowflake die
Alphabet die
White felt
Thermoweb Ultra fusible iron-on adhesive
Foam adhesive sheet
Fabric scrap
Black heavyweight paper
Brown heavyweight paper
Orange card stock
White decorative paper
Metallic foil
Cording or ribbon
Ultra bond adhesive
Thin raffia
Red bead or tiny Pom-Pom
White pen

NOTES & TIPS:
White felt is layered together to make the snowman bodies. Decorative fabric is also layered together for the scarves. Instructions will be given on the process of using a fusible adhesive with both types of fabrics.  *** Follow the instructions that come with the fusible adhesive for heat settings and process. Tips will be given here to help with the process. Most iron-on fusible come with a paper backing on one side.

Glue together 2 layers of the black and brown papers before die-cutting them for the top hat and branch arms.  Use heavyweight paper on hand and paint them to the color desired.

Preparing felt and fabric before die-cutting shapes

The dies used for the snowflakes and letters are older dies that are no longer available but there are some newer designs available.  Substitute another element for the snowflake and another style of alphabet.


Fabric Prep


  • Cut 2 pieces of felt large enough for the nine snowmen shapes and a piece of fusible adhesive to match. 
  • Press the felt if needed before layering.
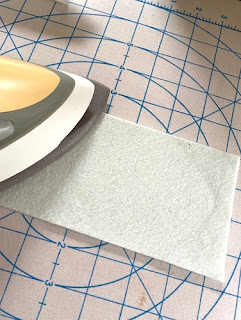
  • Place the fusible down onto one piece of the felt with the paper backing facing up. Place iron onto the paper side of fusible. The best method is to press the iron down and hold for several seconds before moving the iron to another area. Once the entire piece is pressed down in this fashion, the iron can be slide back and forth over the fusible. Allow it to cool down.  Remove the paper backing from the fusible. TIP: If fusible was not heat set enough it may remain attached to the paper backing. Repeat that area again; cool and release.

  • Place the second felt piece over the fused adhesive. Press as before till both pieces are fused together. NOTE: Depending on the thickness of material used it may take a little longer to adhere the layers. Once shapes are die-cut and any edges are not completely fused, repress those edges carefully. 


  • The same process can be used for fusing thinner fabrics together (snowmen scarves). 

 Assembling snowmen for the banner
  • Die-cut ALL pieces from desired materials.
  • Lay out all the pieces needed for each snowman before gluing into place. 

  • Decorate black hats by gluing a strip of raffia around the hat (Refer to photo for placement). Allow glue to dry then add a piece of punched sprig and a red bead to finish the hats. 
  • Add all pieces by gluing onto the snowman shapes. Start  by placing the hats on first in whatever fashion desired. Next add the scarves. Add the eyes and nose, finish with the two branch arms. Set the snowmen aside till all pieces dry.  
  • Cut a piece of a foam adhesive sheet for die cutting the letters used to spell out - let it snow.  Remove one of the backing sheets from the foam. Place a foil sheet over the foam adhesive and press onto the adhesive we’ll.  Remove the clear foil sheet cover.  Die-cut the letters from the foam without removing the other release paper.  
  • Prepare another piece of foam adhesive sheet with for the snowflake spacers using the white decorative paper. Die-cut 4 snowflakes from the covered foam and 4 from paper only.
  • Place the foil/foam letters onto the snowman near the bottom (Refer to photo).
  • With white pen, add a small dot to each eye.
Stringing Banner
  • Lay the snowman out in-line, facing up to arrange. Note: Notice that they are each close enough to have it appear they are holding hands. The snowflakes act as spacers between each group of snowmen and those next to them appear to be touching the snowflakes. 
  • Carefully turn them over, keeping them spaced.
  • Run a bead of glue along the neck area to hold the cord. (Refer to photo). Note: If desired a small paper punched circle or square could be glued over the area where the cord runs along the back of each snowman for extra hold. 

  • Remove the paper backing from the snowflakes and line them up at each end and between the groups as shown in the photo.  Align the other paper snowflakes over the snowflakes with adhesive. 
NOTE: If you are in need of further instruction or clarification, feel free to ask. If you follow me on Facebook or are a member of Eileen Hull's Fan Club, you can ask a question there.  Until I can resolve a problem replying on by blog, I may not be able to quickly answer any concerns.