Showing posts with label Christmas craft. Show all posts

Tuesday, November 24, 2020

Season Greetings - Sizzix Style

Whether it’s for decorating your house during the holidays or making decorations as gifts or even making packages for gift giving it seems my “go to” tools for making are ususally Eileen Hull Sizzix dies along with other dies by Sizzix that all coordinate so well together.  

Here are some ideas for making holiday decorations for your home or gift giving.


Versatility of dies are a major reason for my purchases of these tools.  Here are three used for gift giving.  All are made from the Sizzix mat board covered with the same paper on both sides before die cutting the shapes.  The square gift box cube holds a cellophane bag of hot chocolate mix and snowflake marshmallows. Another is made using the larger, bottom part of the treasure box die, with wire handles using the twist and style tool added. The third is an older die, the loaf pan die, perfect for a cellophane bag filled with sweet treats.   

Using the Eileen’s mitten box die #664510 here are two versions of a banner garlands. One is made from layering red burlap and red cotton fabric.  Two mitten shapes are cut and placed together with glue, leaving an opening at the top. The banner garland can be made as long or as short to fit your decorating needs.  The front of each is decorated using the zigzag shape from the same die, cut from felt and glued in place.  A small fabric heart is cut with a Sizzix die, and placed on the front between the felt zig-zag shapes. To finish, add a sprig of greenery and a pinecone into each mitten.


Another version was made recycling a white foam sheet of packing material. Cut two for each and glue together with white craft glue. Add a die-cut snowflake shape to each.  At the top edge of each mitten two holes were punched for adding a narrow ribbon for stringing them together. 


 Using the newest teacup die #664797 a three-dimensional bell ornament is made from cutting 6 shapes from silver metallic card stock. The handle is cut from each cup shape, scored down the centers for folding. The folded shapes are matched along the edges and glues together to form the 3D bell. A length of cording is folded in half with a jingle bell added and knotted at the cut ends, then fed through the center of the 3D bell.  Two bows are tied from silvery ribbon and glued to the top of the bell, around the hanging cord. 


This short bell garland was made specially for Eileen using the tea cup die.  The bells are made in her favorite color. The shapes are painted and embossed then embellished with shapes from other Sizzix dies. 


The house ornament die was cut from kraft colored card stock, decorated with simple doodles using a white pen to create little tea light holders. The base from the mitten box die becomes the holder for safe battery style tea lights. Use them on a holiday table at each place setting.  


Tuesday, July 21, 2020

Christmas In July Continues - A Banner Season

Continuing with another "Christmas in July" idea using the new snowman die from Eileen Hull to create this banner for holiday decorating.


Most dies are made to be used with paper only but I have a thing with always stretching my ideas to see just where I can take them.  For some reason most projects that I make it's difficult to not mix things up. Sometimes that means spending time experimenting first with the wide variety of materials that are available.  This project features one of the the new Eileen Hull chapter 3 dies used in a different direction, follow along with the steps given, for something new to give away or add to your holiday or seasonal decor.

Materials
Eileen Hull Sizzix die, Snowman
Snowflake die
Alphabet die
White felt
Thermoweb Ultra fusible iron-on adhesive
Foam adhesive sheet
Fabric scrap
Black heavyweight paper
Brown heavyweight paper
Orange card stock
White decorative paper
Metallic foil
Cording or ribbon
Ultra bond adhesive
Thin raffia
Red bead or tiny Pom-Pom
White pen

NOTES & TIPS:
White felt is layered together to make the snowman bodies. Decorative fabric is also layered together for the scarves. Instructions will be given on the process of using a fusible adhesive with both types of fabrics.  *** Follow the instructions that come with the fusible adhesive for heat settings and process. Tips will be given here to help with the process. Most iron-on fusible come with a paper backing on one side.

Glue together 2 layers of the black and brown papers before die-cutting them for the top hat and branch arms.  Use heavyweight paper on hand and paint them to the color desired.

Preparing felt and fabric before die-cutting shapes

The dies used for the snowflakes and letters are older dies that are no longer available but there are some newer designs available.  Substitute another element for the snowflake and another style of alphabet.


Fabric Prep


  • Cut 2 pieces of felt large enough for the nine snowmen shapes and a piece of fusible adhesive to match. 
  • Press the felt if needed before layering.
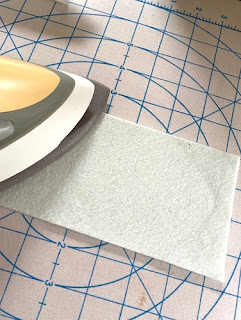
  • Place the fusible down onto one piece of the felt with the paper backing facing up. Place iron onto the paper side of fusible. The best method is to press the iron down and hold for several seconds before moving the iron to another area. Once the entire piece is pressed down in this fashion, the iron can be slide back and forth over the fusible. Allow it to cool down.  Remove the paper backing from the fusible. TIP: If fusible was not heat set enough it may remain attached to the paper backing. Repeat that area again; cool and release.

  • Place the second felt piece over the fused adhesive. Press as before till both pieces are fused together. NOTE: Depending on the thickness of material used it may take a little longer to adhere the layers. Once shapes are die-cut and any edges are not completely fused, repress those edges carefully. 


  • The same process can be used for fusing thinner fabrics together (snowmen scarves). 

 Assembling snowmen for the banner
  • Die-cut ALL pieces from desired materials.
  • Lay out all the pieces needed for each snowman before gluing into place. 

  • Decorate black hats by gluing a strip of raffia around the hat (Refer to photo for placement). Allow glue to dry then add a piece of punched sprig and a red bead to finish the hats. 
  • Add all pieces by gluing onto the snowman shapes. Start  by placing the hats on first in whatever fashion desired. Next add the scarves. Add the eyes and nose, finish with the two branch arms. Set the snowmen aside till all pieces dry.  
  • Cut a piece of a foam adhesive sheet for die cutting the letters used to spell out - let it snow.  Remove one of the backing sheets from the foam. Place a foil sheet over the foam adhesive and press onto the adhesive we’ll.  Remove the clear foil sheet cover.  Die-cut the letters from the foam without removing the other release paper.  
  • Prepare another piece of foam adhesive sheet with for the snowflake spacers using the white decorative paper. Die-cut 4 snowflakes from the covered foam and 4 from paper only.
  • Place the foil/foam letters onto the snowman near the bottom (Refer to photo).
  • With white pen, add a small dot to each eye.
Stringing Banner
  • Lay the snowman out in-line, facing up to arrange. Note: Notice that they are each close enough to have it appear they are holding hands. The snowflakes act as spacers between each group of snowmen and those next to them appear to be touching the snowflakes. 
  • Carefully turn them over, keeping them spaced.
  • Run a bead of glue along the neck area to hold the cord. (Refer to photo). Note: If desired a small paper punched circle or square could be glued over the area where the cord runs along the back of each snowman for extra hold. 

  • Remove the paper backing from the snowflakes and line them up at each end and between the groups as shown in the photo.  Align the other paper snowflakes over the snowflakes with adhesive. 
NOTE: If you are in need of further instruction or clarification, feel free to ask. If you follow me on Facebook or are a member of Eileen Hull's Fan Club, you can ask a question there.  Until I can resolve a problem replying on by blog, I may not be able to quickly answer any concerns. 

Tuesday, December 3, 2013

Holiday Decorations - Designer Craft Connection December

When Thanksgiving falls the very last Thursday of November I am not very "thankful".  Yes, I am one of those people who pulls out the Christmas stuff the day after Thanksgiving.  This year not only did Thanksgiving the last week of November, but I decided to host dinner for 21 family members here.  With the help of many, it was a wonderful day!

On Friday the house began the transformation.  Today is the final day of decorating because I decided to scale back a little and there are several things that will remain packed away this year.  Even with that the house looks pretty festive.
Candle Jars on Mantle

The mantle usually takes on a different look each year, but most of the time in includes candles.  This year is no different.  NOTE: the candle jars are in place but some batting and snow needs to be added.

Back in November I was asked, by our women's group if I would like to share an idea for a holiday decoration with the community.  So I created a variety of samples to display and now those samples became part of my own holiday decorations this year.

Everyone was asked to bring a pint size mason jar, along with a tea light candle.  I supplied the rest.  With some ribbons, raffia, snips of greens, tiny pinecones, berries, bells, snowflakes and felt cut-cuts, each jar becomes unique. The snow is a mix of epsom salt and a small amount of artificial snow with some sparkle.  A snowflake shaped candle rug was made with two different die-cut snowflake shapes that were glued together for a added touch.  Each and everyone was unique and festive.  It was a delightful craft for all.

Here is the display of all the samples I made:
Display of candles at home

Display of candles at clubhouse
NOTE: The runner is another project that the quilting group made last year.  Super simple!

Here is a cute, no water version of a snow globe:

Just a couple of the creations by the group:


The three very, very helpful friends that helped:


Love those Mason Jars!