Showing posts with label banner making. Show all posts

Monday, September 21, 2020

The Great Outdoors ... Brought Inside

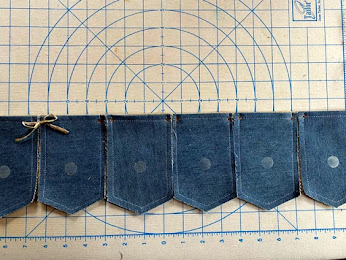
The term "the great outdoors" can conjure up many different ideas.  At this moment, and for this project it is to create something to bring bits of nature inside.  Using the Eileen Hull Tiny Book Case die, I came up with this banner to represent a tiny bit of the outdoors for display somewhere in the inside, plus with a twist.


Materials

Eileen Hull die, Tiny Book Case
Eileen Hull die, homemade alphabet, thinlit
Eileen Hull dies, book plate & labels, thinlit

Various Sizzix dies, 660694, 663607, thinlit

Fabric, lightweight denim
Fusible lightweight interfacing, Pellon soft-flex
Iron
Sewing machine
Thread
Hole punch
Eyelets
Eyelet setter
Jute cording, thin
Raffia ribbon
Metallic-like card stock
Coordinating card stock and decorative paper
Foam adhesive
Metallic foil, patina and copper
Velcro thin clear fasteners
Artificial/real elements for placing inside pockets.


INFO, TIPS & IDEAS TO CONSIDER BEFORE BEGINNING
  • When creating with die-cut shapes by Eileen, I usually like to find ways to combine a variety of materials within the projects.  Experimenting is fun!
  • When working with fabrics it is helpful to use some type of backing for many projects to add body to the fabricmif it helps the design.
  • The type of backing can change depending on the project. There are a variety of fusible and backing adhesives that could be used. 
  • If the design calls for sewing with a machine, use a backing/interfacing that is meant for sewing. (Some interfacings can “gum up” the sewing machine needles.) Be aware!
  • The pockets can be filled with any variety of elements. Use all dried naturals or purchased plant-like stems or flowers or a mix of both.  If ambitious, create plant stems or flowers from die-cuts. 
  • This banner can be made to be reversible if desired. Use the same fabric for both sides or a different color/type for the other. 
  • To connect the pockets, they are tied together using a raffia type ribbon, but thin cord, jute, or ribbon can be used.
  • Gather all supplies before beginning. 

Instructions
  • Select fabric for pockets. Cut 2 pieces for each pocket needed of the main fabric and backing. 
  • Add a backing of choice to the main fabric for each piece.
  • When complete, die-cut each fabric backed pocket piece using the the Tiny Bookcase die.

  • After cutting all pieces needed, mark each for trimming away part of the section with the "V" and the side box flaps. Refer to photo.

  • Once all pieces are marked, trim the "V" section along the mark. Then fold the edge over, so the folded top edge of the pocket aligns with the top of the two side box flaps, as in the photo.  

  • Press the folds of each piece before trimming away the side box flaps. Then stitch on the sewing maching across the top edge of each about 1/4" from the fold. 
  • Match up two pieces, pin if necessary to hold in place. Stitch around the sides and bottom "V" to form each  pocket. Use about a 1/4" seam around the edge. 
  • When all the pockets are formed,  punch a hole with a tool and add an eyelet into each hole.  These holes will be for connecting the pockets together with raffia, cord or ribbon. Refer to the photo to see the eyelet placement and the tying between the pockets.

  • Add a length of thin jute cording to the last eyelet on each end before also tying a bow in each end eyelet. Refer to photo. The cord was looped through the eyelet, then one end of the cord was fed back through to tie a knot to hold it in place.
  • Use clear, thin velcro circles for holding the letter labels on the front of the pockets. Align them on each as shown in the photo. This is side of the velcro circles that are a bit stiffer then the reverse piece. 
  • To create the letter labels, I choose to layer together a decorative paper and a solid card stock with a foam adhesive sheet together.  Die-cut the shape for labels from the layered papers. NOTE: I choose to make 2 sets of changeable words, using a different die design for each. Plus used a different top paper. 
  • Each of the labels are glued onto a die-cut frame, cut from metallic card stock.
  • To make the letters to spell out the words, metallic foil was placed onto one side of foam adhesive, cut and then placed in the center of each label shape.


  • Add the other side of the clear thin Velcro dots to the backs of the letter labels. Press them into place onto the pockets over the opposite Velcro dot. 


Now find a good spot to hang the banner and bring a little bit of the great outdoors inside!

Tuesday, July 21, 2020

Christmas In July Continues - A Banner Season

Continuing with another "Christmas in July" idea using the new snowman die from Eileen Hull to create this banner for holiday decorating.


Most dies are made to be used with paper only but I have a thing with always stretching my ideas to see just where I can take them.  For some reason most projects that I make it's difficult to not mix things up. Sometimes that means spending time experimenting first with the wide variety of materials that are available.  This project features one of the the new Eileen Hull chapter 3 dies used in a different direction, follow along with the steps given, for something new to give away or add to your holiday or seasonal decor.

Materials
Eileen Hull Sizzix die, Snowman
Snowflake die
Alphabet die
White felt
Thermoweb Ultra fusible iron-on adhesive
Foam adhesive sheet
Fabric scrap
Black heavyweight paper
Brown heavyweight paper
Orange card stock
White decorative paper
Metallic foil
Cording or ribbon
Ultra bond adhesive
Thin raffia
Red bead or tiny Pom-Pom
White pen

NOTES & TIPS:
White felt is layered together to make the snowman bodies. Decorative fabric is also layered together for the scarves. Instructions will be given on the process of using a fusible adhesive with both types of fabrics.  *** Follow the instructions that come with the fusible adhesive for heat settings and process. Tips will be given here to help with the process. Most iron-on fusible come with a paper backing on one side.

Glue together 2 layers of the black and brown papers before die-cutting them for the top hat and branch arms.  Use heavyweight paper on hand and paint them to the color desired.

Preparing felt and fabric before die-cutting shapes

The dies used for the snowflakes and letters are older dies that are no longer available but there are some newer designs available.  Substitute another element for the snowflake and another style of alphabet.


Fabric Prep


  • Cut 2 pieces of felt large enough for the nine snowmen shapes and a piece of fusible adhesive to match. 
  • Press the felt if needed before layering.
  • Place the fusible down onto one piece of the felt with the paper backing facing up. Place iron onto the paper side of fusible. The best method is to press the iron down and hold for several seconds before moving the iron to another area. Once the entire piece is pressed down in this fashion, the iron can be slide back and forth over the fusible. Allow it to cool down.  Remove the paper backing from the fusible. TIP: If fusible was not heat set enough it may remain attached to the paper backing. Repeat that area again; cool and release.

  • Place the second felt piece over the fused adhesive. Press as before till both pieces are fused together. NOTE: Depending on the thickness of material used it may take a little longer to adhere the layers. Once shapes are die-cut and any edges are not completely fused, repress those edges carefully. 


  • The same process can be used for fusing thinner fabrics together (snowmen scarves). 

 Assembling snowmen for the banner
  • Die-cut ALL pieces from desired materials.
  • Lay out all the pieces needed for each snowman before gluing into place. 

  • Decorate black hats by gluing a strip of raffia around the hat (Refer to photo for placement). Allow glue to dry then add a piece of punched sprig and a red bead to finish the hats. 
  • Add all pieces by gluing onto the snowman shapes. Start  by placing the hats on first in whatever fashion desired. Next add the scarves. Add the eyes and nose, finish with the two branch arms. Set the snowmen aside till all pieces dry.  
  • Cut a piece of a foam adhesive sheet for die cutting the letters used to spell out - let it snow.  Remove one of the backing sheets from the foam. Place a foil sheet over the foam adhesive and press onto the adhesive we’ll.  Remove the clear foil sheet cover.  Die-cut the letters from the foam without removing the other release paper.  
  • Prepare another piece of foam adhesive sheet with for the snowflake spacers using the white decorative paper. Die-cut 4 snowflakes from the covered foam and 4 from paper only.
  • Place the foil/foam letters onto the snowman near the bottom (Refer to photo).
  • With white pen, add a small dot to each eye.
Stringing Banner
  • Lay the snowman out in-line, facing up to arrange. Note: Notice that they are each close enough to have it appear they are holding hands. The snowflakes act as spacers between each group of snowmen and those next to them appear to be touching the snowflakes. 
  • Carefully turn them over, keeping them spaced.
  • Run a bead of glue along the neck area to hold the cord. (Refer to photo). Note: If desired a small paper punched circle or square could be glued over the area where the cord runs along the back of each snowman for extra hold. 

  • Remove the paper backing from the snowflakes and line them up at each end and between the groups as shown in the photo.  Align the other paper snowflakes over the snowflakes with adhesive. 
NOTE: If you are in need of further instruction or clarification, feel free to ask. If you follow me on Facebook or are a member of Eileen Hull's Fan Club, you can ask a question there.  Until I can resolve a problem replying on by blog, I may not be able to quickly answer any concerns. 

Tuesday, February 3, 2015

Arnold Grummer Papermaking - Love Is In The Air

The holidays came and went in an instant, January found me traveling to Califonia to a Craft & Hobby Industry trade show and then off to visit family,and there went January!  It's been a while since the last post I shared on paper making.  Now that February has arrived I still felt the need to spread a little LOVE!


Being fond of banners of all type, I once again created this one using the "bordering technique" on each handmade paper sheet made using the  pour method to create the panels of the banner.  For an excellent source for adding color by bordering, and so many other techniques, I would recommend a copy of "trash-to-treasure paper making" by Arnold Grummer.


Some hearts are made using the triple heart template and red paper pulp.


After each sheet was complete embellishing began.  Red burlap is used to off-set the digital die-cut letters from black card stock.  Using fabric with small white hearts, I ironed on a fusible webbing to the scrap of fabric.  The top strips were then cut using a Sizzix Big Shot and a border die.  From red card stock rosettes are cut and formed.  The white centers of the flowers are die-cut from a white glitter craft foam, finished with a small green button.  Three leaves for each flower rosette are cut from a solid green paper.  Iron on the fusible backed border and glue all the other elements onto each paper panel using Beacon™ 3-in-1 glue.  Attach each finished panel to jute cording with small binder clips.

Visit the Arnold Grummer website for products, videos and more.  If making a purchase this month use the coupon code - Two20 - when ordering for a 20% discount.

Materials needed:
Pour Mold
Triple Heart Template
Blender
Baster
White paper scraps
Red paper scraps
Red burlap
Black cardstock
Red cardstock
Green cardstock
White glitter craft foam
Small round buttons
Beacon 3-in-1 glue
Jute cording
Small binder clips
Heart fabric scraps
Iron-on fusible