Showing posts with label handmade gift ideas. Show all posts

Friday, December 17, 2021

Small Packages & Making Treats For Giving - Comfort & Joy 2021


Brown Paper Packages, tied up with string!  

Some of the ideas shared here are repeats from past blog posts and Facebook posts. With new members to Eileen’s fan club I felt it was worth sharing the ideas once again. Gift giving surely happens during the holidays but the ideas here can be used year round for any and all tiny gifts. 
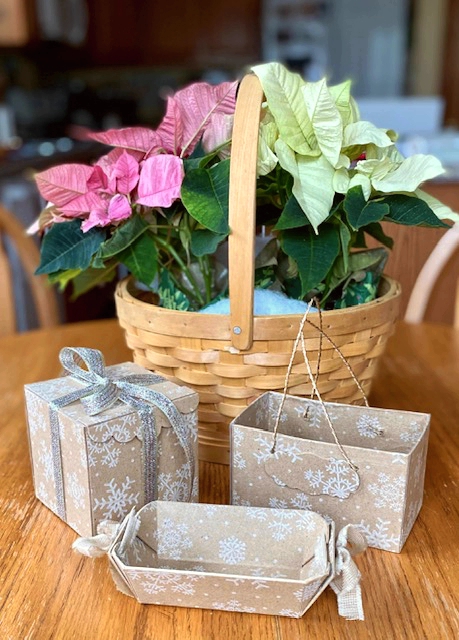


There are some dies still available that would make perfect containers for giving small gifts. There are a couple that may have been discontinued but by showing what I have used, even from older dies I hope to give the followers to this group the idea to always look at Eileen’s dies in a different way, for that matter all Sizzix dies.  

Create packages using gift wrapping paper to cover the mat board or thin poster board. I used spray adhesive to add the wrapping paper to the base boards. Spray well for good adhesion. 


Most of EIleen's dies are meant to be cut from mat board and for three of them that is what I used. These three containers are made with mat board that is covered with holiday wrapping paper before die-cutting.
 NOTE: Always look at the larger boxes or containers with “different” eyes and don’t be afraid to alter them to find various uses. 

IDEAS & TIPS

Each of these were used to give some homemade treats as cute little handmade gifts for neighbors or any holiday visitors. They can hold about a dozen little cookies. 

Fill cellphone bags with spiced nuts, seasoned cracker mix, other homemade candies to be placed into the sweet holiday containers made from the Sizzix dies.

A small gift holder is made using a tiny shopping bag die from an older Eileen Hull release.  Here the design is cut from a thin poster board that is also covered with wrapping paper.  Two sizes are shown here, the original and a slightly larger one. The original size can be used for tiny gifts but by taking the main shape and altering the pieces slightly, it becomes a larger bag.  

The final container is also a older Sizzix die (but not Eileen’s) that has been one that I’ve used over and over for gift giving.  This is also made from layering wrapping paper over thin white poster board before die cutting and constructing.

Use various other dies to create tags or labels for your gift giving.

Others shapes like the Vintage Pickup Truck can make a fun container for tiny gifts or small bags of treats.  

To make interesting little boxes or containers, always “think outside the box”!

INFORMATION ON DIES USED

Eileen Hull dies:

Gift Box #664345

Treasure Box #663634

Loaf Pan #659873

Shopping Bag #658055

Other die was called Box #3 (will try to find the number) 


***As an added bonus to this post on making packages for gift giving, I’ll be including  some recipes for treats to make to fill those packages.***

MINI DOUGHNUT HOT BUTTERED CHEERIOS

Ingredients: 

  • 1/4 cup butter
  • 1/4 teaspoon vanilla
  • 4 cups Cheerios or Cinnamon Cheerios cereal
  • 1/4 cup sugar
  • 1 teaspoon cinnamon

In large skillet, melt butter over low heat and stir in vanilla.  Add cereal; cook and stir 5 minutes. Transfer cereal to large bowl. Add sugar and cinnamon; toss well to coat. Package and gift!

PRETZEL TURTLES

Ingredients:

  • Rolo Candies - 50
  • Mini Pretzels - 50
  • Pecan Halves - 50
Preheat oven to 300. Line a baking sheet with parchment paper. Lay pretzels in a single layer onto parchment. Top each with a Rolo candy in the center of the pretzel. Place into the preheated oven until the chocolate and caramel soften. (About 4 minutes) Remove from oven and press a pecan halve onto each Rolo candy. Chill in refrigerator until chocolate is set. Package and gift! 

CANDIED PECANS

Ingredients:
  • 1 1/2 cup pecan halves
  • 1/4 cup maple syrup
  • 1 teaspoon vanilla
  • 1/8 teaspoon salt
Preheat non-stick skillet over medium-high heat. (Important to preheat, so maple syrup caramelizes.) Add pecans, maple syrup, vanilla and salt to pan.  Stir constantly, 2 to 5 minutes, until syrup caramelizes.  Spoon onto parchment paper and spread evenly to separate clumps and allow to cool well, about 30 minutes. 

Tuesday, May 25, 2021

Creating With The Unusual


Thinking outside the box can be challenging but it helps to stretch ones imagination. There’s bound to be failures but many times it opens up creative possibilities.  Visits to any variety of shopping establishments for the the “usual” purchases can take on something entirely different with an open mind and willingness to experiment.

Besides always first searching through the items I have collected and are on hand, one of the other places I find a good spot to visit are the area “dollar” stores.  That’s exactly where I found o few items to experiment with for this very project. From a package of two manila , padded mailing envelopes comes the end project of this unconventional, padded folio.  

  • Open up the mailing envelope by cutting it open along the sides and bottom. 
  • From the two pieces cut two covers from the die. NOTE: I did not use wide (3 hole) spine. I trimmed it to 2. Also cut a spine from mat board and trimmed to a 2 hole spine to add strength. Though the spine was not used in this project for individual inserts, adding this extra piece as a re-enforcement will help if an additional inserts is desired.
  • Before reconstructing the die-cuts into a new padded folder it's best t0 remove a little of the plastic bubble lining from around the edges. This will help hold the edges together with adhesive tape or glue.

A new padded folio journal was created from the two pieces. 

The procedure is as follows:

  • Using the instructions from the tutorial by Jennie Atkinson, I made four folded folio inserts to fit the front and back covers and two more inserted to the insides. I created a large one for the back cover, a tiny one for the front following the size specifications from Jennie.The inside two are slightly smaller then large one. A big "THANKS" to Jennie for the instructions and inspiration!
  • Here is a link to Jennie's YouTube video showing the process - VIDEO LINK
  • For the small version, the measurements are:  6 x 6 patterned card stock scored at 1.75” all around and then cut as per the original tag book. Final size is 2.5” square.
  • The two inside folder folios begin with paper cut to 9 3/4" square, scored at 2 3/4" on all four sides. One folder was cut in the same way as the original instruction. One was cut with the corner square cut diagonally and folded over. (Refer to photo)
  • Inserts were made with the bookbinding die three of the folders, for placement in the center of them.  
  • Use the new thinlit die to create a waterfall insert in the fourth folder.  

Front cover small folder folio/open


Back cover large folder folio/closed

           
Back cover large folder folio/open

                   
Inside Right folder folio/closed


Open folder folio


Inside Left folder folio


Open folder folio


Materials

Eileen Hull Sizzix die, Folio Journal

Eileen Hull Sizzix thinlit, Bookbinding & Label

Eileen Hull Sizzix thinlit, card, Waterfall & Tags

Big Shot

Padded mailing envelope

Adhesive tape

Glue

Decorative papers (I selected papers from Simple Stories, Simple Vintage Farmhouse Garden collection)

Assorted embellishments from the same collection

Various other decorative papers 

Various others embellishments

Woven edge seam binding

Distress ink and applicator

Decorative edge scissors, pinking

Velcro, thin clear fasteners, 5/8”, 3/8”


Tuesday, April 6, 2021

New Dies, More Ideas with Folio Die

 A new release of Eileen Hull dies for Sizzix is here once again. This latest project here is made by combining the two new dies that were designed to coordinate with the FOLIO die and the other thinlit sets. 


The combination of all the dies gave me the opportunity to create a sweet little booklet to give as a gift. 

It began with a collection of coordinating decorative patterned  papers and card stock.  Die-cutting and layering the pieces and altering the folio as the base can create some fun projects. With this collection, the versatility and the ease of using these dies can result in so many interesting combinations. The Folio covers are cut without the fold and extra flap. All but one binding strip was removed for the spine to make the booklet. A single folder/page was constructed for placing in the middle of the booklet. The inside page contains the waterfall cuts.. The outside, front and back folder covers has the corner pocket attached to hold tags. The inside covers (front & back) of the main booklet have the binding die with tags attached. The booklet is finished off front and back with the Mandala die. The front shows a white shiny mandala adorned with flowers and leaves. The back cover has a black foil mandala cut and adhered with a button at the center for part of the closure. 

This blog hop will show ideas of all types to help with inspiration to start creating. This post will not be sharing a step by step tutorial of the process I used, but will be at another time.  Use this link from Eileen Hull Designs to see the post and read about the projects or use the individual links to each participant of the blog view each individual post here. 


Additional Photos of Folio Booklet


Material List

Dies: Folio journal, scoreboard die

         Mandala, thinlit die

         Folio Page, Pocket & Flowers, thinlit dies

         Card, Waterfall & Tags, thnlit dies 

         Bookbinding & Label, thinlit dies

Decorative patterned paper, several coordinating sheets

Card stock, coordinating solid colors

Double sided adhesive tape, various widths 

Spray adhesive or adhesive sheets

Ribbon, to cover spine

Seam binding

Cording, thin black leather

Elastic hair band

Button, flat for closure

Gel medium, matte 

Brush 

Embellishments 


IDEAS

Mother's Day is soon approaching and this little booklet would make a special small, personal gift card or keepsake for any mother, a new mother and grandmother.  Add photos, quotes, memories, gift cards onto or into pockets, the various tags or folded binding.  (NOTE: I have made my own folded accordian style binding for projects, and I'm really liking this new design.)

Think beyond Mother's Day to upcoming graduations, weddings, special birthdays or celebrations. This is basically a four page booklet made from coordinating decorative papers and some basic card stock. It can go from simple to extravagant as anyone likes. Any combination of the Folio Die with the other elements are a great start to very personalized projects.


***A MESSAGE FROM EILEEN***

Welcome to our Chapter 2 Release Party! Today we are sharing Folio Journal accessory dies- the Waterfall & Tags and Book Binding dies and the new Bigz L Camper ScoreBoards die! Use these elements in different size journals, cards and layouts!

Check out all the different ways to use these dies on our Blog Hop. Click through and leave a comment on each of the designers' posts and be eligible to win a $25 gift certificate in Eileen's Etsy Shop! 

Join us on Facebook Live and YouTube Live for an up close and personal look at the team's projects. I will also demo how to use the dies during the show. Really hope you can join us for this fun event- prepare to be surprised! Thanks for joining us!


NOTE: There is also another Eileen Hull die design in this latest collection being released.  It is a 3D Camper on a Scoreboard die to allow the use of heavier materials.  A new project coming soon using this die in a special way. 

Here are images of the three newly released dies from Eileen Hull -


List of Blog Hop Participants

Monday, June 2, 2014

Designer Crafts Connection - Handmade Gift Ideas

This month we are sharing ideas for handmade gifts.  It's funny that I had an actual reason to create something handmade to give to a friend yesterday, and I will be sharing what I made for this post.

Our quilt group was invited to visit the home of someone who helped us get our little group off and running several years back.   We were all invited to go and see her large collection of quilts and other quilt related pieces, as well as her personal creative space and the Gammill Long-Arm quilting machine.  
Front of card box

I will share a few photos of some of the stacks of quilts were had the opportunity to view.  She also shared several patterns with us.  We decided that we needed to once again work on a larger project, with a new application that none of us have tried before.  So Maureen graciously offered to once again to guide us through a new project.  

To show my "thankfulness" for this wonderful, inspiring visit, I wanted to make a little "handmade" something to give her.  

I created a box of note cards for her.  This is a small gift that anyone could make in their own variations, with tools they have available.  
Box back - stamp details

To make the set of eight cards I used blank white cards and matching envelopes.  For the colored cardstock cut-out design, I used a design for a card (#59910 - adapating the front) for my Silhouette machine.  Eight different colors of textured cardstock were used. To add a little contrast to the cut-out area, I used a blending tool and went over the area with coordinating Distress Inks.  I added a coordinating, decorative paper to the backside of these pieces.  Each of these were then glued to the the blank cards.  Another piece of each decorative paper was trimmed to fit into the envelopes for a liner paper.  


The box to hold them was also cut from a Silhouette file (#54224) using a kraft colored paper.

To decorate the box with a "quilting" theme, I used Ann Butler Faux Quilt design 2" stamps.  
Each design was stamped with clear embossing ink and sprinkled with Ranger Gold Pearl embossing powder.  Heat the powder with a heat tool.  Once all designs are stamped and embossed, I added inks over the images to off-set the embossed areas.  Use a blending tool to add the inks.  I used Frayed Burlap Distress Ink and Archival Potting Shed for shading.  Each of the squares were trimmed down to measure 1 3/4".  Cut two black panels of cardstock just 1/4" or so shy of the box front and back.  Glue the faux quilt squares onto the black card stock, leaving a little black show between the squares.

Add a pretty piece of ribbon for tying closed.  


NOTE: I created a small "thank you" card to attach using another image for a card from Silhouette.  I resized it to make it smaller.  Attach a decorative paper to the inside front of the card.  Add a little sprackle with some glitter.

There is something special about making and giving a gift created with your own hands! 

Now just a few photos of the absolutely beautiful array of handmade quilts -


That is just a small part of what we were treated to seeing!  Amazing!!!!!