
Tutorials for Making Bells and Tea-Light Holders with Eileen Hull Dies

Now, on with some making! I dont know why but I almost always look passed the original use of the designs of dies to find other ways to use them. This happened with the new die teacup design by Eileen Hull for Sizzix.


This tutorial will walk you through the way to use the teacup die in two different ways to create bells.
TIPS
These tips given, are for both type of bells and should be helpful in constructing them. They are given as a starting point, adjust the procedure to suit your own making style.
- The first thing is to cut a template from a piece of chip board (something sturdy). This is to mark where to cut the cup shapes to create the bells.
- The handles need to be removed to form both the bell designs.
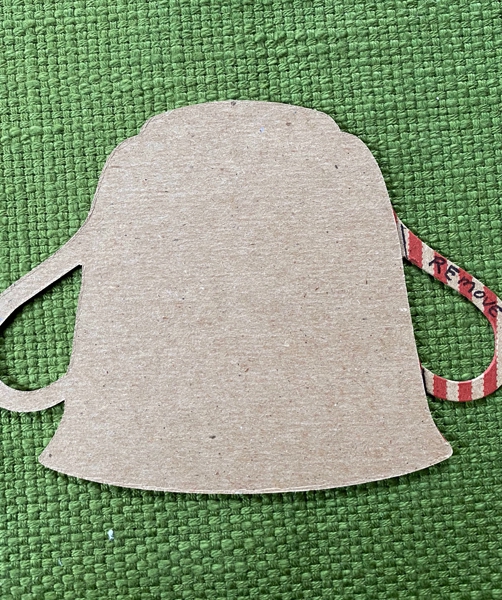
- This cut edge may not be completely smooth as the opposite side of the cup. No problem! Marking with the template, then removing the handle with sharp scissors on those marks will be fine.
- Another template can be cut from plain paper to mark the center fold for the three-dimensional bell. This will help in folding and construction.

- Fold this paper template carefully in half and crease well.
- For either bell design, color the edges with ink using the technique you prefer.
- The 3-dimensional bell can be made from most types of paper. If using a heavy card stock, it may be helpful to mark the fold line and then use a score board to crease the center fold.
- Refer to the NOTES given in the instructions.
- Add any embellishments of choice to the lower edge of the single bell shapes, paper or other. A simple bow may be all it needs if using a paper with lots of pattern.
- Roll the two shapes to curve slightly before joining together with the clapper/spoon if desired.
- To adhere paper for clapper/spoon I used double-sided adhesive. This type of adhesive may be helpful to use for some of the embellishments also.
- If thinner paper warps from gluing, placing the folded pieces under something heavy may help or carefully press with a dry iron along the edges.
3D Bell

- Cut 6 bell shapes from paper of choice. (NOTE: The amount of pieces can vary if desired, but I would use as few as 5 or no more then 7.)
- Place the folding template on each cut shape and line up edges well.
- With a pencil, draw a line down the center of each to fold on.
- Fold each in half, matching edges well and crease with a bone folder.
- Glue the folded shapes together, one at a time. Again, line up the edges of each well. (NOTE: Thinner papers may warp slightly when using a liquid glue.)
- Before the final two sides are glued together create the center for the bell.

- Thread a jingle bell onto a ribbon or cord or wire, long enough to be folded in half to hold the bell and also become the hanger.
- Glue or adhere with double-sided tape, the center hanger and string with bel, along the center of the folded bell shapes. If gluing, let the glue set up.


- Glue/adhere the last two sides together. Adjust the center hanger if needed.
- Make one or two bows from ribbon and glue to the top of bell on one or both sides of the hanger if desired.
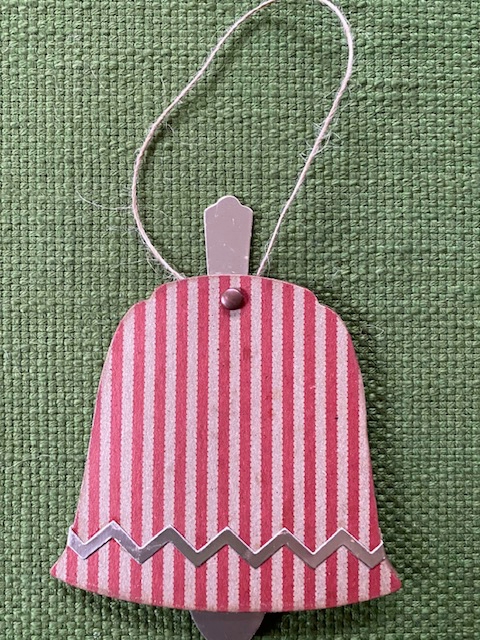
Single Bell for Ornament or Banner


- Cut two shapes for each bell from card stock.
- Use template to mark and remove the handles from each cup shape (NOTE: Use decorative or plain papers. Plain papers can be embossed with embossing folders after cut and handles removed if desired.)
- The bell clapper is cut from the spoon shape for each bell. (NOTE: Two pieces of metallic paper are fused together with double sided adhesive before die-cutting the spoon shape.)
- Line up two bell shapes with the clapper (spoon) in between.

- Adjust the spoon so the handle sticks out the top slightly and the bowl of the spoon shows at the bottom slightly.
- Mark with a dot a spot to punch a small hole to place a paper brad to hold the three layers together.

- Embellish the front of the bell if desired. Use other die-cut shapes or other embellishments.
- For single ornament - cut a length of thin ribbon or cording for a hanger. Thread through the top of the bell, placing the hanger (cord) behind the spoon shape where it catches below the paper brad used to hold the layers together. Form a knot at the top of the hanger.

- For banner design, thread a longer length of cord through each bell so it lies under each paper brad. (NOTE: To keep each bell in place, apply a small amount glue where the cord lies.)

Another seasonal favorite song to share with you, by John Williams, from Home Alone ... A Candle in the Windows.
The house ornament die was easily adapted to create a simple holder for battery style tea lights. As with instructions on adapting the tea cup die into bells, I will include some helpful TIPS.

TIPS
- They can be made of a kraft colored card stock for a gingerbread look.
- Because this is a steel rule die, they can also be cut from a thin corrugated board.
- Each holder will need 4 cut pieces.
- Practice simple doodles, lines, dashes and dots before decorating. The use of white ink looks like icing.
Instructions
- Cut 4 sides from paper of choice.
- Refer to template to remove specific areas and areas to crease.

- Mark each with pencil lines before cutting.
- Use a ruler and craft knife to remove the unused areas.
- Score the two crease lines.
- Decorate each house piece with doodles in white ink.
- Add double-faced tape to the flap along the side of each house piece.
- Some epsom salt can be sprinkled inside before inserting the candle. Use another type of fake snow if desired.

- Remove the backing from tape and align the other edge of the second house piece onto the adhesive strip. Continue till all four sides are connected.

- Apply double-sided adhesive tape to bottom flaps as shown. NOTE: Notice the top flap in the photo has the adhesive on the outside edge of the flap. The remaining 3, it's positioned on the inside of the flaps.
- Begin folding in the flaps with the one with adhesive along the outside edge and alternate each flap till all four are folded onto each other.

- Use the handle of a wooden spoon or another device to push down onto the bottom from the inside of the holder, making sure the taped edges hold.
- Insert a battery tea light inside.
Love all of these ideas Madeline!
ReplyDeleteHappy to hear that Eileen! It will be fun seeing what others make!
DeleteFabulous ideas Madeline! you are so creative ! x
ReplyDeleteJennie, I appreciate your comment so very much! Happy to know others are enjoying the ideas! Love to share!
Delete