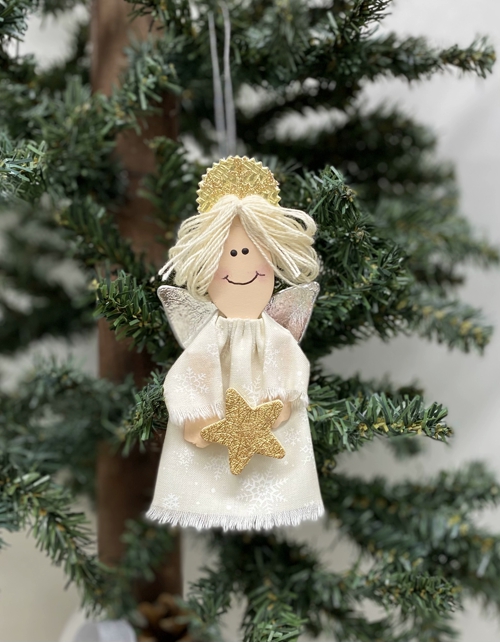
With the release of the two new Eileen Hull dies recently I had shared a few ideas on how the dies could be used. I happen to be someone who always wants to find other ways to use the die shapes. Using the spoon, that is also a shape on the new teacup die, this little angel ornament was created. You will also find two other little spoon characters I had some fun creating!
To make the angel you will find the steps to create your own here.
To make the body:
- Die cut two spoon shapes from mat board
- Cut lower end of spoon handle from the 2 spoon shapes
- Glue the 2 spoon shapes together
- Paint the glued spoon shape and the 2 short, cut handle pieces with flesh colored paint. Dry.
To make dress and sleeves:
- Cut or tear fabric for dress and sleeves to measure 6” x 3 1/2” (dress), 3 1/2” x 2” (sleeves)
- Fold over the top edge of dress piece 1/4” and hand stitch with a running stitch.
- Gather the stitching to create a neckline for the dress.
- Tie around the neck area of the spoon shape and knot.
- Apply some glue under the gathered area of the dresses neck to hold onto the spoon shape.
- Fold the sleeve piece into thirds and run a thin line of glue along edge to hold in place. (Place a strip of waxed paper into the sleeve tube to keep the fabric from sticking together.)
- Tie the dress to the head part of the spoon shape by gathering and knotting the thread.
- Place some glue under the gathered neck of the fabric at the front and back. Allow glue to dry.
- Fold sleeve tube in half to find center. Glue onto the back of dress near the top.
- Glue the two cut pieces from the spoon handle into the sleeves to form the arm and hands of the angel. Refer to photo.
Adding hair and face:
- Make two dots with black paint and the end of a paint brush handle. Dry.
- Using a fine black permanent pen, draw a smiling mouth.
- Add a small touch of blush to the face with a cotton swab or brush.
- When black paint is dry, add a small white dot to each eye for a "sparkle".
- Wind cotton thread around fingers to create hair to length desired. Tie at the center with a short piece of the thread.
- Glue onto the head of the angel. (Refer to photo.)
Making wings and halo:
- Place a piece of double sided adhesive to silver card stock and add another piece of the same card stock to the other side after removing the adhesive backing.
- Die cut angels wings with the butterfly die. (If card stock is thick, cut one with adhesive, one without and adhere together after cutting.)
- Repeat the same process with a gold metallic decorative paper, but use a piece of foam adhesive between two layers.
- Glue a punched snowflake onto the halo.
Finishing:
- Glue the gold halo disc to the back of the head of the angel. Position as desired or refer to photo.
- Form a hanger from silver cording by tying the ends together in a knot.
- Glue the looped cord to the back of the angel along the center back. Placing it so the silver wings will cover the knotted cord.
- Glue on the angel wings. Set aside till glue dries well.
- Add a star or other embellishment to the hands of the angel with glue and allow to dry.
 |
| Extra materials-hair,hanger,embellishment |
You will find the materials used listed below. I have tried to make the instructions and photos as helpful as I could to help recreate the angel.
Here are two other little spoon characters created in a similar way for this time of the year. Instead of making a hanging decoration, a pin back could be applied to the backs to make it wearable.
Material List
Big Shot machine
Eileen Hull Sizzix die, Teacup 3D & Spoon #664797
Mat board
Scissors
Paint, flesh color, black
Fabric, dress and sleeves
Thread, needle
Paint brush(s)
Cotton embroidery thread, natural color
Decorative paper, gold
Silver card stock
White glitter card stock
Adhesive sheet
Foam sheet
Sizzix thinlit, Birds & Butterflies, #661901
Sizzix thinlit, Bookplate, Hinges, Label, #662356
Snowflake punch
Silver cording
Star embellishment
Glue


so cute and clever Madeline! =)
ReplyDeleteThanks Lisa, so happy to read your comment!
DeleteThese little dolls are just adorable Madeline! They each have such personality!
ReplyDeleteThat comment makes me smile Eileen! Thank you! The inspiration came from little characters I made from wooden craft spoons many years ago.
DeleteSo, so clever Madeline! I loved the angel when I saw her on the launch and adore the new versions with the ghost and witch xx
ReplyDeleteI appreciate you comment Jenny! Once I saw the spoon shape, I knew I had to try and redo an old, old project from the past with them. Thank you!!
DeleteSuch a fun and creative use of the spoon Madeline! love all of your characters!
ReplyDeleteI appreciate your comment Julia, thank you! It's good to know these little characters were enjoyed by many!
Delete