
 |
| Come join the party and see the creative ideas for Eileen's Pocket Notebook |
Welcome to the Pocket Notebook Release Party! This is Eileen Hull’s newest book die with Sizzix. On the die, you get all of the pieces you need to make an entire book- the cover, pages, latch and pen loop! The Pocket Notebook measures 6 3/4” x 4 1/2” with a spine that can adjust from of 3/8” to almost 2”! String it with elastic, hemp, ribbon or twine. So many option for this fun die!
Eileen’s Inspiration and Educator teams have combined to show us their amazing Pocket Notebook ideas. Please follow the Blog Hop to see all of the fabulous projects, techniques and videos!
There are also two GIVEAWAYS- the Pocket Notebook die and a gift certificate for Eileen’s Etsy store. To enter to win, leave a comment on each of the posts. Winners will be announced on Tuesday, October 8 on Eileen’s Facebook Live show.
Thanks for hopping along with us today!
Metal & Stencil Mix-Up

Having the opportunity to create with this newest Eileen Hull’s Sizzix die was fun! This is another one of those dies that keeps my mind busy with ideas. This is a nice size for a book for any variety of uses.
My goal was to share ideas of using different materials and applications to incorporate with this die. This caused me to take my favorite stencils, simple techniques of inking and the fun of working with metal embossing, then combining them all together. Working with these Scoreboard dies and mat board makes for a wonderful surface for so many applications.
 |
| Before assembling |
The marvelous products available for crafting today help with creating successful projects. When making books, journals or albums with mat board and dies, I like to use sheet adhesives like those from Thermoweb. Using a product such as this allows the application of a wide variety of materials. I love using papers but my favorite is fabric. This project included some scraps of collected fabrics for the covers.
Preparing fabric for cover:
To design the fabric for book cover, place stencil onto the fabric. Ink sponge and apply ink(s) over the stencil. Don’t worry about complete coverage, randomly applications gives the fabric a faux batik look. Move stencil around on the fabric repeating with the ink(s) until desired coverage.
NOTE: If wanting a different effect on the front cover, use the Art Sheet. Repeat the process used o for the fabric on the surface of the Mixed Media Art Sheet also.
 |
| Back outside cover |
 |
| Back inside cover |
 |
| Front inside cover |
Assemble the pocket notebook as directions suggest with the adhesive of choice. String the binding with elastic cord.
Signatures and Pages:
To make the pages for the notebook, I choose to use various packing papers I had saved. I removed creases by ironing the sheets flat and stacking and cutting them to size.
The signature folders were made using two different card stocks. One has a solid yellow front with white back, the other a simple brown herringbone pattern on one side and white back. I then used stencils and inks to add colors and designs on both sides of the papers and finished with stamped designs. The finished sheets are cut to fit the notebook and paper pages, then inserted.
NOTE: A nice finish to the signatures and pages is to punch all four corners with a rounder punch before inserting. It also helps the process of placing and removing them from the notebook.


Finishing Pocket Notebook:
Carefully punch four holes through the corners of the metal embossed pieces and front cover. Put in place and hold with four paper brads. If desired, place a few pieces of double faced tape to the backside of the metal before putting in place. A old rusty key was attached for a closure, along with a length of silk ribbon.
On the outside spine a piece of foiled adhesive was added. Hand dyed bias tape was laced through the elastic binging and tied together, then finished with some decorative beads. Any other added embellishments and be place on pages or signatures for added decoration.


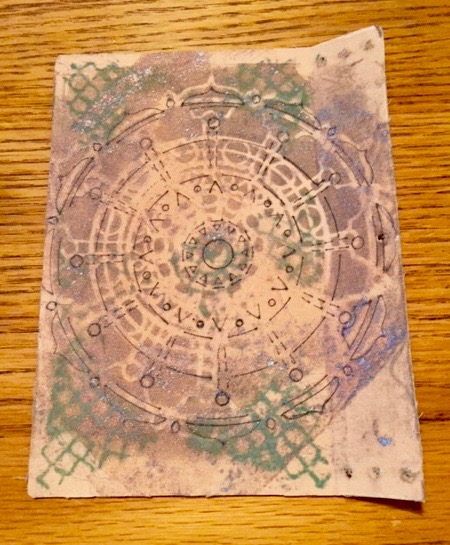
Embossed Metal Cover:
Begin with a piece of aluminum metal slightly larger then then cover. Place the metal onto a sheet of suede or foam pad the help with the embossing of the design. Tape the stencil onto the center of the metal piece. Begin tracing with a stylus the pattern from the stencil. There’s no need to trace every line. NOTE: If you do not have embossing tools, use a black ballpoint pen and and the round d end of paint brushed for forming indented circles. For help with the process of metal embossing refer to either a book or videos online. Also, there are many videos online available with tutorials on every level of metal embossing. No need for expensive materials to start out with. Several books are available for purchase or possibly found at a local library. I was lucky enough to participate in a workshop with Magdalena Muldoon, the author of Metal Embossing Workshop.
MATERIALS
Sizzix Big Shot machine
Eileen Hull #663638 Scoreboard XL Pocket Notebook
Mat board
Thermoweb adhesive sheets
Thermoweb Mixed Media Art sheets by Rebekah Meier
The Crafters Workshop, Rebekah Meier stencils, Rosetta 461S
Lightweight, solid cotton fabric
Inks, assorted colors
Embossing metal
Metal embossing tools
Paper brads, 4
Elastic cord
Seam binding, white-dyeable
Dark brown acrylic paint
Cosmetic sponges
Extras:
Card stock, assorted plain or patterned
Distress Oxide pads or sprays, coordinating colors
The Crafters Workshop stencils, Rebekah Meier 699S, 462S, 775S
Stamps, Impression Obsession, French document, NPC
Paper Trimmer
Metallic foils
Ribbon
Closure, old key
Beads
Any extra embellishments
Paper for signatures
I just love this and I am definitely going to try the metal embossing technique!
ReplyDeleteSo lovely and I love the tin type cover. Thanks for sharing.
ReplyDeleteThank you for "If you do not have embossing tools, use a black ballpoint pen"
ReplyDeleteI love the use of metal embossed on the outside.
Love all the doodads that you added to your book . Nice gift for a friend. Thanks for sharing.
ReplyDeleteThat metal embossing is awesome - thank you for sharing!
ReplyDeleteWhat an amazing journal - the embossing is fab and like the pages as well - you did a great piece of work here TFS
ReplyDeleteThis is awesome! The metal is so cool!
ReplyDeleteI especially love the cover! NICE tin cover.
ReplyDeleteThank you for sharing....will have to try this metal embossing.. looks great!!
ReplyDeleteThe embossed metal takes this to another level.
ReplyDeleteWow, I have an empty coffee tin that I was contemplating what to do with.
ReplyDeleteI love that cover! And I love that you used fabric. Totally amazing!
ReplyDeleteLove this. And especially the “how to use metal”part.
ReplyDeleteAnita Holte
Oh wow, I am in love with everything about this
ReplyDeleteAwesome book. Love the embossing on the front
ReplyDeleteWow - so many different materials used on this wonderful notebook! love that metal embossed cover and the stenciled fabrics! xx
ReplyDeleteWow- the metal cover!
ReplyDeleteThis cover looks impressive! Never tried embossing metal before.But will definitely try it soon when making christmas presents.
ReplyDeleteWOW!! I love the cover so fantastic. The tin embossed is too amazing. I am going to give it a try.
ReplyDeleteThis is unique and beautiful. Thank you for all the tips...will have to give metal embossing a try.
ReplyDeleteOH MY!!! The techniques you shared are amazing Madeline, love them. Just love your Mixed Media Pocket Notebook and drooling over all the fabulous details!
ReplyDeletelove the metal look i will try out that technique x thanks for sharing and thank you for the hop xx
ReplyDeleteYou had me at "metal"! Awesome journal, Madeline!
ReplyDeleteLoving the metallic look.
ReplyDeleteHandsome and striking! Just the ticket for dad or brother!
ReplyDeleteWhat a fantastic cover. When I saw a preview of your notebook I couldn't wait to see how you made it. Love it!
ReplyDeleteOh that metal cover...superb! LOVE it!
ReplyDeleteI love when I learn or can see a new technique. This is really fantastic.
ReplyDeleteThe metal technique is cool thanks for showing it!
ReplyDeleteLove the embossing technique!
ReplyDeleteYour metal cover is cool! Thanks for sharing the how-to.
ReplyDeleteI love anything Tin, so you did a FAB job with this! Looks sooo cool!
ReplyDeleteOh my goodness, this is such a WOW technique, thank you so much for sharing your creative ideas with us! I definitely want to try this!
ReplyDeleteWowza....so much work and detail here and it came out fabulous! Nice effects. TFS!
ReplyDeleteOh, I love how you mixed fabric and metal... looks amazing! The image on the metal plate is so pretty! Fabulous pocket notebook!
ReplyDeleteMadeline I am SO in love with that embossed metal cover! The stencilled fabric on the remaining sides works in perfect contrast with it and I love the cluster of ribbons and beads you've used to secure the pages inside. A wonderful Notebook x
ReplyDeleteWow! Love the embossed metal on the front! Great idea!
ReplyDeleteBeautiful! I love the embossed metal!
ReplyDeleteThis is amazing! I love the metal!
ReplyDeleteMadeline- another awesome project! You are the queen of exploring die cuttable materials :-) I love that you used fabric and metal and Rebekah's stencils are perfect, especially on the cover! So glad we were able to get together in Schaumburg!
ReplyDeleteMadeline- another awesome project! You are the queen of exploring die cuttable materials :-) I love that you used fabric and metal and Rebekah's stencils are perfect, especially on the cover! So glad we were able to get together in Schaumburg!
ReplyDeleteLove the metal!
ReplyDeleteBeautiful with the embossed metal and I like how you stenciled on fabric.
ReplyDeleteHi Madeline, I love the effect you have achieved with the embossed metal, can you advise on the thickness of the metal you used. Thanks
ReplyDeleteBeautiful Journal! I love all the treatments and details. The stenciled fabric is wonderful, I have not tried that, yet! Thanks for the pictures.
ReplyDeleteWow!! So artsy to use the tin and make this amazing album!
ReplyDeleteWow! Luv your metal cover! Wouldn't of ever thought of doing that ...but thanks so much for sharing your techniques! And the stenciled material is beautiful! Suzy Q
ReplyDeleteWow!
ReplyDelete