Thursday, September 21, 2017

On The Personal Side - A Family Wedding

So this next blog post will include - "just a thought or two" or maybe a few more, about the celebration of a special wedding.

This past week-end I traveled with family to the northwest corner of our state, to the town of Galena. This town is a lovely historical area.  Just to the northeast lies the perfect wedding venue of Oak Hill Farm.

Here is the place where my youngest child and his soul mate joined together in marriage, with as many family members and friends who could travel there.

And the story begins -


An engagement takes place ...


... Reminders are sent out ...


... invitations are mailed ...

... and the day arrives!

September 16, 2017


So much preparation went into making this day memorable and fun by Andrea and Matthew, not only for them but for each of those in attendance.  From the location, to the venue and all the special touches, we enjoyed this special moment of their lives with them!

The weather was more then spectacular for early Fall.  The forecasts was calling first for 70's all week, slowly the temps climbed with each report.  The sun was shining and temps reached mid 80's.

The saying goes - "location, location, location" - and yes, it was big part of making this day!  Galena is situated in the far, northwest corner of Illinois.  It's filled with unique buildings and history.  With that in mind, guests who made the trip could enjoy all this rural town and area offered in any free time.

The venue for the entire wedding, from ceremony to reception, took place at Oak Hill.  It's a 20 minute ride from town, down country roads with spectacular views of the countryside and river valley in this area.


The Bridal Party, the families of the Bride & Groom, the Officiant, the musicians and photographer arrived ahead of time for photos.  Guests began to arrive just before the 4:30 ceremony and took their seats near the handmade wooden pergola.  Above this setting, we waited for the ceremony to begin in a lovely renovated barn on the property.


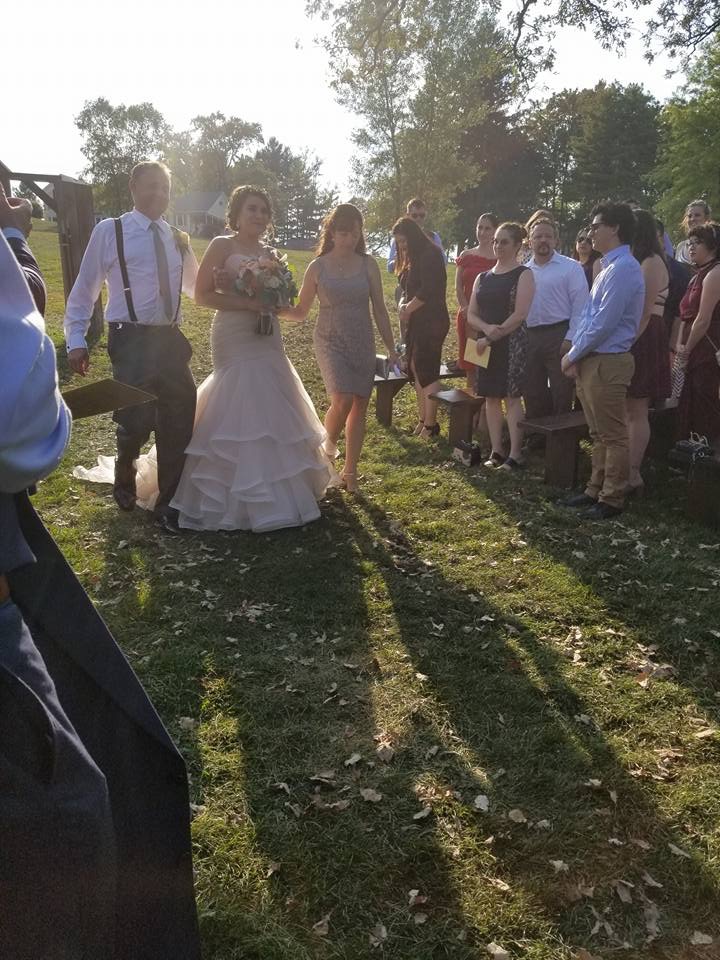
The time arrived to start!  Matthew and I were the first to begin the walk down the hill for the ceremony.  As I took my youngest son's hand, I asked him to hold on tight and tried to keep the happy tears from my eyes.  He told me several times to just keep looking straight ahead as we walked through the doors to the area of the guests.  The attendants followed, each couple held a significent  relationship to both the Bride & Groom.  THEN came the Bride ... escorted by her parents!


The ceremony was officiated by a high school friend of Matthew's, Erik Peterson.  Readings were done by Matthew's sister and Andrea's brother.  A song was sung by Andrea's youngest brother.  Their handwritten, personal vows were exchanged as well as very special wedding rings.  A tree planting took place before it was over.  Then came the official annoucement of the new husband & wife, followed by, yes, the KISS!


Just before the ceremony was over the winds picked up slightly with gentle, cooling breezes.  Call it what you will - but many of us saw this as a sign of someone being present among us on this special day!

Now, let the party start!

After the ceremony, everyone moved onto the site of the "old schoolhouse" that is located on the property. (Yes, it's an actual schoolhouse that was moved to the venue.) Signature cocktails, for the Bride and Groom,  and appetizers were shared by all.  There was a place for "selfies" and instagram photos.  The schoolhouse had a message on the old blackboards and photos of the Bride & Groom could be found around the school room.


It became cloudy and a very gentle shower began but only lasted a couple of minutes.  Some moved on to the reception tent to avoid the few raindrops.


The time for dinner arrived.  Guests moved to the tent and found their seats.  Kraft tags were used for locating the table for the guests, along with it showing their menu choice.  The space captured the look of "rustic chic" they were going for - from the dining table style set-up, the mason jar water glasses, candle holders from recycled jars and handmade centerpieces from reclaimed wood (Thanks Brien Akers) and handmade succulents (made with love by me), each helped to create "their" look!

After introductions of the parents and bridal party, the DJ, Adam Ryan introduced the married couple. We immediately were asked to start the evening off with a dance and many joined in!  As dinner was served the speeches and toasts took place by the father of the bride, the matron of honor and the best man.  Each was lovely and emotional!

It was at this point the the best man, Matthew's older brother Kevin, presented the couple with a version of what is called a "shotski".  This one was made from a birch branch from Camp Nawakwa and wood burned with the couples initials and wedding date by Kevin.  (This camp, in northern Wisconsin, is a place of many memories for 4 generations of our family.) The couple, the matron of honor and best man broke it in that evening (I missed getting a photo of them).  Many did give it a try during the evening (as seen below) even I did!


Instead of cake, they chose cupcakes for their guests.  Again, I missed taking a photo.  The first dance was next, followed with Andrea dancing with her father and Matthew and I taking to the dance floor.


Things came to a slight stand still as dinner began because the sky was putting on a marvelous display!  The slightly cloudy sky that brought a few sprinkles, began to clear as the sun began setting and made for a priceless background.


It was a wonderfully delightful evening, filled with laughs and fun and so many special moments.  One being the performance of the Bride & Groom singing a duet together!  It was quite the performance to say the least!


The rest of the evening was filled with dancing, dancing and more dancing, with music provided by both Adam the DJ and a live band that was excellent!  Photo taking, talking, laughing and  catching up as much as possible with family and friends.  Then of course drinking and celebrating, with their signature drinks (one vodka, one bourban), their favorite beers from New Glarus brewery.  Each element spoke of who Matthew and Andrea are!  The only thing that could not take place was a "sparkler send off" before leaving the venue and heading back to town because of dry conditions! Oh what a night ... and day ... and week-end!

And now the story will continue.....

Just some additional photos of family and friends that joined Andrea & Matthew on their wedding day.  They really did come from near and FAR to help them celebrate.  Most came from in and around the Chicago area, others locations were Wisconsin, Minnesota, Kentucky(my college grandson), Atlanta, California, New York and all the way from Belguim.


Adam & Sarah from Belguim
Matt, Matt, Andrea, Lauren
Godfather & Aunt from California
Stacey(California), Patti,  Caroline
Uncle & Aunt
Relatives from Minnesota/New York state/Wisconsin
Bill, Mary Ellen, Mary(Godmother), Grandmother


Thursday, August 3, 2017

It Begins...Finally!

Well finally it has happened!  You see I have this marvelous space in my basement that I had always hoped to utilize for more then my own use - and - it is beginning to happen.

Last week I had my first group and taught my first class here in my wonderful workspace.  I already have ideas to expand just a little bit to accomodate more people.  How lucky I am to have this opportunity.

I would like to share the experience of the evening here with this post.

Seven lovely ladies participated in some journal making with me that night.  Of the seven, I would say four of them had experience with mixed media and paper arts and three were "crafty" ladies, but much of what was shared, was very new to them.  The most important part of the entire evening was that they all enjoyed themselves, maybe learned or at least tried something new and left with a journal made by them.

Besides the journal making project I was lucky enough to have my very dear friend Rebekah Meier there to show her wonderful mixed media work and walk them through some of the great features of her line of products with Thermoweb.


Kits were put together for each person with all the materials needed to complete their journals.  Of course one of the main features of this session was to use Eileen Hull's Journal die from Sizzix.  Some of the participants have never seen or used a die or die-cutting machine.  After a quick demonstration on how the Sizzix Big Shot works, each were able to crank away on one to cut the covers for their journals after learning how to cover them with different materials.  The use of Rebekah's Mixed Media Adhesive sheets made this process easy for them.


Instructions continued on how to construct the journal and how to lace the elastic through the spine to hold the signatures for the inside of the journals.


Once the covers were together, with the use of Super Tape by Thermoweb, and the elastic was threaded through the spine and a second piece was added for the journal's closure.  Now the fun could begin - Embellishing!  Also a quick explanation and demonstration was given on how to create the signatures for the journals.  Three different signature covers were shown plus information on what can be used for covers and pages.  All were left to just have some fun and enjoy the process!


So  the evening ended with everyone completing a journal, plus trying some new things like tools, products, techniques, materials and ideas!  What more could I ask for?  Maybe more time!


I thank the class participants, Rebekah Meier and Eileen Hull for designing wonderful products to teach and share with others!

Happy Creating & Crafting!

Rebekah Meier Designs
Eileen Hull Designs
ThermoWeb
Sizzix

Saturday, June 17, 2017

Journal Making Becomes Personal

This journal making adventure began back in April and the creative journey continues!  With this next edition I am making it more personal.  It became what I call my personal assemblage journal, just for me and my personal thoughts.


For this journal I knew it had to include items that I like, so I began to assemble ideas and elements that are to my liking.  The color needed to be mostly blue.  Many of the embellishments are from the stash of favorite finds that are treasures.  With all the elements gathered the creative process could start!  What best way to start? The great Eileen Hull Journal die for Sizzix of course!  Combine that with the wonderful Mixed Media products by Rebekah Meier for Thermo-Web and I call that a GREAT start!!!
Back outside cover
For this journal I created a wider spine to expand the journal to hold four signatures instead of three.  The cover pieces were cut from a slightly thinner board so the Mixed Media Foam  could be added to the outside and inside of the covers.  NOTE: I found that the slightly thinner board helped to add stability to the covers and the foam layers added flexibility and softness.  

PLEASE READ THE ENTIRE INSTRUCTION PROCESS BELOW BEFORE BEGINNING AND THE SPECIFIC NOTES POSTED.

Die-cut all the board and foam sheet pieces for the front and backs.  NOTE: Before cutting the inside cover FOAM pieces, choose paper, fabric or other material to cover the surface of one side of the foam sheet.  I chose a textured fabric for one and Mixed Media Art Paper for the other.   Two board pieces, four foam pieces are needed for the journal covers.  The Thermo web Mixed Media Foam sheets are backed on both sides with adhesive.

Cut the foam sheet in half. Remove the backing sheet from the foam and adhere to the board.  Die-cut the first part of the two cover pieces.


Arrange the found items for the assemblage covers.  Once you find the arrangement that you like, remove the backing paper and return the items onto the adhesive and press in place.  NOTE: If there are any items that do not adhere to the adhesive, put in place with glue. 


The next step was to add some color, if desired.  Using inks, thinned with water, brush the coloring lightly over areas.  Dry the ink and add more layers of color if desired.


***SIDE TIP***
Raised Monogram Embellishment
This area was created by tracing the letter "M" from a metal shape, onto a piece of a foam sheet,  Cut the letter out with either teflon scissors or an X-acto knife.  DO NOT REMOVE EITHER BACKING PAPER.  Cut a rectangle shape from the foam, slightly larger then the letter.  Trim around the edges with decorative scissors.  Remove the backing paper from the backside of the rectangle and place and press onto the front cover.  Remove the backing paper from the topside of the rectangle. Now remove the backing paper from the backside of the letter and carefully position it onto the rectangle and press in place.  Glue the clay ebellishment in place on the foam letter.  NOTE: Mark the area where the clay piece will sit.  Carefully cut the paper backing away from this area and remove the paper, BUT LEAVE THE REMAINING PAPER ON THE LETTER.  Add glue if necessary to the clay and put in place.

Once the inked areas are completely dry, coat the entire surface with a light layer of white gesso.   NOTE: A light coat of the gesso allows some of the colored areas to still show through.  When the gesso is very dry, use a stiff cloth and rub some of the gesso off some of the elements, example: keys, buttons, frame, metal tag, pen nib, clips, pearls.  Another layer of color can also be added to other areas by using inks or paints, example: the foam rectangle, rick-rack, lace, flower trims, paper flower, clay pieces.

Construct the journal according to directions.  I used 1.5mm clear Stretch Magic® cord for threading through the spine to hold the four signatures and a length of picot edged cream satin ribbon for the tie closure.

Touches of foiling were added to the keys, frame, pen nib, lace (on back cover) and  the small monogram letters.  Brush small amounts randomly onto areas with the Mixed Media Medium. Allow the medium to dry well.  Press on the foil paper and lift; add more if desired.  To add foil to the foam letter, remove the backing paper that remains in place.  Lay the foil over the surface and rub to apply, repeat if necessary.  NOTE: If desired, coat the complete journal covers, both inside and out with a decoupage finish.  I used Beacon Fast Finish Decoupage.

The four signatures were made by combining fabrics and papers for the covers.  Here again I used favorites like gingham, in tiny checks, denim blue and other blue fabric.  I stenciled on the outside of the denim fabric with a few of my favorite stencils by Rebekah Meier from TCW, using Eileen Hull's  Coconut Colorbox Blends.  The denim was layered with decorative papers, using the Mixed Media Adhesive sheets and stenciling the paper side again with my favorite designs and using the blends and spray inks.


Pages for the four signatures were cut from a tablet of newsprint paper, copy paper and graph paper, giving a nice variety for the journal inserts.

I enjoyed creating the journal with the "assemblage" look.  Using the Mixed Media Foam Sheets made the process easier.  The last addition to my personal journal was the black and white photo added to the tiny metal frame that belonged to my very sweet mother.  NOTE: Those locks were the look back then! Those were the days my friends!!!!

For more information see:
Eileen Hull
Rebekah Meier
Thermo Web
Eileen Hull Sizzix
Sizzix

HAPPY JOURNAL MAKING!
PS - Feel free to contact me with any questions.