Showing posts with label creative ideas. Show all posts

Monday, August 23, 2021

Circles Have No End ... To Ideas


The theme for this months blog is “Four Seasons Crafting with Chapter 3 Dies”, I chose to use the Ornament Box die. Sunflowers seem to be perfect for Summer and Autumn decorations. Using the simple circle shape set my mind searching for ideas. What different ways can this shape be used? Can any of the other shape designs on the die be used? Combining three of the shapes included on this die brought a out the sunflower garland. ***An added bonus of two other ideas are also included using the circle cut in simple ways. 

TIPS & NOTES: 

(Please read these tips and notes before beginning the project.)

Before listing the steps to make the sunflower garland here are some tips on materials and process that I used.  The garland can be made with any amount of flowers needed for a short expanse to a larger one.  The projects colors lend itself to the summertime and autumnal seasons but using a different color pallete with the same instructions can make lovely decorations for any season.  

Being a lover of paper, of course papers can be used to make these flowers, but it’s always fun to experiment with other materials to combine for texture and uniqueness. After paper my “go to” is always fabrics! 

Crepe paper is used for some of the petals but petals can also be cut from coffee filters that are colored by dying them with inks or diluted paints. The coffee filters are stronger then tissue paper. Make sure the grain of the crepe paper is running vertically on the elongated oval die shape before cutting out the pieces needed. 

The zig-zag design on the die is used for added embellishment around the centers of the flowers. A light weight cotton print was backed with a light weight cotton fusible fabric to help keep the shape to these pieces. (This is optional but wanted to use/show as many shapes from this die as possible.) A ready made rick-rack or other trim could also be used as an extra embellishment. 

The leaves were cut from two shades of green felt using a shape from a nested set of thinlit dies by Sizzix (likely retired now), use another leaf die or make a paper pattern, trace and cut your own leaf design. 

These steps can be altered as needed or desired for your own look or interpretation.


Materials

Eileen Hull Ornament Box die

Leaf dies

Sizzzix Big Shot 

Fabrics 

Felt

Fusible adhesive

Crepe paper, yellow/gold 

Coffee filter, colored with ink or paint (optional)

Metallic mesh ribbon (optional)

Ribbon 

Corrugated board

Double sided adhesive

White craft glue

Ribbon or cording 

Iron

Pressing board


Instructions:

  • After choosing fabric for the circle centers of the flowers, adhere a fusible interfacing between two layers of the fabric. 


  • Cut the circle shape from the layered fabric for each of the flowers needed.  
  • Cut circles from a mesh ribbon for each flower.


  • Glue the mesh circles over the fabric circles, by applying glue around the outer edge.
  • From the crepe paper, using the narrow oval shape on the die, cut 18 pieces for the petals of each flower. (If using an additional type of material for the petals cut half the amount (9) from each). 


  • Fold each of the petals in half. 
  • Slightly crease the folded edge and glue the fold in place.  
  • When glue dries, shape the petals by slightly pulling out from the center. 


  • Glue the 18 folded petal shapes around the edge of the fabric circles.
  • Space evenly around to fill and slightly overlapping if necessary. 
  • Cut leaves from green felt, two large, one small. 
  • Cut a circle from corrugated to back each flower.  
  • Apply a double-sided adhesive to a green fabric and cut circles to match the amount of flowers made.  
  • Apply the adhesive backed circles to one side of the corrugated circles.  
  • Glue leave in place on the back of each flower (refer to photo for placement).   
  • Lay a length of ribbon along the top of each flower and attach with glue to hold in place. (Space the flowers apart as evenly as possible.) 
  • Glue the green fabric covered circles to the back of each flower.  
  • Cut 3 zig-zag shapes for each flower. These are glued around the center of the flowers for added embellishment. (Refer to photo below) Overlap the end of each zig-zag shape slightly. Adjust the curve of these pieces to the circle shape. 

Close-up of petal, trim, leaves


Half Moon Felt Garland

Cut circles from felt.  Fold each in half and press in the fold. On a length of thin cord, glue the half moon shapes along the cord.  Leave a small space between each.  Loop a strip of torn fabric between each. It these to the length desired. Embellish the felt pieces with embellishments if desired or leave plain. Refer to photo for placement of components.
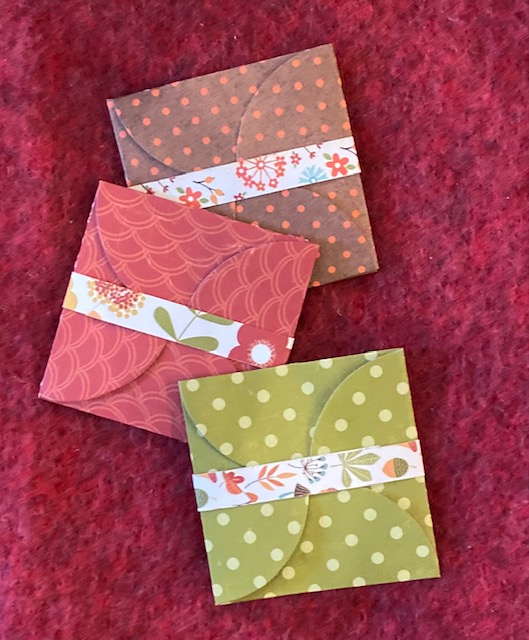


Tiny Notes

Cut four circles from decorative, double sided papers. Fold each circle in half. Place the four together as shown.  Hold in place with some small clear pieces of tape on the inside.  Apply a 3” square of solid paper onto the inside center, along the folds. Make a band from a strip of the paper to wrap around the tiny note card. Tuck one in anywhere with a special message! How nice to find a little note in a lunch bag or box, a backpack pocket, a coat pocket and more.


Monday, June 21, 2021

Summer Travel - What To Take Along


Summer travels are happening again this year! Many have already taken to the road or other means of traveling to various destinations. 

A few years back I created two journals from Eileen Hull's Journal die for two of my grandchildren to take on a road trip with their parents to points west of where they live. It was meant to be a way for them to right down thoughts of places they would be going to; but also as a keepsake to place anything interesting that they found.  Here is a photo of the journals made for them. 

The journal die was also used to create something similar for two friends that where traveling to Scotland several years ago for the same purpose. Unfortunately I deleted the photos I had of them but they were easy for them to tuck in a backpack or travel bag for taking and keeping notes or information of the  places they were visiting.

For this latest journal I used many of the same ideas, but with the addition of some of the newer dies from Eileen, I made some additions.

Materials

Eileen Hull Journal die

Eileen Hull Notebook die

Eileen Hull Folio Journal die

Folio  page, pocket and flower dies

Eileen Hull Homemade Alphabet die

Sizzix Label die

Big Shot machine

Matboard

Adhesive, of choice

Old map

Card stock

Clear vinyl adhesive sheet

Elastic

Inserts for writing

Chalk tape

NOTE: To make this journal, covered completely outside and inside with an old map, I used Thermoweb Heat n Bond Ultra, iron on adhesive.  Of course double-sided adhesive sheets can be used or a spray adhesive also. Anyone not familiar with using Heat n Bond as an adhesive in crafting projects, it takes a little practice to getting the heat setting on the iron and the pressure needed to adhere different materials together. I also used another product from Thermoweb after the map was adhered to the pieces of matboard called Thermoweb vinyl. This material was applied to the covers, outside and inside and the separate inside box that was created also. After applying, the excess was trimmed carefully with an Xacto knife. Hint: A clear covering product like contact paper can also be used.


  • The inside pocket box is made from cutting the Notebook die and three of the end pieces from the Folio Journal die.
  • To form the box, one of the end pieces is attached to the bottom of the box with double-sided adhesive tape.
  • The two side pieces are trimmed slightly at the top to be even with the box and attached to each side with double-sided adhesive tape. 
  • Elastic was threaded through the opening along the edge of the box that will be closest to the journal spine; threaded through the bottom, middle hole and center hole, then knotted.
  • The signature inserts were purchased and inserted with elastic to each side of the box insert. 
  • Corner pockets are cut from card stock, covered with the iron-on vinyl (if desired) and attached to the corners with double-sided adhesive tape.
  • Letters and labels are cut from black adhesive backed chalkboard tape.
  • Add your choice of closure ... pack up and hit the road for an adventure!


Tuesday, February 2, 2021

New Die Release - Folio Fun My Way

 It’s always fun creating with Eileen Hull dies, but really exciting, interesting and fun when there are brand new designs.  

The newest Eileen Hull dies released by Sizzix are the Folio, Mandala and Folio Page, Pocket and Flowers. I will be showing how I combined these dies for my creation. 


Though I will not be giving step-by-step instructions, this post will give a description of the process I used. 

When creating projects with Sizzix dies I have a tendency to try to combine a variety of materials and also play around with with the designs of the dies by altering them or combining them with others.  

The folio die will likely become another favorite! I think you will see that with the creations by the  others participating in this blog hop.  It’s always inspiring to see the ideas shared. This project begins of course with the folio die-cut design. It does have a old, shabby distressed look because of the materials used, plus the surface techniques used. The addition of the mandala design, the red, wool hearts and ribbon each add a little touch of warmth to the finished project.

  • This version has a spine that extends as far as possible. This gave me the opportunity to include several sections inside.
  • The outside of the folio was painted with a metallic copper paint. Brushed over with a wash of brown paint. Old dictionary pages are torn and applied to the inside of the folio cover with gel medium.
  • Corrugated board is cut to fit the front and back covers, as well as the front and back inner flaps.  
  • Apply adhesive for foiling sheets randomly into the corrugated pieces. Press foiling sheets of choice to add bits of the metallic foil on the covers. 
  • Use glue or adhesive sheets cut to size to add the covers and flaps to the folio.  
  • Cut a mandala design from a copper colored paper, backed with adhesive for the front cover. 
  • Cut the same mandala design from another type of paper for the back cover.  Gel medium was used to apply the design to the back. Heart shapes were cut from a felted wool sweater. Two are layered to the front cover, one to the back. A ribbon tie is added for a closure.

The inside has a variety of sections

  • The first section is enclosed as a holder. A couple folders were made to be inserts into the holder. Each folder has a tab added to the edge for removing and inserting them into the holder. 
  • The next insert is a folder made from card stock cut from an older Eileen Hull scoreboard die (Album). Pockets are added in two different directions from coordinating decorative paper.

  • The next insert is made with the older album die, cut from a acrylic folder and altered to create a narrow album insert.  The covers are embellished with the mandala cut from white copy paper. Use a gel medium to adhere them. Pages are made from copy or newsprint paper. 

  • The next two inserts are small lined notebooks. Each is covered with coordinating decorative papers. 

  • The last folded section also hold a small covered notebook and has a pen holder. The pen holder shape is from the Journal die. TIP: One or more pocket folder could be added to this section too. 

Finishing the folio
Follow along the list of participants to see a wonderful variety of ideas and styles. 
***A NOTE FROM EILEEN ***
Welcome to the Chapter 1 Eileen Hull/Sizzix Release Party Blog Hop! Just wait till you see all of the fun options the new ScoreBoards Folio Journal die has in store for you! You will also love the Mandala and Folio Page, Pockets and Flower Thinlits dies that coordinate ❤
Please hop through the blogs and be inspired by the work of the talented Inspiration and Educator teams! Leave a comment for each designer and you could win a Folio Journal die (as soon as it arrives!)
Join me and specials guests for a Facebook Live on Wednesday, Feb. 3 at noon Eastern. Comment on our Facebook Live and be eligible to win either the Mandela die or the Folio Pages, Pockets and Flowers die- two winners! 
Winners will be announced on the Facebook Live show on February 9 at 6:00 EST. 
We appreciate your love and support, friends!