Showing posts with label Smoothfoam. Show all posts

Tuesday, December 9, 2014

Designer Craft Connection/Smoothfoam™ - Holiday Ball Decorations

The countdown to Christmas has begun - decorations are going up, there is tree lighting, card writing, cookie baking, planning and shopping going on.  Each holiday season I tell myself there is no need for any new decorations but there always seems to something new being created.


Here is a cute ornament idea using a Smoothfoamball.  To make this ornament, punch the primitive heart shape using a decorative punch and several solid and printed papers. Cut a length of ribbon for hanger and knot the cut ends.  Drop a small bead of glue to the center of the ball, press the knotted end of the ribbon hanger onto the glue, press a straight pin into the knot and into the ball to secure.  Dipping just the bottom tip of the punched hearts into a white glue, place the heart shapes around the ball.  Start at the top and continue to work around in rows until the ball is completely covered.  Add a bow to the top of the ornament.  NOTE: Use other small punch shapes like a holly leaf that can be glued on in the same fashion or a snowflake that could be attached with pins.

Do you have an ball ornament to share?  If you do add it to the link along with all the others. See other ideas here with this link: Inlinkz  or the Smoothfoam™ blog.

Tuesday, October 7, 2014

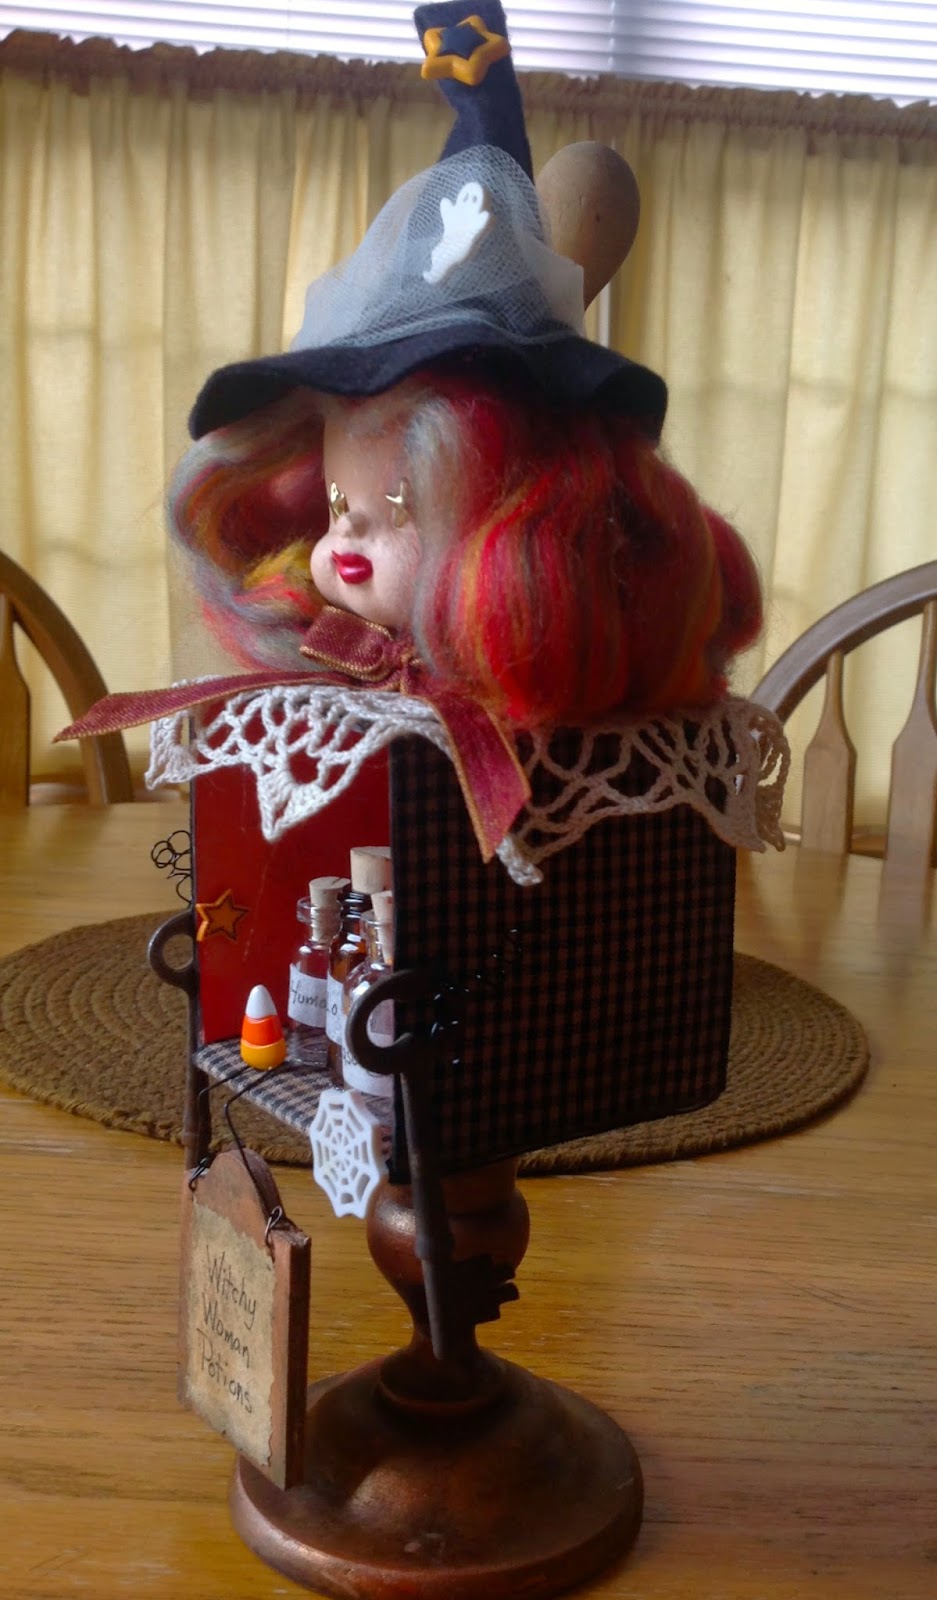
Designer Craft Connection - Witchy Halloween

Work some crafty magic by combining interesting elements to create a "bewitching Halloween decoration.


Begin by painting a Smoothfoam baby head with white gesso, then give the head two coats of a flesh colored acrylic paint.  Gold star brads are used for the eyes.  Paint red lips on the face.  Strips of of thick variegated yarn is glued to the head for hair.

Cut a round piece from black felt for the brim of hat.  Form a cone shape from another piece of black felt for the top part of the hat.  Cut slits around the lower edge and glue this part to the brim.  Add any decorative additions to the witch's hat as desired.

Using Eileen Hull's box die, cut the shape from mat board.  Paint the inside with acrylic paint of choice.  Cover the outside of the two pieces with fabric, using heat n' bond iron on fusible.  Form the box by glue it together.  NOTE: cut one flap away and push the side into the inside of the box to have one side of the box open.

Old keys are wired to the sides of the box for arms.  A small, old doily is places on the top of the box.  Place several interesting items into the open area of the box.      

Attach the box to some type of base.  In this case an old wooden candle holder was used as a base using a strong glue.  Glue the head to the box using a strong glue.

Other views of my "Witchy Woman":


Friday, November 15, 2013

Designer Craft Connection Challenge - The Robin's Nest & SmoothFoam


Accept a challenge and just go for it!  The product received from The Robin's Nest are new to me.  How would I combine the holiday papers and Dew Drops with SmoothFoam and create an ornament?  The end result is here:

I used a simple square of SmoothFoam cut the same size of the 6" x 6" paper stock.  One paper design is glued to the front and another to the back. A length of coordinating ribbon was glued around the outer edge of the foam square.  Attach a hanging loop from a short length of ribbon and attach to the top center, add a bow to finish the look. A small photo mat was glued to the front to hold a photo. Use any variety of the Dew Drops to add some embellishments to the surface.  NOTE: a similar smaller ornament could be made by trimming the Smoothfoam and papers smaller (4" or 3" squares are good sizes).

Here are four other versions of ornaments made from the papers and Dew Drops.

This three-dimensional hanging uses a 6 x 6  paper sheet of Black & White Glittered Pine Tree for the background.  The base of this hanger is recycled packaging from a Sizzix die, that was painted.  The verse "tis the season" is die-cut from one of the coordinating papers I received.  A white felt piece is die-cut using an "over the edge" die.
Assorted Dew Drops embellish the surface.

This snowflake ornament was die-cut using the Winter Glittered Snowflake designed paper. For backing the die-cut snowflake, I cut a circle from white glittered card stock and Winter Glittered Deer paper.  A length of white organza ribbon forms a hanger. The snowflake is embellished with a variety of the Dew Drops.

This ornament is die-cut from another coordinating paper to create a pointsetta.  Stiffened green fabric is die-cut to make holly leaves.  Small gold Dew Drops make the center of the pointsetta.

This 3-D die-cut ornament is made using two patterns of paper. When the ornament is formed, Diamond Dew Drops in Ruby Red and Jade are glued into the triangle area of each  of the eight discs.

The are several designers participating in this blog hop whose creations you should see.  Please go to The Robin's Nest blog to find links to all the other projects.  You are invited to enter to win a prize that will include SmoothFoam and Robin's Nest products.  NOTE: You must comment and become a follower on each blog, in order to be eligible to win.

Please hop through the links or use the Designer Craft Connection button at the right to move to the blogs and check out the projects and get some inspiration to create some fun stuff for the holidays.

(NOTE: I will be updating this post with new photos and another project.)

Monday, November 12, 2012

Designer Craft Connection Challenge - Smoothfoam™

NOTE: I must first apologize for being a bit late to the posting for this challenge.  There was a human error of forgetfulness of equipment needed to get this post complete for the Saturday date while away with family.

The product for this challenge is Smoothfoam™.  Here is a link to the products website: www.smoothfoam.com and a Pinterest link here: http://pinterest.com/plasteel/michael-s-smoothfoam/ 

I look forward to experimenting with this product in other ways then the ideas I will share with you here.
Here is an ornament using one of the Smoothfoam™ balls.  I would recommend the 3" or 4" size.  I used an apple corer to form a hole into the ball. Tapered pieces of scrap fabric were cut to be glued around the lower two-thirds of the ball. The "petals" from pinecones  were glued around the top one-third of the ball.  Insert a hanger of gold fine cording to the center top.  Brown moss was glued into the open center at the top and a small amount into the hole at the front.  Wire a little bird to a short twig and glue to the front of the ornament.  Two ribbon streamers are place at the top.  Dab a small amount of DecoArt Snow-Tex to the tips of the pinecone petals and twig.

A simple ribbon wreath can be made by cutting out the center of a 12" disc.  Measure about 1" to 1 1/2" from the edge and use a serrated knife or desired cutting tool.  Tie 5/8" wide ribbons of choice around the Smoothfoam™ring.  Clip a "V" into the ends of each ribbon. Use a short sequin pins to add snowflake sequins around the front of the wreath in the "white" spaces between the ribbons.  Form a bow from ribbons and attach with a pin.  Add a wire hanger to the back top for hanging.

Not to waste materials, I took the leftover disc and cut another ring in the same way as above to make a candle ring.  I took thin, white quilt batting and cut it into a 1" strip.  This was wrapped around the ring, gluing it onto the ring as it is wrapped.  Coat the surface of the ring with DecoArt Snow-Tex. NOTE: Do not cover bottom. Two coats may be needed.  Allow the finish to dray well.  Top the surface with DecoArt Crystal Craft Twinkle Glitter paint.  When the glitter paint is dry, glue snowflake sequins all over the ring with Beacon Gem Tac and onto a pillar candle.

NOTE: Waste nothing - from the small leftover piece check out the small candle holder in the previous post.

There is a "giveaway" for this challenge of a kit to make a snowman with some extras.  To enter to win leave a comment on the blog of the designer whose project(s) you like.  The more often you comment the more chances you have to win.  You can also make comments on the Pinterest site.  The winner will be announced on Novermber 19th on the Designer Craft Connection Facebook page.