Showing posts with label #Sizzixscoreboarddies. Show all posts

Saturday, October 21, 2023

Halloween Treats Without The Calories

Had some fun with creating a few new handmade (non-caloric type) treats for Halloween again this year. With the projects completed I figured it was time to do some sharing, so I went back and found some previous makes and decided to make a post of all Halloween related ideas!

NOTE: For each of these projects Sizzix dies were used to create them. The majority of projects here use dies designed by Eileen Hull for Sizzix, but several other dies and products used are also from other designers, all for Sizzix. 

Here goes - 


Monday, October 24, 2022

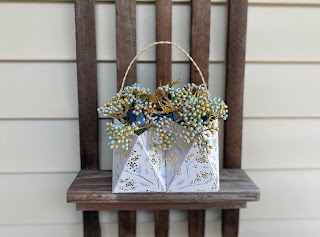
Double Geometric Cork Basket


The newest Chapter 4 release from Eileen Hull for Sizzix included the Geometric Box. We’ve been seeing and sharing wonderful ideas with the unique design. I chose to share, as a blog post this month, another version of a sample I created for the release. 


I wanted to share this idea with others. I didn’t want the box to be rigid as it would be but using mat board.  Still needed a base that would cut well and fold easily along the score lines. Using a heavyweight watercolor paper between two sheets of decorative card stock gave the box flexibility and the sturdiness I had hope for.  

When making this double basket I was able to include the use of of cork sheets by Sizzix as the top layer of the geometric boxes.

MATERIALS
  •  Big Shot machine
  •  Geometric Box die
  •  Watercolor paper, 140#
  •  Sizzix Cork roll
  •  Decorative card stock
  •  Double-sided adhesive sheets
  •  Mat board, small square 
  •  Glue
  •  Sizzix thinlit dies
  • Distress ink
  • Cosmetic sponge 
  • White gel pen (optional)
  • Cord, for handle (optional) 


THE PROCESS OF CONSTRUCTING THE BOXES

  • Choose a decor paper for outer layers.
  • Cover both sides of the watercolor paper with double sided adhesive. 

  • Cover 2 squares of mat board with cork and decorative paper and double sided adhesive.
  • Remove liner paper and layer cork to one side of watercolor paper.
  • Remove liner paper on other side and layer with the decorative paper.
  • Die-cut 4 box pieces of the layered papers NOTE: These will create 2 boxes.
  • Cut two box bottoms from cork covered mat board.
  • Fold all the box pieces on the score lines.
  • Remove a thin layer of the paper from the joining edges of each piece.
  • Glue two of the box pieces together to form the box.
  • Complete the second box. 
  • Glue the bottoms into the boxes.
  • Align the boxes next to each other. 
  • Matching the point of the triangle and the straight edge of the bottom together.
  • Apply glue to one of the boxes and press the other to it to attach them together. NOTE: Double sided tape could also be used to attach them together but align them carefully


EMBELLISH THE BOXES AS DESIRED
  • I chose to ink along the edges of the top and bottom of the pieces and also along the angled folds.  
  • I die-cut some shapes using thinlits from the cork sheet. 
  • Glue the cut designs onto 6 of the boxes triangles 
  • Lightly add some color onto the thinlit designs with a paint brush with your choice of coloring. NOTE: These shapes can be colored before adhering to box.


Optional - Use a white gel pen to create dashes around the triangles 
                 Thread jute cord through holes punched into the sides and knotted for a handle


Monday, July 25, 2022

Time To Travel Is Anytime


Summertime usually means travel time, but it happens everyday throughout the year for different reasons. Here in this post I'm sharing an easy project to have on hand either for the car, a RV or to keep in a travel bag. 

In all the examples here, each book contains notebooks for keeping track of any variety of information and holders for receipts or various items needed while traveling or on the road, either near home or away. 

For all the examples here and others I have made in the past for a few of my traveling friends, I like to use images of maps. Either use found maps from resale shops, or pages from old road atlas's. I have also printed out copies of map images to use for covering books. 

Any of the  book dies, old or new, that are from Eileen Hull's collection by Sizzix make wonderful travel companions. 

The main purpose of the book featured, was to have something on hand in my car.  By using the Pocket Notebook (#663638), the size makes it easy for storing in the glove compartment of a car or for slipping it into a side door pocket for easy access.

There are several other dies that could by used in the same fashion, and listed here:

Passport Book (#660331)

Wrapped Journal (#662816)

Folio Journal (#664884)

Mini Album (#658982) 

Journal (#661906)


Insert for any of these can either be made or small notebooks or pads can be found at various outlets around or online. 

For purchased note book inserts, the outsides can be covered over with other coordinating papers of even fabrics. 

Folder envelopes can be fashioned as inserts also.  NOTE: I made a simple folder from two small envelopes. I covered the envelopes with clear contact paper to give them some strength and protection.  If the folder becomes tattered, make another and replace or add more.

Envelope folder view1

Envelope Folder view 2


Book Inserts


These two travel books were created for my granddaughters.  Each year, after the school is over, they have been lucky to go traveling with their parents for a week.  These were made for the summer they went on a two week trip, by car to several places West.  They contained pages for writing and pages for drawing, along with places to slip small finds and keepsakes of their travels.   

I made similar journals for friends who went on a trip overseas, using maps of the countries they were traveling to. 


Use this LINK to visit Eileen's Hub on the Sizzix website