Monday, February 21, 2022

Make Unique One-Of-A-Kind Coverings With Gel Prints For Sizzix Die-cut Shapes

Original Phone Stand

Stand with phone

Original gel printed tapes


Time to share a fun technique!  The new Eileen Hull Phone Stand @Sizzix can be decorated in a number of ways. One of the samples I created was done with a technique using a gel press plate and clear adhesive material.  While playing around with one of the many ways to pull prints from a gel plate, I experimented with something a little different from the technique that uses clear packing tape.  With nothing wider in clear tape available then the 2” rolls, I thought to give clear contact paper a try.  I had two type in my possession, one clear and glossy and one clear with a matte finish. Why not give them both a try!

Cut strips from the roll of contact adhesive paper slightly wider then the width of the phone stand. Two strips should be enough to cover the phone stand.  

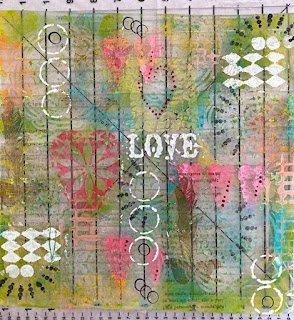
*** Through the photos, my hope is to show the steps taken when using this technique the best way I can. All gel prints are a series of layering designs on the plate but when using the tape or contact paper the images seem to make the layering more visable. This alone gives the pulled prints a different look. ***

To make the design on the gel plate use the steps that follow - 

NOTE: The most important thing to remember and do is to add the layers of design and WAIT for each application to dry COMPLETELY before moving on to adding more.


  • Gather all materials before beginning. Set up an area for the gel plate with everything you may use within quick reach. NOTE: I use a smaller gel plate as a palette for any paints that will used be better applied then directly to the larger plate, such as brayering small areas, sponging areas of stencils, adding extra design elements in specific areas.


  • Masks from die-cut designs are placed randomly onto the gel plate. NOTE: Masks are cut from waxed paper with the Eileen Hull Heart Mandala thinlit die.  On a small separate gel plate, apply some paint. With a small brayer, add paint randomly around the masks on plate. NOTE: I left some areas without the first color of paint. With a second color of paint, place some drops around the plate in open areas. Spread the drops with the brayer to mix slightly with the first color. Allow to dry; remove the masks from the plate. 


  • The next layer uses designs from a variety of stencils and other colors of paint to build the design. Again, allow to dry before continuing with more layers if desired.


  • The third layer is randomly stamping in different areas of the gel plate with word stamps or other images using an archival ink in black or neutral shade. NOTE: Some images were stamped with Oxide inks. Allow to dry well.

  • The final layer is adding small elements for design purposes. I used the end of a wide plastic straw for circles and the tips (prongs) of a small cocktail fork for tiny dots.  Step away and let the paint dry well (30 to 40 minutes).


  • Place the strips of clear contact adhesive over the gel plate. If any areas of the plate are uncovered, use strips of packing tape to cover the entire plate.  Press down the layers of clear adhesive to the plate well by hand or burnish it with the side of a bone folder. 
  • Pull the tape/contact paper up from the gel plate. Pull slowly, if necessary place back down and burnish more if needed, (some bits of paint just may not come up with the tape, that’s OK).

***As with pulling prints from a gel plate with any materials you must be willing to except the images. ***


To finish the strips for using on projects -

  • They can be layered onto paper surfaces of all types like old book pages,  by applying a coat of gel medium first to hold them in place. 
  • For a more transparent look, brush the back side with mica powders before adhering to projects. 


  • NOTE: the tape/contact paper will have only small sections that still keep its tackiness, but not really enough, making them strips lose much of the sticking ability.  Another way of adhering the pieces are needed. For the phone stand, double-sided adhesive tape was used. 


Gel printed strips are now ready to be cut and applied to the Eileen Hull Phone Stand die-cut shape. 


Materials 

Eileen Hull Phone Stand die

Eileen Hull Heart Mandala thinlit die

Sizzix Big Shot

Gel Press Plate

Brayer

Paints

Permanent ink pad

Stencils

Stamps

Sponge applicator 

Clear contact paper/Packing tape

Mica powder(s)

Brush

Double-side adhesive tape or Gel Medium


Monday, January 31, 2022

New Year, New Eileen Hull Dies - Chapter 1 Release


That time has arrived again - a new release of dies by Eileen Hull.  The new release consists of two Scoreboard dies, one thinlit set and a 3D embossing folder. Let the ideas and crafting begin!

For this post I will be sharing images of the projects made for the release. At a later date, a post will show the process taken in creating the projects. Now's the time to just take in the creativity to be had when working with wonderful designs. You will definitely see them with the group of makers Eileen has within the two teams!

Both the projects here are made by covering the die-cut scoreboard shapes with materials that had been designed on a Gel Press plate.  The book box is covered with cotton fabric that was printed using both acrylic paints and Distress Oxide inks along with stencils and stamped images.  The phone stand is covered with pieces of clear, glossy contact paper that is pulled from the gel plate and then applied to the die-cut surface before assembling.  


Here are other versions of the ways I used of the new releases:

Keepsake Book Box


Washi Tape Covered Phone Stand


Card with Snail Mail Sections & 3D Folder

HERE IS A MESSAGE FROM EILEEN - 


I am so excited to share my Chapter 1 release with you! The dies in this collection are versatile, practical and fun to embellish.
The Phone Stand, an XL ScoreBoards die, is a MUST- you need one for every room! Make for yourself, family, friends, for gifts or to sell- the die cuts the stand in one pass and is very easy to assemble.

The Book Box can be used to make a book or a box that holds A-2 greeting cards. What a great way to package handmade cards ... or a quick and easy book!

Add the Vintage Buttons folder to create vintage backgrounds for cards, journals, pages and tags. The 3D effect is stunning when you add a little Luster Wax to bring out the highlights...

The Snail Mail Thinlits die cuts a postal pane that coordinates with two of Eileen's Snail Mail Maker Forte stamps. This die was designed to use on the front of an A-2 card!

The dies may be found in local scrapbook stores and Eileen's Etsy store: https://www.etsy.com/shop/EileenHull

So now come follow the links to the other posts for inspiration!

****There's a giveaway too! If you leave a comment for each of the designers in the Release Party Hop, or during the Facebook Live or YouTube video, you will be eligible to win one of the newly released products! Tell us what your favorite new product is and what you plan to do with it! Thanks for hopping with us.****

Tuesday, January 25, 2022

Sizzix Dies Meet Gel Press Printing


It's fun and  interesting when opportunities happen such as this collaboration with Eileen Hull's dies and the wonderful creative products from Gel Press.  Working with amazing products, and the willingness and desire to have some fun experimenting, is a great part of why I have always enjoyed crafts and making things.

I'm not new to the the gel printing process, but have only scratched the surface of what the process is all about. The more I experiment, the more fun and creative it becomes.  I would consider myself more a novice on the topic of gel printing, but an eager learner and one to almost always be up to giving something a try. I just went for it with this opportunity. 


Here is the finished project made with Eileen Hull's newest large Journal die. I will describe in a condensed version the process that I used for making prints on fabric and deli papers to create the covers of the journal and the inside signature folders.  I was pleasantly pleased with the results of the designs on the fabric for the covers, that I chose to keep embellishments very minimal. I love the way the designs from the various stencils appear on the fabric. NOTE: The one thing about gel press printing is that many times it's best to not expect perfect print pulls and go with what you get!


I knew that I wanted to work with fabric for the covers. Never having used fabric in the past for gel printing, I researched a few videos and other information I could find to help give fabric printing a try.  

The printing process began by gathering all the materials I thought I would like to use. In the past I had only worked on small gel plates and a variety of papers for printing.  For this project I worked with a 12 x 12” plate from Gel Press giving me the opportunity to print fabric squares to use for covering the larger journal covers. The other prints I made with the deli paper and the large gel plate could be used as whole sheets or cut into smaller forms.  

In the past printing experiences I have usually used acrylic paints but have also worked with other mediums like distress inks, distress oxide ink and alcohol inks.  For the prints made here I used a combination of acrylic paints and distress oxide inks.

Stencils were the other tools I used for the adding the majority of the designs.  

When putting the journal together, large paper brads were used on the spine, plus some glue, to hold the covers together.  A strip of leftover fabric is glued to the inside spine to hide the prongs from the brads.  Some batting was added to the outside, mat board covers to add some softness to the appearence of the finished journal.  Just for a tiny touch, a simple multi-colored ribbon was added for a closure to tie near the spine of the journal. 

Gel Press prints on fabric 

Front and back covers-outside

Front and back inside covers

Outside Book Spine 

Inside Book Spine

Inside the journal there are five signature folders made from sheets of decorative 12 x 12 card stock.  NOTE: I used papers printed on one side only for two of the signature folders. 


Two of the folders are covered with others prints pulled from the gel press plate with cotton fabric squares. NOTE: I used a fusible adhesive to apply the fabric to the card stock.


The remaining three signature folders are made using a double-sided decorative papers. Gel printed sheets made with the deli paper are used to decorate them. 


Seven  journal inserts - 5 folders, 2 notebooks

It was a fun to be a part of this collaboration.   

Links to information on everything Gel Press:

Gel Press YouTube

Gel Press Facebook

Gel Press Instagram

Gel Press Pinterest 


Materials

Eileen Hull Full size Journal

Gel Press Plate

TCW stencils

Acrylic paints

Distress Oxide inks

Brayer 

Mat board

Cotton fabric squares

Deli paper sheets

Decorative card stock 

Gel medium 

Adhesive sheets

Fusible iron-on adhesive

Fabric glue

Large paper brads

Bias tape/ribbon

Elastic

Assorted tiny embellishments (buttons)


Wednesday, December 22, 2021

A Christmas Star Shines

To continue with the theme of "little and small" good things, and one more share of "Comfort & Joy" for Eileen Hull's Fan Club.


So on "Christmas Eve Eve" here's an idea for making a small star book before the holiday celebrations start!


Materials

  • Tiny book die
  • Glitter paper 
  • Decorative papers, assorted (3)
  • Ribbon, closure
  • Double sided tape, 1/8" or 1/4"
  • Various flat embellishments


  • From chosen papers, cut a cover.  ( I used a gold glitter corrugated card stock because it was sturdy but still flexible.) Insert pages are cut from decorative paper sheets. 
  • Cut the papers for the inserts with the tiny book die and the trim accordingly to create the folded pages. NOTE: I cut papers for 5 pages. This is a tiny book and thinner papers work best when layering them for the star effect. Cut papers one at a time, instead of stacking together, so the crease does not cut through. ***On mat board it would create a score line for folding that you don't need for this project.

Sizes for the papers for the folded inserts are:

Make 5 sets with 3 layers

3” x 4 7/8”

3” x 4 1/4”

2 3/4” x 3 3/4”


  • Use a scoring tool to crease down the center of the cover piece (The fold line will run down the center between the 2 original scoring lines.) 


There are many places to find instructions and ideas for making star books online. If more detailed instructions are needed refer to finding videos online on You Tube or other sources.

  • Each of the three cut papers for each of the five sections will go together the same way. The sides edges can be glued or use double sided 1/8" tape to connect them all. 


  • When all five sections are complete, connect each of the five sections with either tape or glue along the outer edges, before adding the layered five page section to the cover.  


  • Decorate the pages as desired with flat embellishments like small die-cut images or stamped words or verses. 


The book can be opened to form the shape of a star. The ribbon tie can be used to hold the book open as well as a closure.  A tiny clip can be added to help in holding the book open if so desired.  By using a flexible type of cardstock for the cover will make the opening of the book and folding the covers back easier.


Friday, December 17, 2021

Small Packages & Making Treats For Giving - Comfort & Joy 2021


Brown Paper Packages, tied up with string!  

Some of the ideas shared here are repeats from past blog posts and Facebook posts. With new members to Eileen’s fan club I felt it was worth sharing the ideas once again. Gift giving surely happens during the holidays but the ideas here can be used year round for any and all tiny gifts. 


There are some dies still available that would make perfect containers for giving small gifts. There are a couple that may have been discontinued but by showing what I have used, even from older dies I hope to give the followers to this group the idea to always look at Eileen’s dies in a different way, for that matter all Sizzix dies.  

Create packages using gift wrapping paper to cover the mat board or thin poster board. I used spray adhesive to add the wrapping paper to the base boards. Spray well for good adhesion. 


Most of EIleen's dies are meant to be cut from mat board and for three of them that is what I used. These three containers are made with mat board that is covered with holiday wrapping paper before die-cutting.
 NOTE: Always look at the larger boxes or containers with “different” eyes and don’t be afraid to alter them to find various uses. 

IDEAS & TIPS

Each of these were used to give some homemade treats as cute little handmade gifts for neighbors or any holiday visitors. They can hold about a dozen little cookies. 

Fill cellphone bags with spiced nuts, seasoned cracker mix, other homemade candies to be placed into the sweet holiday containers made from the Sizzix dies.

A small gift holder is made using a tiny shopping bag die from an older Eileen Hull release.  Here the design is cut from a thin poster board that is also covered with wrapping paper.  Two sizes are shown here, the original and a slightly larger one. The original size can be used for tiny gifts but by taking the main shape and altering the pieces slightly, it becomes a larger bag.  

The final container is also a older Sizzix die (but not Eileen’s) that has been one that I’ve used over and over for gift giving.  This is also made from layering wrapping paper over thin white poster board before die cutting and constructing.

Use various other dies to create tags or labels for your gift giving.

Others shapes like the Vintage Pickup Truck can make a fun container for tiny gifts or small bags of treats.  

To make interesting little boxes or containers, always “think outside the box”!

INFORMATION ON DIES USED

Eileen Hull dies:

Gift Box #664345

Treasure Box #663634

Loaf Pan #659873

Shopping Bag #658055

Other die was called Box #3 (will try to find the number) 


***As an added bonus to this post on making packages for gift giving, I’ll be including  some recipes for treats to make to fill those packages.***

MINI DOUGHNUT HOT BUTTERED CHEERIOS

Ingredients: 

  • 1/4 cup butter
  • 1/4 teaspoon vanilla
  • 4 cups Cheerios or Cinnamon Cheerios cereal
  • 1/4 cup sugar
  • 1 teaspoon cinnamon

In large skillet, melt butter over low heat and stir in vanilla.  Add cereal; cook and stir 5 minutes. Transfer cereal to large bowl. Add sugar and cinnamon; toss well to coat. Package and gift!

PRETZEL TURTLES

Ingredients:

  • Rolo Candies - 50
  • Mini Pretzels - 50
  • Pecan Halves - 50
Preheat oven to 300. Line a baking sheet with parchment paper. Lay pretzels in a single layer onto parchment. Top each with a Rolo candy in the center of the pretzel. Place into the preheated oven until the chocolate and caramel soften. (About 4 minutes) Remove from oven and press a pecan halve onto each Rolo candy. Chill in refrigerator until chocolate is set. Package and gift! 

CANDIED PECANS

Ingredients:
  • 1 1/2 cup pecan halves
  • 1/4 cup maple syrup
  • 1 teaspoon vanilla
  • 1/8 teaspoon salt
Preheat non-stick skillet over medium-high heat. (Important to preheat, so maple syrup caramelizes.) Add pecans, maple syrup, vanilla and salt to pan.  Stir constantly, 2 to 5 minutes, until syrup caramelizes.  Spoon onto parchment paper and spread evenly to separate clumps and allow to cool well, about 30 minutes.