Thursday, October 18, 2012

Time Passes, Life Goes On, But You Will Remain With Us Always

The year milestone of a life changing moment has been reached.  I wasn't sure how this moment should be approached or dealt with.  I wasn't sure of how this past year would or should be handled. It was a time of so much uncertainty.  Is there really any right way to face losing someone?

It seems that the best way I found to approach this, is how we decided from the time we first learned the diagnosis over two years ago - take one day at a time.

These days will be busy on purpose, with friends and family.  I think about this very special man everyday.  He is here in every room of this house, he's visible in each of the kids in various ways.  There's been tears and there sure will be more, but they won't out number the memories and thoughts of this amazing man.


We won't think of him as gone away
Just think of him as resting
Where there are no days or years
And think of him as living
In the hearts of those he touched
For nothing loved is ever lost
And he was loved so much

Saturday, October 13, 2012

Creative Challenge with Makin's Clay

I was so happy to be included in this latest challenge with an easy, fun product. Always up for a challenge and a chance to work with interesting mediums.  Makin's Clay is not new to me, I have used it, when it first became available several years ago.  I've dabbled with polymer clays before, though not an expert and other air-dry clays out there that are fun to work with.

With this opportunity I was able to familiarize myself once again with this medium. We needed to use at least 75% of the product in our project.  I feel that I used everything in some way that I received for this challenge.

A small sketchbook that was laying around was reused and this list of products from Makin's:
Makin's - Neon Green
Makin's - Natural
Makin's - Earth Tone Assortment
Makin's - Texture Sheet Set D
Makin's - Push Mold Leaves
Makin's - Clay Cutters Bulb Ornament
Makin's - Roller and Cutter Set

The clay was rolled, textured, cut, molded, die-cut, painted, stained, dry brushed and glued.

For creating my project here are steps I took with the products:
Two of the clays were rolled out to the size needed for the background of the cover and the frame, then each piece was textured differently with the texture plates.  To change the basic color without blending clays or adding paint, I brushed the neon green clay with a dark green acrylic paint and then wiped off to highlight the "wood" texture and darken the clay slightly.  For the frame edges, natural clay was textured with the "scales" plate and antiqued with Ranger Vintage Photo Distress Stain and wiped to tint the clay.  Ranger's Perfect Pearls "Perfect Gold" was brushed over these pieces to add some depth.  Using the "Leaves" push mold and the green clay from the earth tone assortment, several leaves were formed.  Flower petals were made using another color from the assortment and "bulb ornament" clay cutters.  The lightest "flesh" color, from the assortment, was rolled out to a thin layer and dried and then die-cut into shapes to make smaller flowers.  I used different colors of Perfect Pearls to highlight all the the pieces and give them a slight shimmer.  To finish my album, all pieces were glued in place with Beacon Adhesives 3-in-1 glue.  Beads were glued in place for centers of the flowers with Beacon's Gem Tac.  Torn scraps of fabric and variegated ribbon were tied to the wire coil of the album.  A photo or a printed verse can be slipped into the frame.

There is a new blog dedicated to just the Makin's line - here is a LINK for you to check out.  Follow through to check out the twelve other creative ideas other designers who also participated in this challenge. Use the button in the sidebar at the top right for the Designer Craft Connection to follow through to the other projects.  It's so amazing to see what and how other designers  come up with and how they use the same product.

There are small amounts of clay that went unused that I'm looking forward to some experiments with.  Need to try adding paint to it, mixing colors and blending colors.  It's clean, easy, air-dry, kid-friendly and designer approved!

Makin's Clay is offering a price package valued at just over $111.00, with products including clay, tools and a Memory Frame Kit.  To enter, leave a comment on the Makin's Clay Blog, telling us which project you liked best on the blog hop.  The winner will be randomly drawn from all entries on or about October 24th.  The winner will be announced on the Makin's Clay blog, so please check back on Thursday, October 25th to find out the winner.

 The holidays are coming and it's always nice to make some little gift or holiday decoration.

Check out the Facebook Page:  https://www.facebook.com/MakinsClay?ref=ts&fref=ts
Check out Pinterest Board: http://pinterest.com/cindibisson/makin-s-clay/

Monday, October 1, 2012

Designer Craft Connection October Edition - Fall/Halloween Ideas

Here we are the first Monday of a new month - time for more ideas.  This time around it's a fairly easy decoration to celebrate the lovely Fall season.

I have found that I now like to decorate more for the season than a specific holiday, especially at this time of the year.  There is something about the colors and motifs of Autumn that I really like.  My kids still love to decorate for Halloween and I enjoy helping them with ideas for their own homes.


Sharing a fairly simple swag to hang during this time of the year. I purchased the precut leaves from Michael's.  Each collection of oak and maple leaves came in four colors.  Some of the leaves were glittered and some plain. I used a tool from Makins' Clay to make and impression in the foam leaves as veins.  Punch a small hole into the stems of the set of leaves.  Thread some raffia through the hole and knot; then tie to a base cord.
Then a strip of torn fabric was tied around the stems (just below the knotted raffia). Continue adding the sets of leaves for any desired length needed.  This swag has finished with a set of three leaves on each end.

I have three great spots in the house to display such swags or banners and enjoy creating new ones for each spot and each season.

Please take the time to hop along through the blogs for some ideas. Follow the "button" at top right to follow through.

On Saturday October 13th, there will be a challenge that will include 12 designers with ideas using Makin's Clay.  Just a little information - this is a air dry clay that is fun and easy to work with.  The is a "give away" once again.  See this photo of the prize package worth just over $100.00.  To have the chance to enter and win, go to the Makin's Clay Blog and leave a comment. Link:http://makinsclayblog.blogspot.com/2012/09/makins-clay-blog-hop-contest.html

Hope you will come back to see the ideas from the challenge.


Monday, September 3, 2012

Designer Craft Connection September Edition - Vintage

 Happy to be back and posting for another edition of this groups monthly blog.  It would have been fun to participate in the last two creative projects, but I really needed to take a little break.  It was still fun to hop through all the great ideas that follow designers created for July and August's editions.

Here we are with a new theme - "Vintage", crafting with old stuff.  It was tough to decide on just what to create and what vintage items from my stash to use.  It's a little different way to show off a photo and and create a keepsake.


After digging through supplies on hand, I chose to construct a  three dimensional frame, embellished with several vintage finds.  Two different size wooden frames, with the same size opening, were painted with both Ranger Adirondack Acrylic Paints and Distress Paints.  I went through my collection of old vintage postcards and chose one to use for a background image.  There are many interesting things that I collect and keep on hand.  I like little containers, tins, boxes, jars and such.  Here I used part of a small plastic heart shaped container to hold a photo of my youngest granddaughter.  To add embellishments to the frame, bits and pieces of old tatting, made by my grandmother was were used along with a small crocheted doily.  I constructed a paper rose using "Paper Blossom" punches by McGill.  All the embellishments were lightly glued in place with Beacon Gem Tac or Beacon 3-in-1 adhesive and then everything was coated with several coats of Beacon Liquid Laminate.  To finish off the frame, several "mother of pearl" buttons were added and a stamped verse on a strip of canvas fabric.
Details:stamped verse, doily, tatting
Details: photo frame, tatted edging, buttons, paper rose

There is also a manufacture challenge with a "Give Away" from Crafty KT, that you may be interested in.  It is running from September 8th through September 18th.  There are 12 designers participating.  To win sign up for the newsletter using this link:
         http://craftykt.com/suscribe-to-newsletter

NOTE: You only need to enter once.  Only those with a mainland USA shipping address are eligible to win the giveaway.  See the photo here of the Kool Tak™ products you could win.


Now get to hopping on through the blogs by following the Designer Craft Connection button on the upper right.


Friday, August 17, 2012

Where, Oh Where Has Madeline Been?

I feel like I could be living through a "Where's Waldo" book all these past weeks.  The last post I wrote was on July 3rd. It was good to take a break, but now it's time once again to get back on track.  Let me do a little catching up...

Just after the last post, I was busy working on several projects that I created for Beacon Adhesives, to be used in their booth display during the Summer CHA show.  Though the show was smaller then past summer shows, I still enjoyed attending two days.  Just  having a chance to reconnect with some follow designers, meet others face to face, check out some new products and have some fun with "make & takes" too, was a very welcome  way to spend my days.

Cover paper mache suitcase
Hnadmade paper rolls with leaf embellishments
Repurposed burlap bag
Next came a trip to California for a week.  Spent a week visiting Sacramento and Folsom, where three of my nieces live, along with dad and mom (my older brother and sister-in-law).  Had lots of fun there with everyone.  Celebrated the 50th birthday of one of the girls.  They know how to throw a party!  Took a trip to Napa Valley and visited an amazing winery with a personal tour and tasting for just six of us.  Wonderful, expensive wines, but so much fun!  Had the opportunity to spend time with each one of the girls and their families and can't say enough about how much I really enjoyed that.  This was my first trip to this part of California and would love to go back.  Next stop - San Francisco (hopefully)!
At "Far Niente" Vineyard
Old Folsom
Old Sacramento
I realized that I'm sure didn't enjoy the traveling part of this trip as much as I used to.  It's been awhile since I have had to deal with the crazy procedures at an airport.  It was a pleasure to return home after a 5 hour delay.  Felt very sorry for the 40 people that missed connecting flights that day.  What happened to the "friendly skies"?

Then there were two days to recover, regroup and repack.  On August 3rd, I was off again.  This time I was headed to the Wisconsin northwoods for week with the kids at Camp Nawakwa.  This is the place where the family has spent a week or two for over 40 years.  It was a different experience this summer.  It was our first without my sweetheart Michael. He all felt he was there with us.  Though the time there was bittersweet, I truly enjoyed sitting back and watching the next generation that gathered there, with their own children and all the fun and chaos that camp can be!
Maddie, Zoe, Tess
Matthew 
Eight Cousins out of Twenty
Off-spring of just the 8
I know that I have left out many details of all the transpired during all those happenings, but just wanted to touch on what has been happening. So, I'm back home now and working on catching up and getting organized to get back to work on a variety of things and that means more blog posts.


Tuesday, July 3, 2012

DCC July Blog Theme - Vacation

So yesterday was the first Monday in this new month of July - that means a new post for the Designer Craft Connection Blog.  I'm taking this month off, so let's just say - "I'M ON VACATION!"

It will be a busy month though.  Thee are a number of things happening throughout the month that I'm really looking forward to.  Personally, it's going to be difficult in some ways, but with many " happenings" I hope it will be good therapy.

With a trip planned later this month, I am working on a small project that is related to this months theme, but will not be able to share it with you till the time of the trip or after.

I have been reading the blog posts that have been posted already and once again there are a wonderful variety of ideas for the readers.  So stay cool inside and hop around the blogs to collect some "summer/vacation" inspiration.

Thought I would share an old post with a recipe for using one of Summer's favorite crops:
(Though it's been a bit too hot to bake anything lately.) :
http://madelinesthoughts.blogspot.com/2009/08/blueberry-sour-cream-pound-cake-with.html

Tuesday, June 5, 2012

June Edition of DCC Blog Hop - Picnic Anyone?

Yes, I'm a little late to posting this month.  Even though I hadn't planned on sharing a monthly themed "creation" I will share something a bit different.

With the calendar now turned to the month of June and the first of the summer holidays passed us, we can  "go all out" and think of outside fun.  The one old-fashioned, timeless act of a PICNIC is still around.
Thinking about picnics brought to mind my small collection of metal picnic baskets and a couple of tin lunch pails and a woven wood picnic basket for one or two.


What else is better to share then some ideas and recipes to put in those picnic containers.   Whether the plan is a all-day picnic at the beach, forest preserve or city park or something for just a couple of hours, make it special with some easy homemade touches.   (TIP: Pack anything perishable into a cooler filled with ice packs. Transfer to picnic basket at destination and enjoy!)  Craft some sandwiches that travel well and wrap in parchment paper.  Freeze some water bottles or drinks in bottles before packing for the picnic.  (TIP: Do not fill to top, allow for expansion.) The drinks will defrost slowly and remain cold.  Pack and use recyclable utensils and extra items, carry some extra ziplock bags to place dirty, reusable items. Think "Green" and limit the disposables. These are just a few ideas to help with picnic plans.

Now we all have "favorites" when it comes to picnic and summer foods.  My list is fairly long but some are better for dinners on the deck, Bar-B-Ques, camping trips, family gatherings or other outdoor events.

Here are only two yummy recipes - One a easy snack and the other a great dessert.
Dilly Oyster Crackers
1 (1.6 oz.) package of ranch style salad dressing mix
1 Tablespoon of dill weed
1/2 teaspoon of garlic powder
1 (16 oz.) package of oyster crackers, unseasoned
1 cup vegetable oil

In a large bowl, combine dressing mix, dill weed, and garlic powder.  Add crackers and blend throughly.  Pour oil over this mixture and stir throughly; allow the crackers to absorb oil and seasonings.  Store in an airtight container.  Yields: 8 cups.

Take along a container or ziplock bag for snacking.

NOTE:  I have used various forms of this recipe and in most I have placed the crackers on a large lipped  baking pan and bake at 250 or 300 for 15 to 20 minutes for crisp the crackers.  Also stir them once or twice during the baking.

Picnic Sheet Cake

Step 1: Bring to a boil: 2 sticks of margarine, 1 cup of water, 4 Tablespoons of cocoa
Step 2: Min in a large bowl: 2 cups sugar, 2 cups sifted flour, 2 eggs, 1 teaspoon of baking soda, 1/2 cup sour cream.  Set aside.
When "Step 1" is cool, add to the dry ingredients (Step 2).  Mix well.
Grease a cookie sheet with sides (approx. size: 14 1/2 - 15 1/2 long by 10 1/2 wide).
Bake for 20 minutes at 350 degrees.

Icing: Bring to a boil: 1 stick of margarine, 6 Tablespoons of milk, 4 Tablespoons of cocoa.  Remove from heat and add 1 teaspoon of vanilla and one box of confectioners sugar, sifted.  (Sifting helps keep lumps from forming in icing.)

Ice cake while hot.  Set aside to cool or place in refrigerator before cutting and taking along.  This cake is very moist.

Get out and plan a day in the city or country.  Pack up a basket for yourself and another or a whole bunch of people and enjoy!

Before leaving - Hop on through the blogs (use the blue DCC button at the top right) and check out the ideas the group has to share with you.
  

Tuesday, May 22, 2012

Seasons, Home & Holidays

"The seasons are what a symphony ought to be: four perfect movements in harmony with each other."  - Arthur Rubenstein

The summer season is upon us once again.  We had a little tease a few months back which caused so much of nature to be fooled into plants blooming much earlier then usual.  The weather sure can be fickle!

Now we are approaching the first "holiday" of the summer season.  We celebrate Memorial Day on the last week-end of May, instead of it's true date of May 30th, and it will be here in a few days.  Where or where do these days go?  Didn't we just celebrate Easter?

With the beautiful weather this past week-end I decided to do a little annual summer planting.  The plan this season is to keep it easy to take care of.  I do enjoy visiting Garden Centers and Nurseries to see all the wonderful plants and look for the unusual or interesting.  I may ask the family to help me dig up a small area near the garage to plant a hydrangea.  I have come to love the new varieties there are.  Some favorites I planted are a new very vibrant petunia, Superbells (love the colors these come in), Sweet Potato Vine and African Daisies (love the shades of these too).

        "Be like a flower and turn your face to the sun."  -  Kahlil Gibran


With all three summer holidays being very "American"  I put together a quick banner to hang from the porch railing.  Took several flags off sticks and glued them to a cotton cord and then added gold foil stars for a homemade "All-American" easy decoration. 


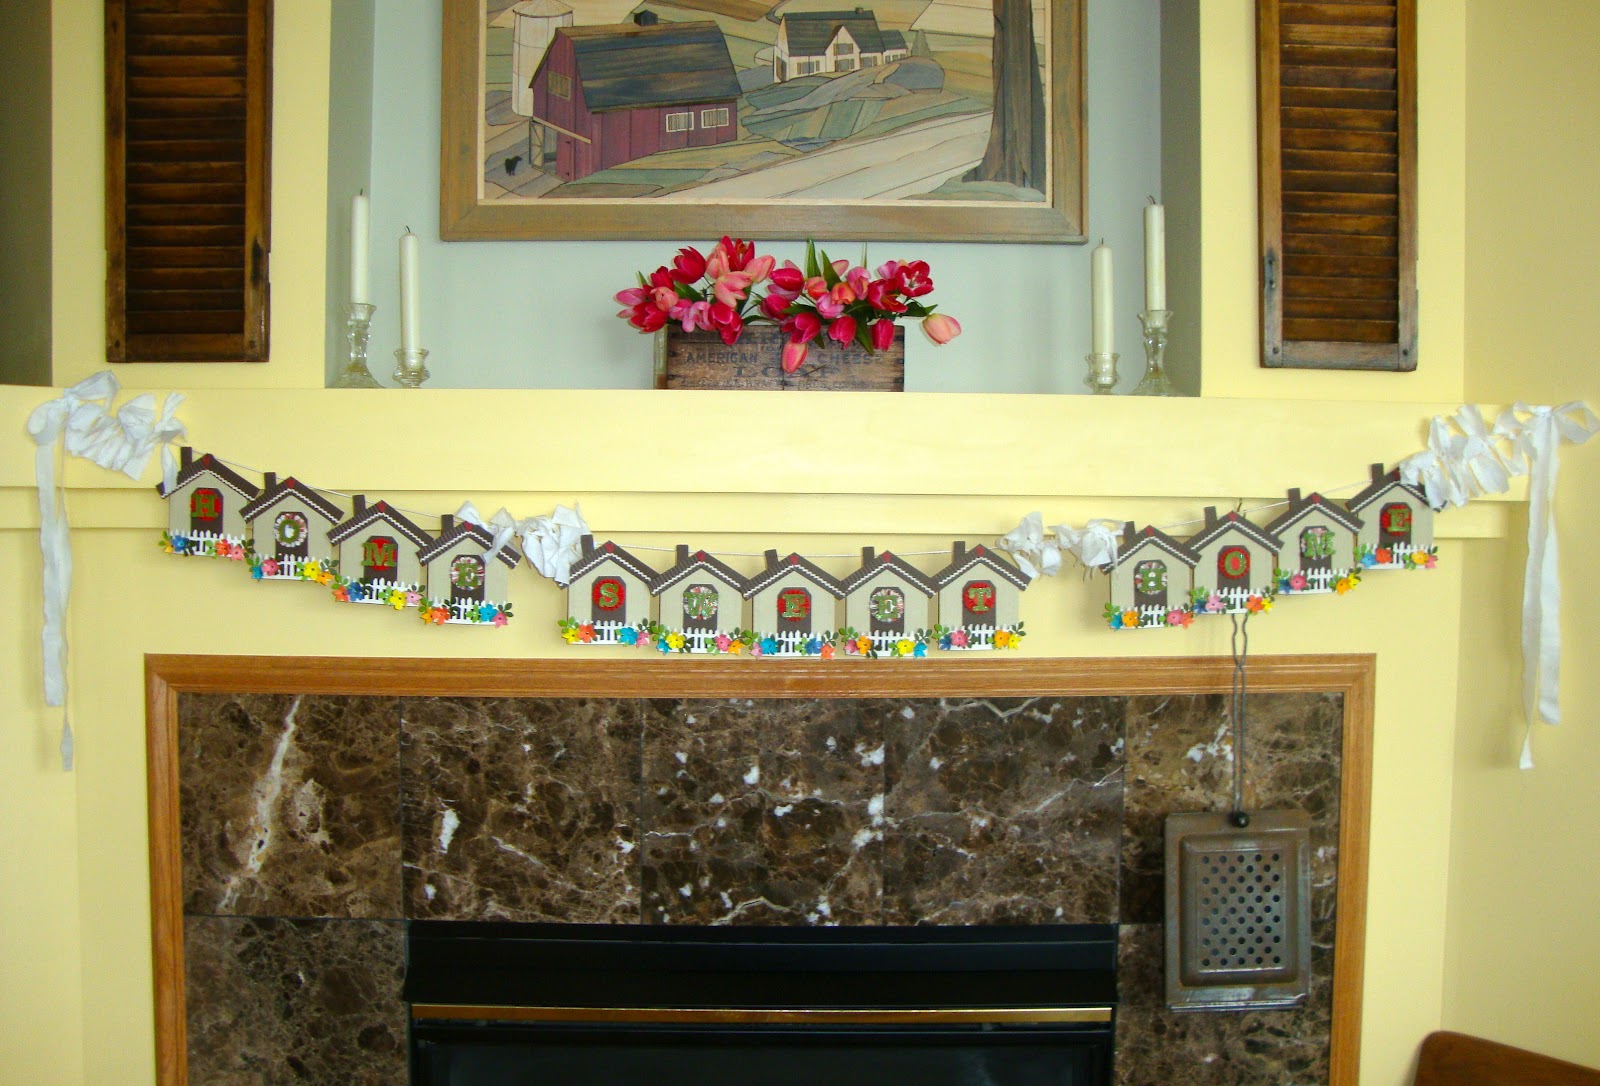
Had to come up with another idea for a banner to hang above the fireplace.  Again I pulled out my trusty Sizzix Big Shot and dies, some paper punches and a bunch of scraps to create a banner for my 
"Home Sweet Home"!


Materials:
Variety of paper scraps
Sizzix Big Shot
Sizzix Dies: Original Pocket, Rectangles, Round A Bout Alphabet, Over the edge "On the Fence", Mini Paper Rosettes, Tiny Tabs & Tags
McGill Paper Punch, Mini Flowers
EK Success Leaf Punch
EK Heart Punch
Mini Rick-Rack
Beacon Adhesive Zip Dry Glue
Ranger Stickles
Ranger Distress Paint-Picket Fence

Here is a link to the post from last summer with another banner idea:
http://madelinesthoughts.blogspot.com/2011/06/junes-designer-craft-connection-red.html
This will be going back up for the summer to replace the "butterfly & flower" garland in another spot.